Building and deploying data applications usually brings more complexity than anyone wants to deal with. Snowflake has addressed a big chunk of that by introducing Snowflake Native Apps. Snowflake Native Apps allows you to build, run and monetize data apps directly within the Snowflake ecosystem. No external integrations. No infrastructure headaches.
Snowflake previously supported Connected Apps, which operated outside Snowflake, connected via APIs and required manual data movement. Native Apps, by contrast, run entirely within Snowflake, leveraging its secure and scalable infrastructure. They’re built using the Snowflake Native App Framework, which gives developers a way to build integrated apps that process data where it already lives, without shipping it elsewhere.
In this article, we will discuss the features, benefits and inner workings of Snowflake Native Apps and walk you through the step-by-step process of creating a Snowflake Native App and publishing and monetizing your Native Apps through the Snowflake Marketplace.
What are Snowflake Native Applications?
Snowflake Native Apps are applications built using the Snowflake Native App Framework, which allows developers to create, test and deploy applications directly within Snowflake’s Data Cloud. These Native Apps leverage Snowflake’s core features like stored procedures, user-defined functions (Snowflake UDFs) and the Snowpark API, all while keeping the data secure by running the code on your data stored in Snowflake. Native apps are available on the Snowflake Marketplace. You can discover and install them quickly, just like downloading an app on your smartphone.
TL;DR:
What they are — Snowflake Native Apps run entirely within Snowflake, removing the need to move data out for processing
How they work — Snowflake Native Apps operate in the consumer’s Snowflake account, using existing data without external connections. Providers build and distribute them via the Snowflake Marketplace
Why use them:
- Fast — Data is processed directly in Snowflake, reducing latency
- Secure — No data leaves the consumer’s account; Snowflake’s encryption and access controls apply throughout
- Scalable — Apps scale alongside the consumer’s Snowflake resources
Key technical characteristics of Snowflake Native Apps
1) Native integration with Snowflake services
Snowflake Native Apps work directly with Snowflake’s core services. They use stored procedures, user-defined functions (Snowflake UDFs UDFs) and the Snowpark API, making them efficient and seamless. There is no translation layer between the app and Snowflake’s compute.
2) Simplified development and testing
The Snowflake Native App Framework streamlines the full build-test-deploy cycle. You create, test and deploy apps within Snowflake itself, which cuts down the feedback loop considerably.
3) Monetization via Snowflake Marketplace
Providers can list and sell Snowflake apps in the Snowflake Marketplace. Consumers install them straight into their own Snowflake accounts, which makes both distribution and monetization fairly straightforward.
4) Security and governance
Snowflake Native Apps don’t transfer data outside the platform. Providers package their logic securely, protecting intellectual property. Consumers retain full control over access permissions, and Snowflake’s encryption and governance features handle data security.
5) Secure data sharing
Native Apps leverage Snowflake’s secure data sharing. Apps can access shared datasets without creating duplicates or moving data outside the consumer’s account.
6) Advanced feature Support
Snowflake Native Applications use Snowflake features like:
- User-Defined Functions (Snowflake UDFs)
- Stored Procedures
- Snowpark
- Streamlit in Snowflake
- Snowpark Container Services (for containerized workloads)
7) Versioning and patching
Snowflake Native App Framework supports versioning and patching so providers can push updates to consumers in a controlled way. This is especially important when you’re managing apps across many consumer accounts.
8) Streamlit integration
You can embed a Streamlit app directly inside your Native App, giving consumers an interactive UI without needing to leave Snowflake. Streamlit in Snowflake is generally available and well-integrated with the Native App Framework.
9) Encapsulation in application packages
Snowflake Native Apps are bundled into application packages that contain all the necessary components like data content, application logic, metadata and setup scripts. This makes deployment predictable and reduces compatibility problems.
10) Source control and tool integration
You can integrate with external tools like IDEs, CI/CD pipelines and source control systems. This flexibility helps teams apply standard DevOps practices to Native App development.
11) AI and ML workflows
Native Apps support machine learning and AI tasks through Snowpark and, for more advanced cases, Snowpark Container Services. You can integrate external ML libraries, process training data and deploy models inside Snowflake.
12) Full cross-cloud deployment (AWS + Azure + GCP)
The Snowflake Native App Framework is generally available across all three major cloud platforms; AWS, Azure and Google Cloud Platform (GCP). Snowpark Container Services support for Native Apps reached general availability on GCP in October 2025, completing full three-cloud coverage. There’s no longer a meaningful distinction in support levels across clouds for most use cases, though specific private connectivity configurations (such as AWS PrivateLink or Azure Private Link) vary by region.
What are the benefits of Snowflake Native Apps—for providers?
Snowflake Native Apps offer significant advantages for providers looking to build, distribute and monetize their applications within the Snowflake ecosystem. Here are some of the benefits:
➥ Simplified development
Providers use Snowflake’s own tools to build apps that inherit Snowflake’s high availability and scalability. There’s no separate infrastructure to provision or maintain. Apps run in the consumer’s Snowflake account, so data stays in their environment, which simplifies data integration and security management.
➥ On-platform monetization opportunities
Providers can sell apps directly through the Snowflake Marketplacee without needing third-party billing or distribution systems. Snowflake manages the transaction layer natively.
➥ Easy app management
Since apps are hosted within Snowflake’s infrastructure, you don’t need to manage separate resources. Snowflake offers always-on availability, global reach, built-in governance and secure operations.
➥ Data protection
Snowflake Native Apps interact directly with the consumer’s account. Customer data stays in their environment, which reduces security risk and compliance burden. Providers don’t touch sensitive data directly—Snowflake’s governance handles it.
➥ Lower operational costs
Traditional data apps often require providers to pay for their own compute and storage. With Native Apps, the consumer’s compute runs the app. That shifts the cost structure in the provider’s favor.
➥ Access to new customers
The Snowflake Marketplace gives providers visibility across Snowflake’s global customer base. Consumers can find, evaluate and install apps without leaving their Snowflake environment, which means less friction in the sales and onboarding process.
What are the benefits of Snowflake Native Apps—for consumers?
Snowflake Native Apps offer significant advantages for end-users, enhancing their ability to integrate, utilize and manage data applications seamlessly within the Snowflake ecosystem. Here are some of the key benefits of Native Snowflake apps for consumers:
➥ Quick and easy access
Consumers can browse the Snowflake Marketplace or private listings, then install apps with a single click. No separate contracts with SaaS vendors, no complex integrations.
➥ Secure data use
Data never leaves the consumer’s Snowflake account. This removes the risks associated with data transfers and keeps everything within Snowflake’s governance and security controls.
➥ Better performance
Apps use the consumer’s own Snowflake compute resources. That means performance scales with what the consumer already has, rather than depending on a shared external service.
➥ Trial support
Consumers can test apps via trial periods before committing. Data generated during a trial carries over to the full version, making evaluation low-risk.
➥ Simplified management
Consumers manage access privileges, event logging and app-related tasks directly from within their Snowflake account. No extra admin interface required.
How do Snowflake Native Applications work?
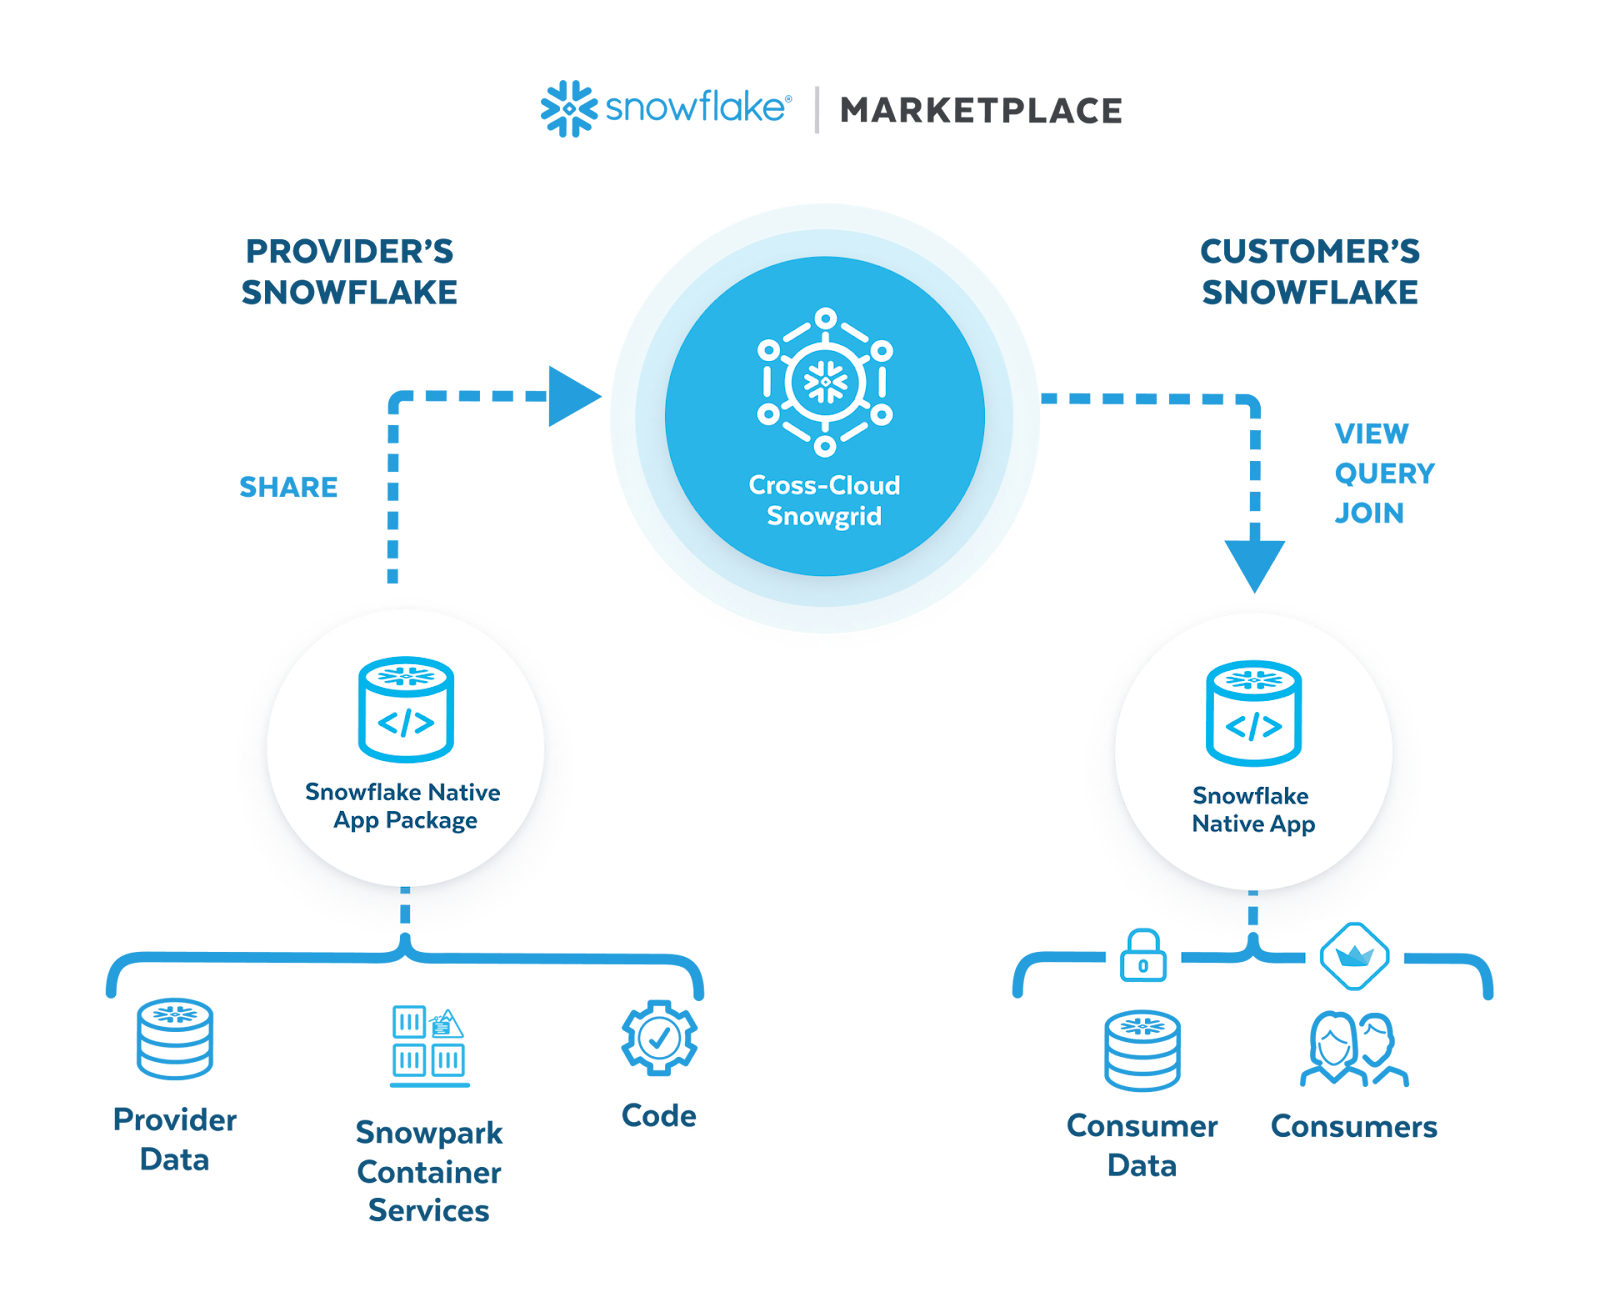
Snowflake Native Applications leverage the Snowflake Native App Framework to build and deploy data-driven applications directly within the Snowflake ecosystem. These apps use Snowflake’s core features like secure data sharing, analytics, compute and governance, so there’s no reason for data to move outside the platform.
Snowflake Native App Framework supports everything from analytical tools to fully containerized services. Specifically, it enables:
- Providers to share data, business logic and application interfaces (e.g., Streamlit apps, stored procedures) using Snowpark API, Python, SQL and JavaScript
- Applications to be listed as free or paid offerings on the Snowflake Marketplace or shared privately with select accounts
- Developers to benefit from streamlined testing environments, version control via external repositories and detailed logging for troubleshooting
- Built-in support for structured and unstructured event logging to streamline troubleshooting and performance tracking
- Integration with Streamlit to build interactive, user-friendly visual interfaces
On top of that, the Snowflake Native Framework also provides an enhanced developer experience, including:
- A unified testing environment for app lifecycle management
- Integration with version control systems for seamless code and resource management
- Incremental app updates with versioning and patch support
Snowflake Native Apps extend the functionality of features like Secure Data Sharing and Collaboration, ensuring providers can offer scalable, governed applications to other Snowflake users.
Architecture of the Snowflake Native App framework
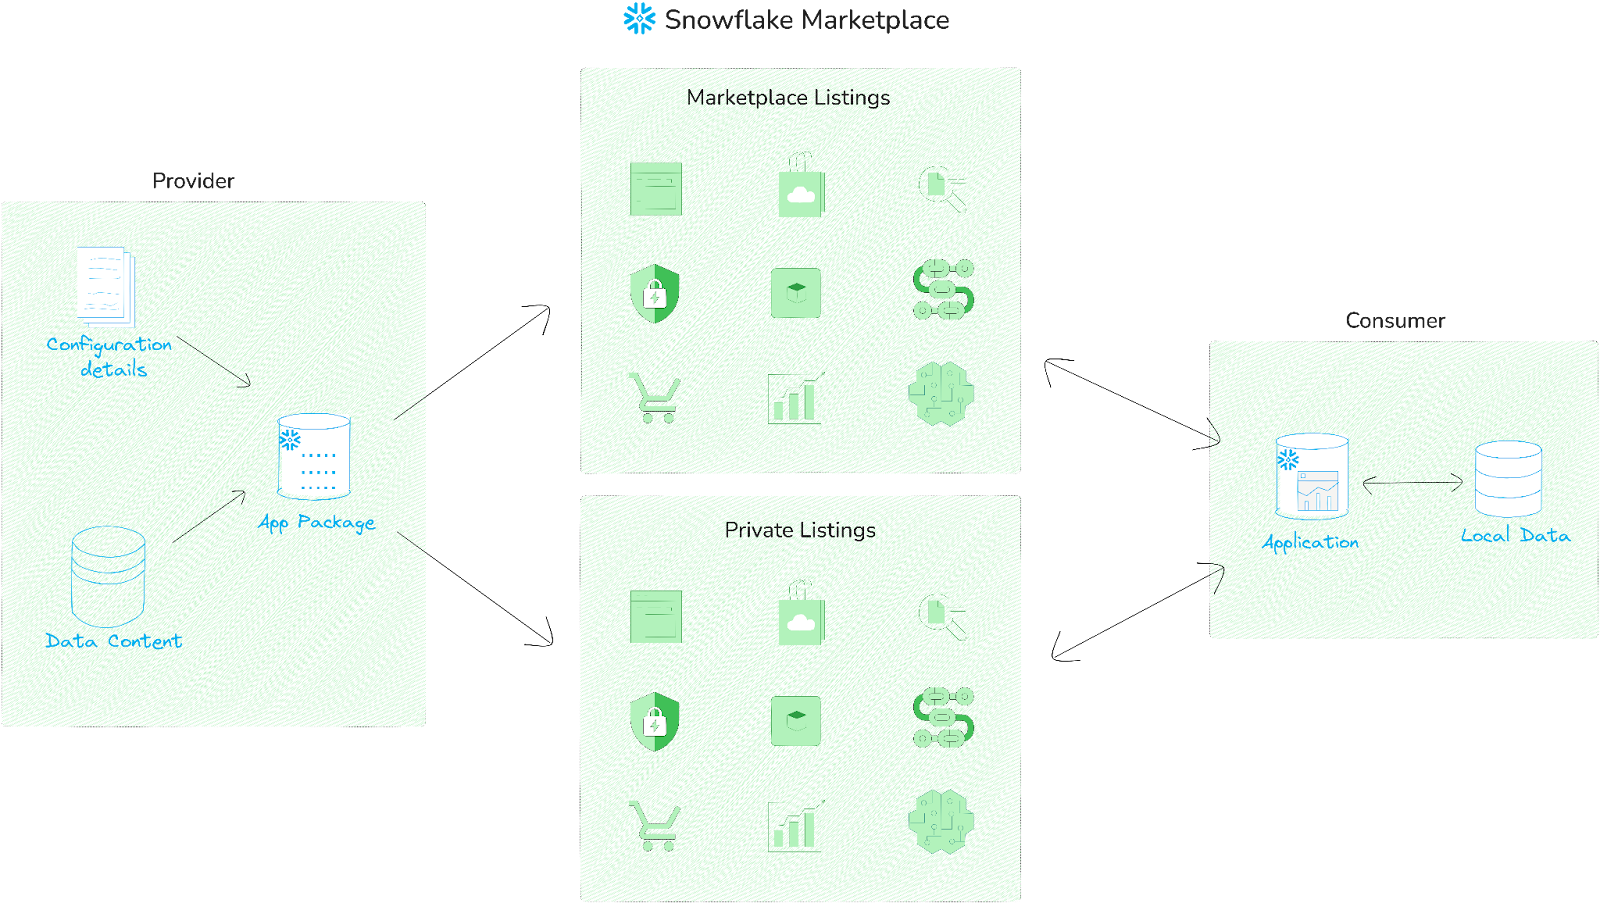
The architecture of the Snowflake Native App Framework operates on a provider-consumer model:
- Provider — Creates and shares data and application logic using the framework.
- Consumer — Installs and interacts with applications shared by providers.
Native Apps are packaged as application packages, which contain the logic, metadata and configuration needed to deploy the app. An application package includes:
- Manifest file (manifest.yml) — Configuration details, including setup script location and versioning
- Setup script (setup_script.sql) — SQL commands that run during installation and upgrades
Providers distribute apps in two ways:
- Marketplace listings — Accessible to all Snowflake users for broad distribution
- Private listings — Targeted sharing with specific accounts across regions
Upon installation, Snowflake creates a corresponding database object in their account and runs the setup script to establish the necessary resources. Additional configurations like logging or privilege grants can be applied post-installation.
Snowflake Native Applications with Snowpark Container Services
For advanced use cases, Snowflake Native Applications can utilize Snowpark Container Services, which enable Snowflake apps to manage containerized workloads within Snowflake. This approach supports high-performance applications, such as machine learning and AI-driven analytics, without externalizing data.
Components unique to containerized Snowflake apps:
- Services specification file — Applications reference container images stored in the provider’s repository.
- Compute pool — A collection of virtual machine nodes where containerized workloads execute.
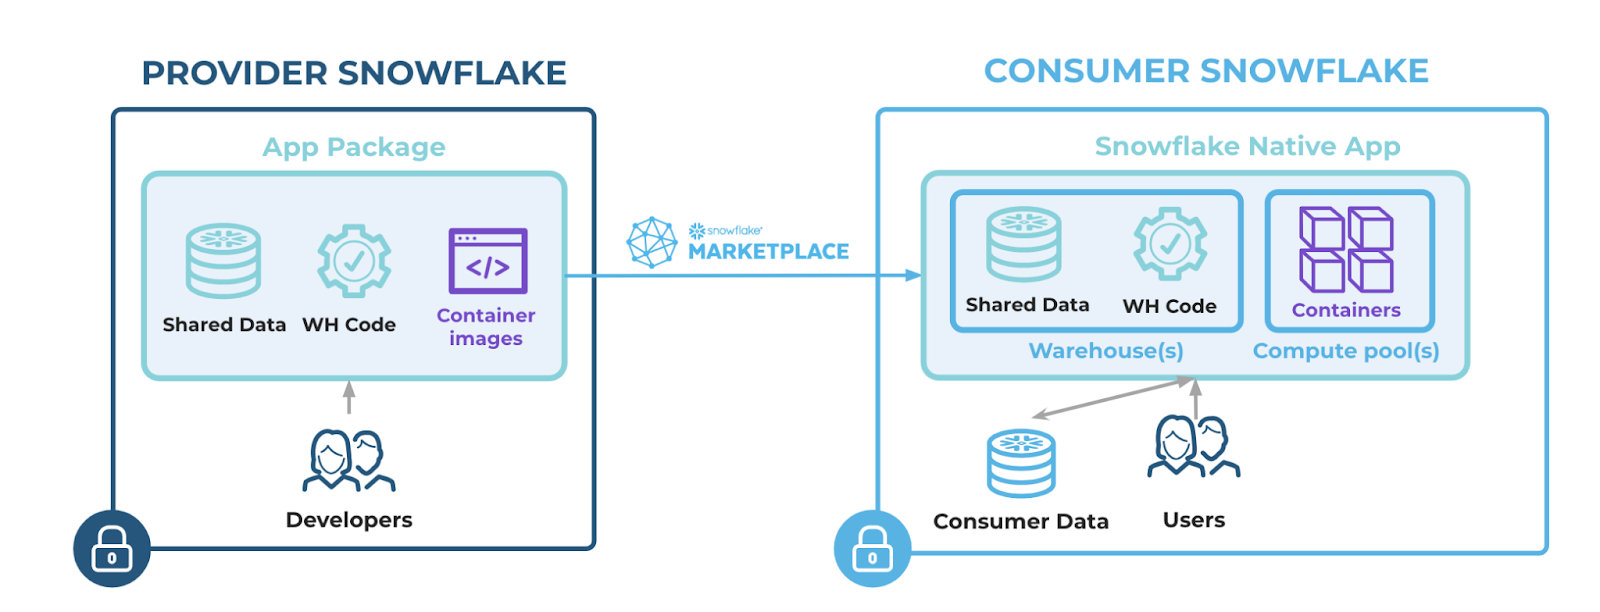
Snowpark Container Services supports:
- AI/ML workloads with low latency
- Persistent data and model storage co-located with compute
- Deployment across GPU and CPU configurations
Step-by-step guide to create a Snowflake Native App
Now that we have covered the features, benefits and inner workings/architecture of Snowflake Native Applications, let’s dive into a step-by-step guide on how you can create a simple Snowflake Native App on Snowflake.
Before you start building a Snowflake Native App, make sure you meet these requirements:
Prerequisite:
- Snowflake CLI: Install the Snowflake CLI on your machine.
- Visual Studio Code: If you haven’t already installed VSCode, download it from here.
- ACCOUNTADMIN Role: Use the ACCOUNTADMIN role for all steps in this tutorial.
- Second Snowflake Account: If installing your app from a private listing, you need access to a second Snowflake account.
- Set a Current Warehouse: Use the USE WAREHOUSE command to specify the active warehouse.
- SQL Command Session: Run all SQL commands within the same session. The session context must remain consistent as the steps build on one another.
Let’s kick off by covering the main pieces you’ll be working with.
Application Package
Think of this as a container for your entire application. It holds:
- Shared data
- Application logic
- Deployment artifacts
Setup Script
The blueprint of your application’s initialization. This script:
- Creates schemas
- Sets up application roles
- Defines initial objects and permissions
Manifest File
Your app’s configuration metadata. It tells Snowflake:
- Which files to include
- How to structure the deployment
- Runtime behaviors
Project Definition File
Defines deployment specifics:
- Application package name
- Stages
- Artifacts to include
Step 1—Configure the environment
First, log into your Snowflake account and create a new database and schema for your application. You can do this using the following SQL commands:
CREATE DATABASE IF NOT EXISTS my_app_db;
USE DATABASE my_app_db;
CREATE SCHEMA IF NOT EXISTS my_app_schema;
This sets up a dedicated space for your app’s data and logic.
Now make sure you have an active warehouse set for executing your SQL commands. You can create a new warehouse or use an existing one:
CREATE WAREHOUSE IF NOT EXISTS <warehouse> WITH WAREHOUSE_SIZE = 'SMALL';
USE WAREHOUSE <warehouse>;
Step 2—Set up Snowflake CLI
To get started, you need to install and configure Snowflake CLI. It allows users to execute SQL queries and carry out a wide range of DDL and DML operations.
To download Snowflake CLI, first download from the SnowSQL download page and then open a new terminal window. Execute the following code to test your connection:
snow connection addOnce you have done that, enter all the credentials when prompted.

That’s it!
For full installation instructions, see the official Snowflake CLI documentation.
Step 3—Initialize a new project
Now that your environment is set up, you will initialize a new project folder for your app using the Snowflake CLI. Open your terminal and execute:
snow init --template app_basic snowflake_native_app_demo
This command creates a directory named snowflake_native_app_demo, which contains a basic structure for your Snowflake Native App project.

Here’s what is inside the app directory:

OR
You can clone the starter project which is provided by Snowflake by running the following command:
git clone https://github.com/Snowflake-Labs/sfguide-getting-started-with-native-apps.git
Step 4—Create application files
Navigate to the snowflake_native_app_demo directory and create several essential files:
➥ Configuring Setup Script
This SQL script runs automatically when a consumer installs your app. Modify app/setup_script.sql with the following content (add comment for now, we will update the script later on):
-- Snowflake Native App Setup script ➥ Configuring Manifest File
This YAML file contains configuration information about your app. Create/Update app/manifest.yml with this:
manifest_version: 1

version:
name: V1
label: "Version One"
comment: "Initial version of the demo app"

artifacts:
setup_script: setup_script.sql
readme: README.md

configuration:
log_level: INFO
trace_level: ALWAYS
➥ Configuring Project Definition File
This YAML file defines objects that can be deployed to Snowflake. Create/Update snowflake.yml in the root of your project with this:
definition_version: 2

entities:

  snowflake_native_app_demo_package:

    type: application package

    stage: stage_content.hello_snowflake_stage

    manifest: app/manifest.yml

    identifier: snowflake_native_app_demo_package

    artifacts:

      - src: app/*

        dest: ./

  demo_snowflake_native_app:

    type: application

    from:

      target: snowflake_native_app_demo_package

    debug: false
This file is central to setting up a Snowflake Native App. It specifies key details about the app’s configuration and how resources are managed within Snowflake.
To create an application package, you need the CREATE APPLICATION PACKAGE privilege. If your role doesn’t have this, you can grant it with the Snowflake CLI:
snow sql -q "GRANT CREATE APPLICATION PACKAGE ON ACCOUNT TO ROLE accountadmin" -c <connection_name>
Replace connection_name with the connection name specified in your config.toml file.
snowflake.yml file defines objects and configuration details. Here’s what it includes:
a) Application package
Serves as the container for app-related objects. Example: snowflake_native_app_demo_package
b) Application object
Created from the application package. Example: demo_snowflake_native_app
c) Named stage
Holds application files. Example: stage_content.hello_snowflake_stage. The stage name is schema-qualified and created inside the application package.
It stores files for setup scripts or runtime use.
Artifacts section
Specifies file rules for deployment. Example: Files in app/ are uploaded to the root of the stage.
Example mappings:
tutorial/app/manifest.yml → @snowflake_native_app_demo_package.stage_content.hello_snowflake_stage
tutorial/app/README.md → @snowflake_native_app_demo_package.stage_content.hello_snowflake_stage
tutorial/app/setup_script.sql → @snowflake_native_app_demo_package.stage_content.hello_snowflake_stage
Use <% … %> syntax for dynamic referencing. Example: <% ctx.entities.pkg.identifier %> accesses the package identifier.
Debug mode
The debug field in snowflake.yml is set to false for production. Debug mode is typically enabled by default during development.
➥ Configuring README File
This file provides a description of your application. Create app/README.md with a brief description:
This is a demo Snowflake Native App.Step 5—Write the application logic
Now let’s get to the essence of Snowflake Native App development—adding application logic and installing your first app. This involves creating stored procedures, setting up application roles and configuring privileges for seamless execution. Here’s how you can achieve this:
➥ Add a Stored Procedure to the setup script
The setup script is central to your app’s functionality. By extending it, you can define key components like roles and stored procedures.
First, let’s define an Application Role. To do so, add the following to your setup_script.sql file:
CREATE APPLICATION ROLE IF NOT EXISTS snowflake_native_app_public;
CREATE SCHEMA IF NOT EXISTS native_app_core;
GRANT USAGE ON SCHEMA native_app_core TO APPLICATION ROLE snowflake_native_app_public;
As you can see, this creates an application-specific role (snowflake_native_app_public) and a schema (native_app_core) for the app. And the role is restricted to the app’s context and manages access to app-specific objects.
Next, add a stored procedure that your app can call:
CREATE OR REPLACE PROCEDURE native_app_core.HELLO()
	RETURNS STRING
	LANGUAGE SQL
	EXECUTE AS OWNER
	AS
BEGIN
	 RETURN 'Demo Snowflake Native App!';
END;
This stored procedure outputs a simple greeting—useful as a test or base for more complex logic.
Finally, grant the application role permission to use the procedure:
GRANT USAGE ON PROCEDURE native_app_core.hello() TO APPLICATION ROLE snowflake_native_app_public;Now this role can access and execute the stored procedure.
Here is how your setup_script.sql file should look like:
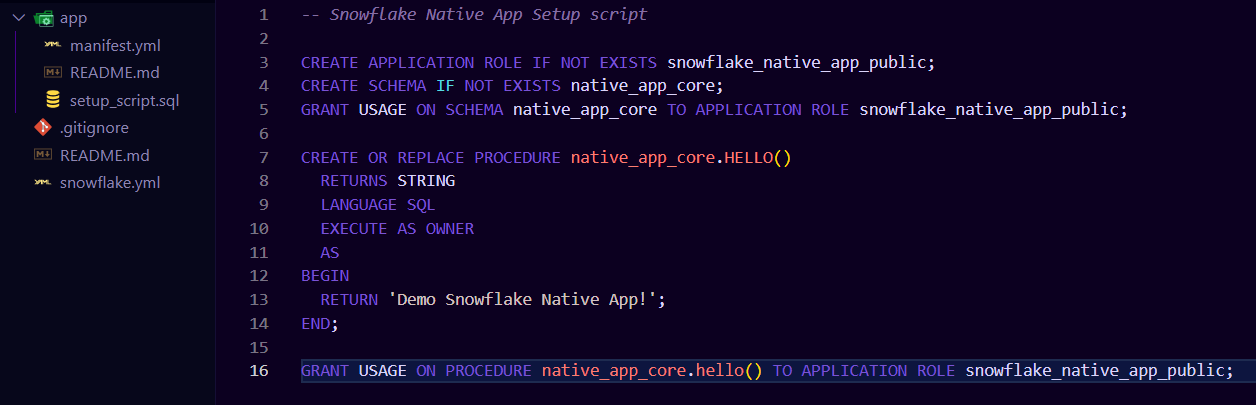
Once your setup script includes the necessary logic, install the app in stage dev mode using the Snowflake CLI. Dev mode lets you test app behavior before deploying it to production.
To test it, run the following Snowflake CLI command:
snow app run -c connection_name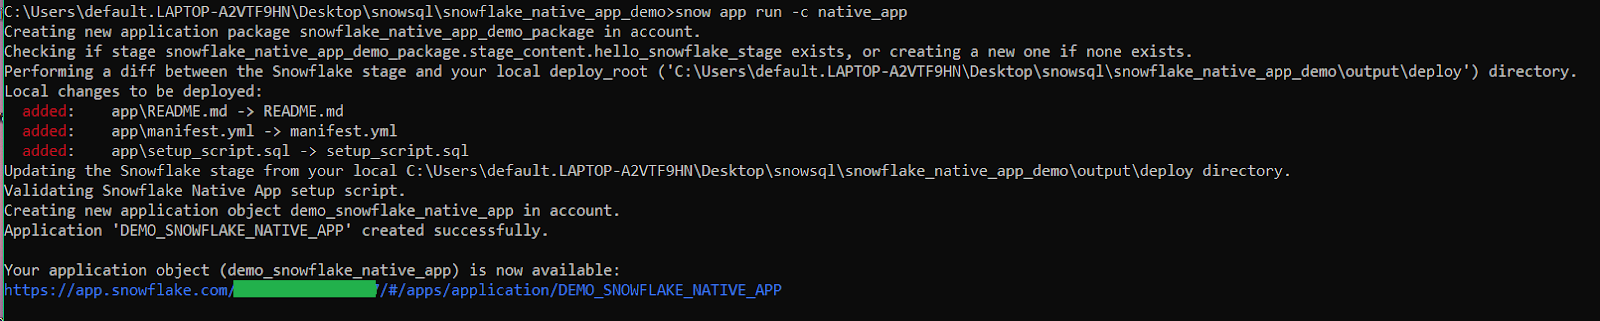
As you can see, if the command runs successfully, it outputs a URL where you can see your app in Snowsight.

To run the stored procedure that you added to setup_script.sql in a previous section, run the following Snowflake CLI command:
snow sql -q "call demo_snowflake_native_app.native_app_core.hello()" -c connection_nameYou should see the following result/output:

Step 6—Add shared data content
In this step, you’ll enhance your Snowflake Native App by incorporating shared data content. This involves creating and sharing a table within your app package and granting access to app users. Additionally, you’ll create a view for secure data access by consumers.
First, let’s create a table to share with the app. To do so, you can add a table to your app package by writing a SQL script and specifying its execution in the project definition file.
So let’s create and populate the table. To do that, you need to create a folder scripts and inside that folder, create a file called shared_content.sql. Then, add the following code:
USE APPLICATION PACKAGE <% ctx.entities.snowflake_native_app_demo_package.identifier %>;

CREATE SCHEMA IF NOT EXISTS shared_data;
USE SCHEMA shared_data;
CREATE TABLE IF NOT EXISTS wealthy_individuals (
		id INT,
		 name VARCHAR,
		status VARCHAR
);

TRUNCATE TABLE wealthy_individuals;

INSERT INTO wealthy_individuals VALUES
		 (1, 'Elon', 'Billionaire'),
		(2, 'Bernard', 'Billionaire'),
		(3, 'Jeff', 'Billionaire'),
		 (4, 'Warren', 'Billionaire'),
		(5, 'Larry', 'Billionaire'),
		(6, 'Sergey', 'Billionaire'),
		 (7, 'Gautam', 'Billionaire'),
		(8, 'Carlos', 'Billionaire'),
		 (9, 'Mukesh', 'Billionaire'),
		(10, 'Bill', 'Millionaire'),
		(11, 'Mark', 'Millionaire'),
		(12, 'Larry', 'Millionaire'),
		 (13, 'Michael', 'Millionaire'),
		(14, 'Aman', 'Millionaire'),
		(15, 'Warren', 'Billionaire');
Now, grant access to the table and schema using:
GRANT USAGE ON SCHEMA shared_data TO SHARE IN APPLICATION PACKAGE <% ctx.entities.snowflake_native_app_demo_package.identifier %>;
GRANT SELECT ON TABLE wealthy_individuals TO SHARE IN APPLICATION PACKAGE <% ctx.entities.snowflake_native_app_demo_package.identifier %>;
The placeholder <% ctx.entities.snowflake_native_app_demo_package.identifier %> dynamically resolves to your application package identifier during deployment.
Register the script as a post-deploy hook
Update the snowflake.yml file to include the new script in post-deployment hooks:
definition_version: 2
entities:
	 snowflake_native_app_demo_package:
			 type: application package
			stage: stage_content.hello_snowflake_stage
			manifest: app/manifest.yml
			identifier: snowflake_native_app_demo_package
			 artifacts:
					- src: app/*
					 dest: ./
			 meta:
				 post_deploy:
						 - sql_script: scripts/shared_content.sql
		demo_snowflake_native_app:
			type: application
			 from:
				 target: snowflake_native_app_demo_package
			debug: false
Next, modify the setup_script.sql file to create a view that app consumers can use to query the data.
Create a versioned Schema:
CREATE OR ALTER VERSIONED SCHEMA code_schema;
GRANT USAGE ON SCHEMA code_schema TO APPLICATION ROLE snowflake_native_app_public;
Create a View for consumer access
CREATE VIEW IF NOT EXISTS code_schema.accounts_view
	 AS SELECT roll_number, NAME, VALUE
	 FROM shared_data.wealthy_individuals;
GRANT SELECT ON VIEW code_schema.accounts_view TO APPLICATION ROLE snowflake_native_app_public;
After adding the table and view, test the updated app to make sure everything works as expected. Let’s deploy the updates:
snow app run -c connection_name
This uploads the edited files to the stage, runs scripts/shared_content.sql and deploys the app.
Now, finally, to verify the data access, fire the command below:
snow sql -q "SELECT * FROM demo_snowflake_native_app.code_schema.accounts_view" -c connection_name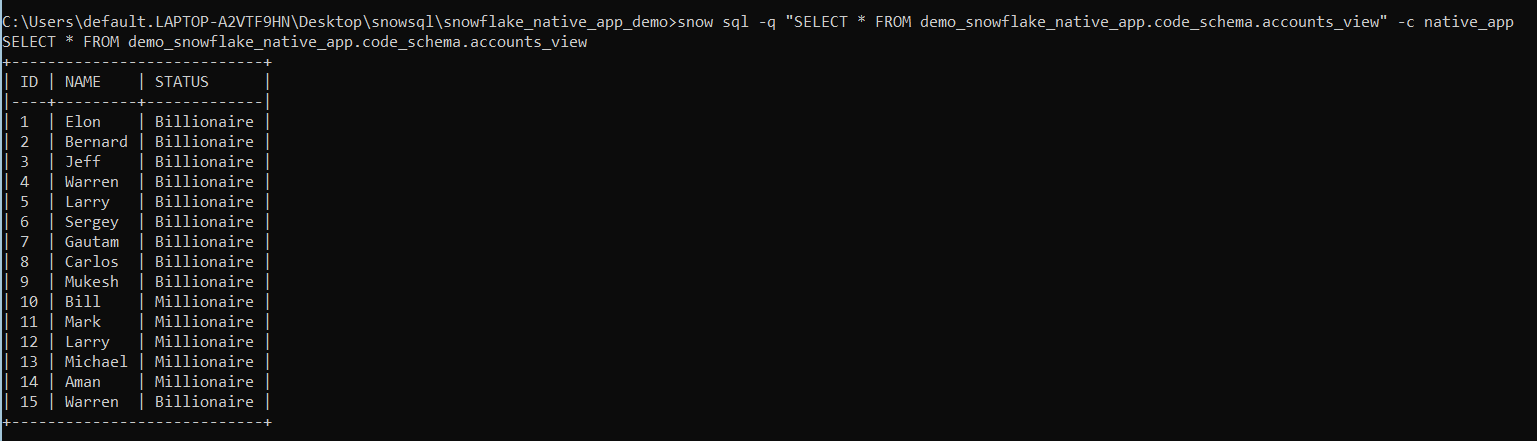
The output should list the sample data from the accounts table.
Step 7—Add Python UDFs
Let’s enhance our Snowflake Native App by incorporating Python-based logic using User-Defined Functions (Snowflake UDFs). We’ll add both an inline Python UDF and one that references an external Python module.
Inline Python UDFs enable you to embed Python logic directly within your setup script. To do so, update your setup script to include the following code:
CREATE OR REPLACE FUNCTION code_schema.squareroot(i INT)
RETURNS INT
LANGUAGE PYTHON
RUNTIME_VERSION = '3.11'
HANDLER = 'squareroot_py'
AS
$$
def squareroot_py(i):
	 return i * i
$$;

GRANT USAGE ON FUNCTION code_schema.squareroot(INT) TO APPLICATION ROLE snowflake_native_app_public;
As you can see, this:
- Creates a Python UDF named squareroot in the code_schema schema.
- Uses Python 3.11 runtime.
- Grants the necessary usage privilege to the snowflake_native_app_public role.
Now let’s reference a Python file for modular and reusable logic. First, let’s add this code to your setup script:
CREATE OR REPLACE FUNCTION code_schema.cuberoot(i INT)
RETURNS FLOAT
LANGUAGE PYTHON
RUNTIME_VERSION = 3.11
IMPORTS = ('/python/cube_python.py')
HANDLER = 'cube_python.cuberoot';

GRANT USAGE ON FUNCTION code_schema.cuberoot(INT) TO APPLICATION ROLE snowflake_native_app_public;
Now let’s add the external Python file. To do this, in the project folder, create a subdirectory: python/. Inside this folder, create a file named cube_python.py with the following content:
def cuberoot(i):
	 return i * i * i
Update the project definition file to include the Python file:
artifacts:
	- src: python/cube_python.py
After adding the Python UDFs, deploy and validate their functionality.
Deploy the updates
snow app run -c connection_name
This uploads the updated files to the stage and deploys the app.
Test the inline Python UDF:
snow sql -q "SELECT demo_snowflake_native_app.code_schema.squareroot(2)" -c connection_nameOutput:

Test the external Python UDF:
snow sql -q "SELECT demo_snowflake_native_app.code_schema.cuberoot(2)" -c connection_nameOutput:

Step 8—Add a Streamlit UI to your Snowflake Native App
Now, let’s integrate a Streamlit-based user interface into your Snowflake Native App. Streamlit is an open-source framework designed for building interactive data applications, offering features for data visualization and user interaction.
Head over to your project folder and create a subdirectory named streamlit/. Inside the streamlit folder, create a file named streamlit_app.py. Then, add the following Python code to streamlit_app.py:
# Import python packages
import streamlit as st
from snowflake.snowpark import Session
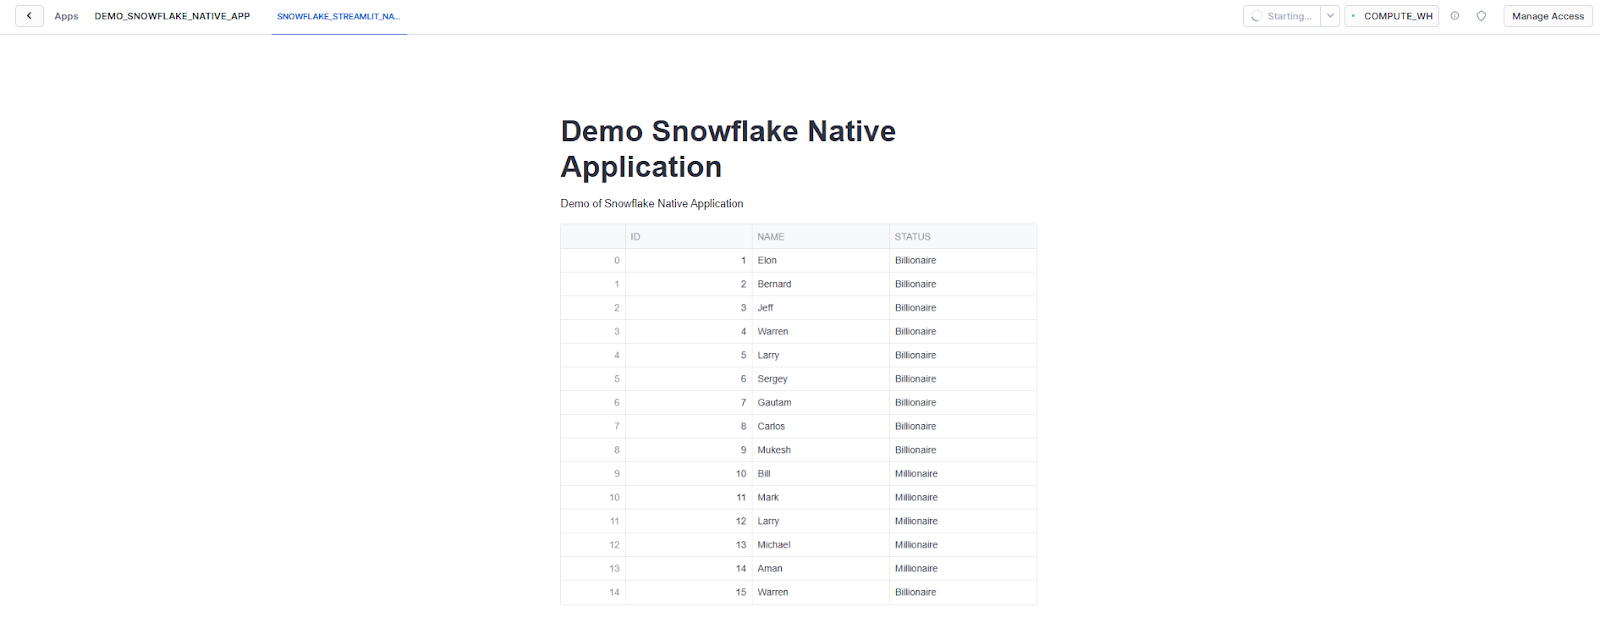
st.title("Demo Snowflake Native Application")
st.write("""Demo of Snowflake Native Application""")
# Get the current credentials
session = Session.builder.getOrCreate()
# Create an example data frame
data_frame = session.sql("SELECT * FROM code_schema.accounts_view")
# Execute the query and convert it into a Pandas data frame
queried_data = data_frame.to_pandas()
# Display the Pandas data frame as a Streamlit data frame.
st.dataframe(queried_data, use_container_width=True)Next, add the following to the artifacts section of the project definition file:
artifacts:
	 - src: streamlit/streamlit_app.py
This is how your snowflake.yml should look:
definition_version: 2
entities:
		snowflake_native_app_demo_package:
			type: application package
			 stage: stage_content.hello_snowflake_stage
			 manifest: app/manifest.yml
			 identifier: snowflake_native_app_demo_package
			artifacts:
				 - src: app/*
						dest: ./
				 - src: python/cube_python.py
					- src: streamlit/streamlit_app.py
			meta:
					post_deploy:
						- sql_script: scripts/shared_content.sql
	 demo_snowflake_native_app:
			 type: application
			from:
					target: snowflake_native_app_demo_package
			 debug: false
Then, create the Streamlit object. To do that, add the following to the end of the setup_script.sql file:
CREATE STREAMLIT IF NOT EXISTS code_schema.snowflake_streamlit_native_app
	FROM '/streamlit'
	 MAIN_FILE = '/streamlit_app.py';
Add the following statement to the same script to allow the application role to access the Streamlit object:
GRANT USAGE ON STREAMLIT code_schema.hello_snowflake_streamlit TO APPLICATION ROLE snowflake_native_app_public;Deploy the updates by running the following command to update the app:
snow app run -c connection_name
After deployment, a URL will be printed in the console. Navigate to this URL to interact with the app. Click the snowflake_streamlit_native_app tab to view the Streamlit interface.
Step 9—Version your Snowflake Native App
Let’s formalize your Snowflake Native App by creating a version. While previous steps utilized “stage development” mode for rapid iteration, adding a version is essential for listing the application package and sharing it with other Snowflake users.
Run the following command to create version V1 for the snowflake_native_app_demo_package application package:
snow app version create v1 -c connection_name
Here is how you would check the version of the app to see whether it was added successfully or not. To do so, run the following command:
snow app version list -c connection_name
Step 10—Install and test the versioned app
To install and test the versioned app, run the following command to install the app based on the created version:

Step 11—View Snowflake Native App in Snowsight
After finalizing your Snowflake Native App, you can use Snowsight, Snowflake’s web interface, to explore your app visually, instead of relying solely on SQL commands.
To start, sign in to Snowsight using your Snowflake credentials. Once logged in, switch to the ACCOUNTADMIN role to ensure you have the necessary permissions. You can do this by selecting your username from the navigation menu, opening the account menu and switching from the current active role (e.g., PUBLIC) to ACCOUNTADMIN. Next, navigate to the Data Products section and select Apps from the menu.
Locate your application, DEMO_SNOWFLAKE_NATIVE_APP, in the list.
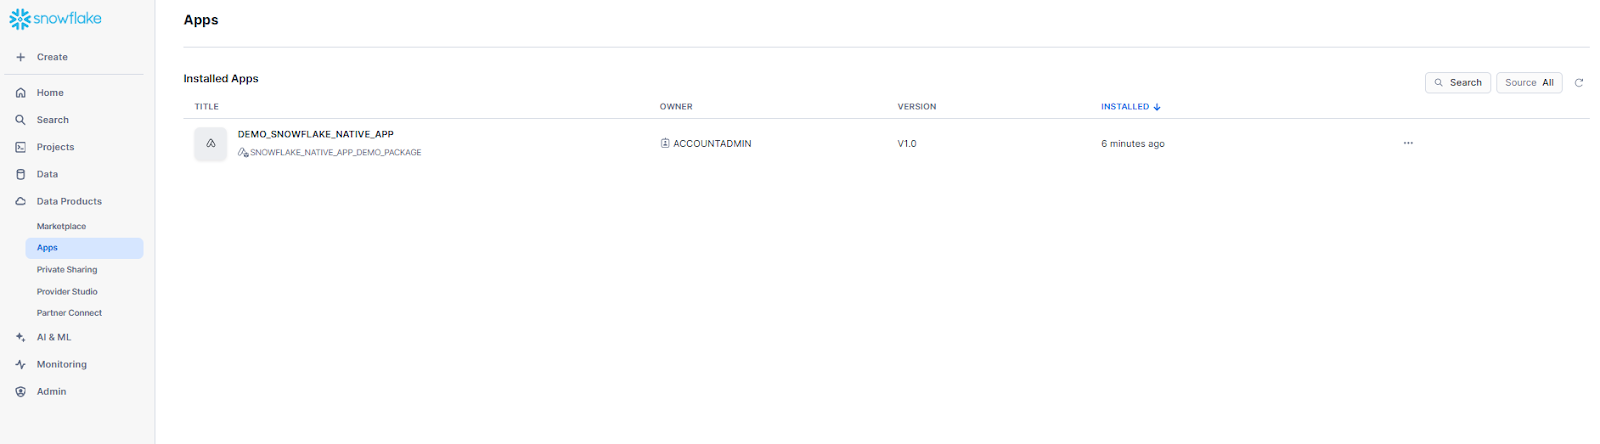
Clicking on it opens the Read Me tab, which displays the content of the README.md file you created earlier in this tutorial.
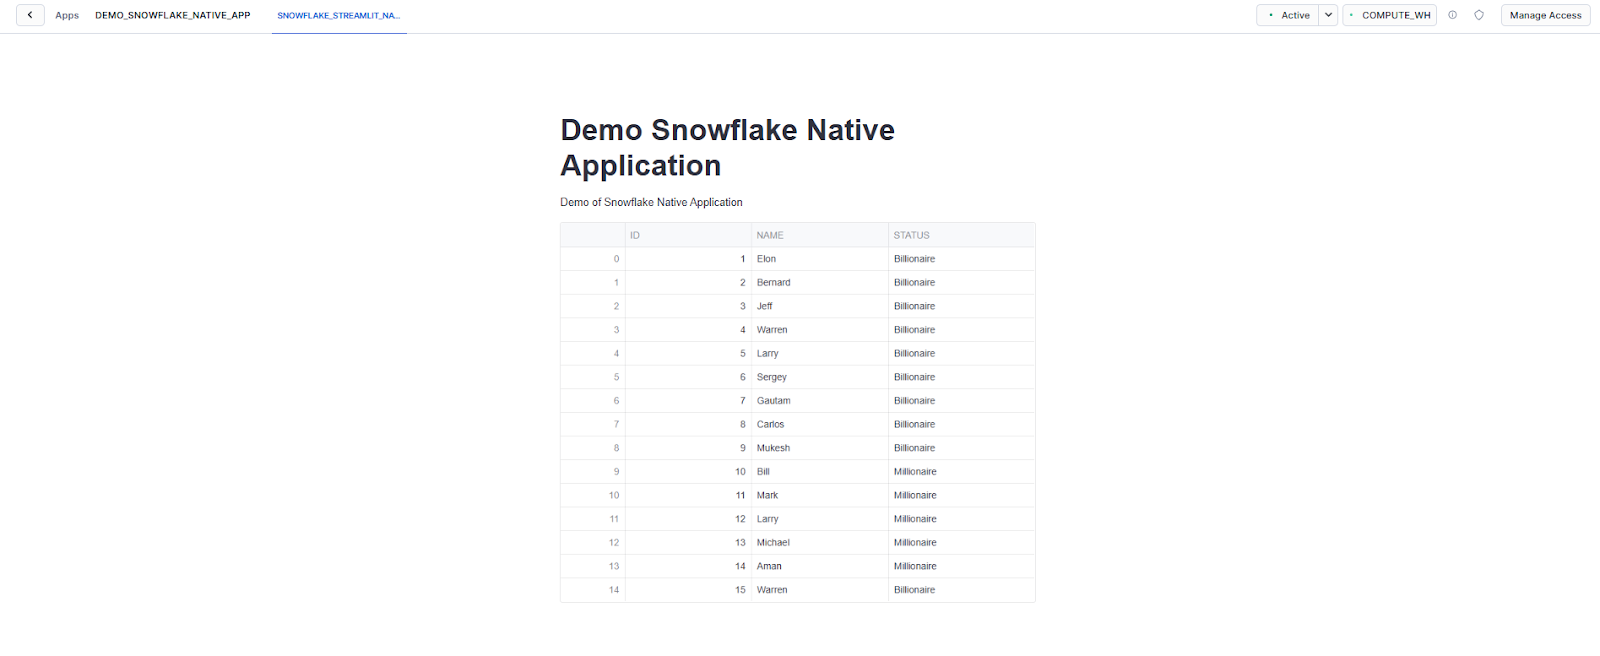
To view the Streamlit interface, find and select SNOWFLAKE_STREAMLIT_NATIVE_APP.
Monetization and distribution of Snowflake Native App
Now that we have covered the detailed steps of how you can create and build Snowflake Native Applications from scratch, let’s go through the process of how you can monetize your Snowflake Native Applications via Snowflake Marketplace. But before that, let’s actually understand what Snowflake Marketplace is.
The Snowflake Marketplace is a platform where users can discover, evaluate and purchase a variety of products, including third-party data, data services, Snowflake Native Apps and AI products. It serves as a public data exchange integrated within the Snowflake Data Cloud, facilitating seamless and secure transactions between data providers and consumers.
The Snowflake marketplace offers various types of data products, such as:
- Raw and enriched datasets
- Historical datasets for forecasting and ML
- Real-time data streams
- Snowflake Native Applications
- Pre-built data pipelines and transformations
Snowflake Marketplace leverages Snowflake’s architecture to facilitate the secure sharing of data and applications. Transactions are managed natively, eliminating the need for third-party billing systems. Vendors can offer their products through various pricing models, such as pay-as-you-go, one-time payment, usage-based payment, or subscription-based plans, while benefiting from Snowflake’s built-in analytics to track customer engagement.
Let’s jump right into the juicy part of the article: a step-by-step guide to monetizing Snowflake Native Applications via Snowflake Marketplace.
Step-by-step monetization process of a Snowflake Native App via Snowflake Marketplace
Step 1—Prepare your Snowflake Native Application package
Before monetization, make sure your Snowflake Native App meets Snowflake’s submission requirements:
- The app must be fully functional upon installation, with all necessary resources and configurations included.
- It must not depend on external systems for core functionality.
- Should Leverage Snowflake-stored or shared data for operations.
- Include the following files:
- manifest.yml (outlines app permissions and dependencies).
- readme.md (describes app functionality, post-installation setup steps and sample usage SQL).
- Set up scripts and external components like Streamlit files or UDF code
Step 2—Define the default release directive
Now, set the release directive to specify the app version and patch available for distribution:
List available versions and patches:
snow app version list -c connection_nameThen, set the default release directive:
snow sql -q "ALTER APPLICATION PACKAGE <your_app_package> SET DEFAULT RELEASE DIRECTIVE VERSION = v1 PATCH = 0"
As you can see, this command sets version v1 and patch 0 as the default for your app, ensuring it is ready for deployment.
Step 3—Create a private listing on the Snowflake Marketplace
To share your app via the Snowflake Marketplace, start by signing in to Snowsight and navigating to Data Products > Provider Studio.
Click + Listing to create a new listing and proceed with configuration. Enter a name for the listing and specify the discovery permissions, choosing whether the listing will be public or restricted to specific consumers (e.g., select “Only specified consumers” for private sharing and select “Anyone on the Marketplace” for public listing).
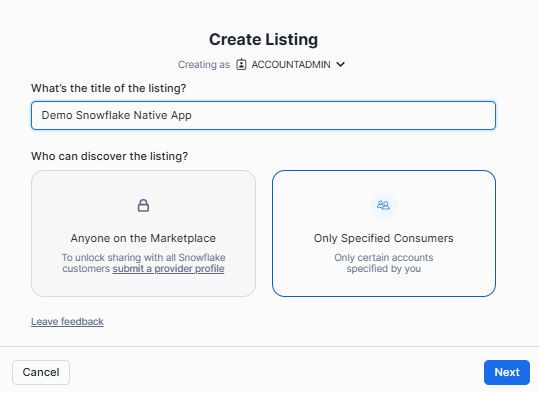
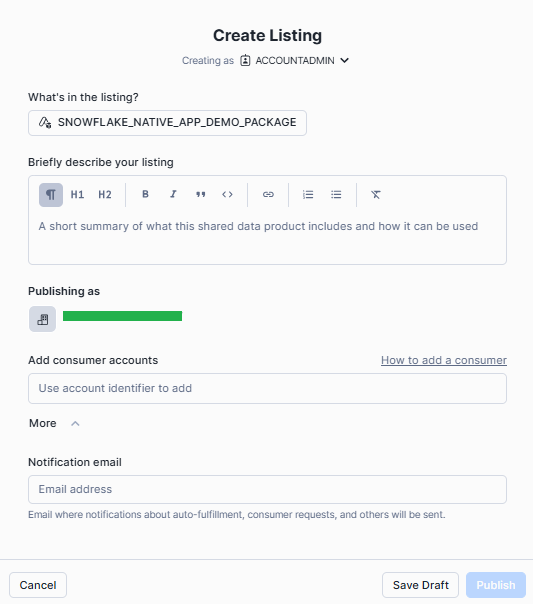
Attach the application package you prepared earlier as the core data content for the listing. Provide a detailed description outlining your app’s features and usage scenarios. If creating a private listing, add the account identifiers of intended consumers in the “Add Consumer accounts” section. Finally, publish your listing for approval.
Step 4—Create a public paid listing on the Snowflake Marketplace
Now, to create a public listing, you need to first contact your Snowflake business development partner to approve your paid listing. If you don’t have a business development partner, you’ll need to submit a case with Marketplace Operations. Before proceeding, verify that your role has the required privileges to create a listing.
Once everything is in place, you need to log in to Snowsight and go to Data Products > Provider Studio from the menu. Select + Listing to open the Create Listing window. Here, name your listing and set its visibility. To make the listing publicly discoverable, choose “Anyone on the Marketplace” under the discovery settings.
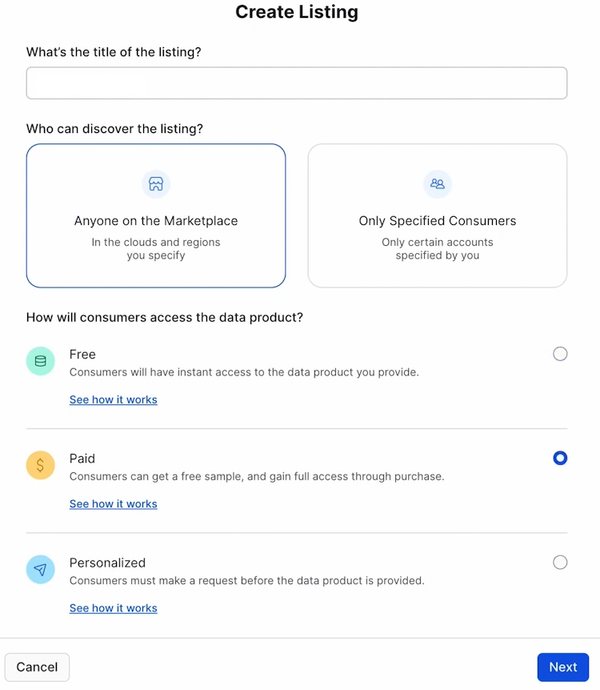
Next, you need to decide how consumers will access your data product: choose “Free” for no-cost access, “Personalized/Limited Trial” to offer a trial version with full access upon request, or “Paid” if you plan to charge consumers directly.
After setting the access type, click Next to generate a draft listing. Lastly, refine and configure the draft by including all necessary details to ready it for publication on the Snowflake Marketplace.
Step 5—Submit the listing for approval
All listings on the Snowflake Marketplace must undergo a review and approval process before publication. If a listing is rejected, review the provided feedback, make the necessary updates and resubmit it for approval.
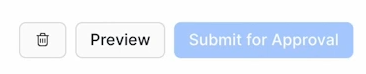
Before publishing make sure that your listing configuration is complete, you have the ACCOUNTADMIN role or OWNERSHIP privilege for the associated data product and all sample SQL queries in the listing are validated successfully. To submit your listing, sign in to Snowsight, navigate to Data Products ➤ Provider Studio, go to the Listings tab, select your draft listing and click Submit for Approval.
Step 6—Final approval and publishing
Once submitted, Snowflake will review your listing and provide an Approved or Denied status. If denied, review the feedback, make the necessary updates and resubmit the listing. After receiving approval, return to the Listings tab, select your approved listing and click Publish. Upon publication, the listing will be visible to consumers in all current and future Snowflake Marketplace regions. Regional availability can be managed through cross-cloud auto-fulfillment settings and you can create referral links for direct access to your listing.
Further Reading
- Snowflake Native Apps
- What Are Native Apps?
- About the Snowflake Native App Framework
- Snowflake Native App Framework on AWS and Azure
- Introducing the Snowflake Native App Framework
- Getting Started with Snowflake Native Apps
- Snowflake Native Apps Example
Save up to 30% on your Snowflake spend in a few minutes!
Conclusion
And that’s a wrap! Snowflake Native Apps are built using the Snowflake Native App Framework. This allows developers to create, test and launch apps right in Snowflake. The framework simplifies the process of building, launching and integrating advanced tools. It ensures security and governance by tapping into the Snowflake ecosystem. For providers, these apps provide an easy way to sell their solutions on the Snowflake Marketplace, reaching thousands of customers. Meanwhile, consumers get instant access to the apps without needing a complex setup.
In this article, we have covered:
- What are Native Apps in Snowflake?
- Key features and characteristics of Snowflake Native Apps
- What are the benefits of Snowflake Native Apps for providers?
- What are the benefits of Snowflake Native Apps for consumers?
- How do Snowflake Native Apps work?
- Step-by-step guide to create a Snowflake Native App
- Monetization and distribution of Snowflake Native Apps
- Step-by-step monetization process via Snowflake Marketplace
… and so much more!
FAQs
What are Snowflake Native Apps?
Snowflake Native Apps are applications built with the Snowflake Native App Framework that run entirely within a consumer’s Snowflake account. Data stays in place; no external access or data movement is required.
How do I develop and test a Snowflake Native App locally?
Use Snowflake CLI with the snow app run command in dev mode. This deploys the app from loose files on a named stage, letting you iterate quickly without creating a formal version. VSCode integrates well with the CLI for editing app files.
Can I share my Snowflake Native App with other users?
Yes. Create a version with snow app version create, set a release directive and publish a listing through Provider Studio. You can share privately with specific accounts or publicly on the Snowflake Marketplace.
Does the framework support logging and monitoring?
Yes. The Native App Framework includes structured event logging and tracing. Providers configure log and trace levels in manifest.yml and can consume events from a shared event table.
What role does Streamlit play in Native Apps?
Streamlit in Snowflake lets providers embed interactive UIs inside Native Apps. It’s generally available and works directly within the consumer’s Snowflake account—no separate hosting required.
Can I update my app after deployment?
Yes. Use versioning and patching to push updates. Set a new release directive to control when and how consumers receive the update. Providers can also use release channels (in preview as of early 2025) for staged rollouts.
What’s the difference between Snowflake CLI and SnowSQL?
They’re separate tools. SnowSQL is the legacy command-line SQL client. Snowflake CLI (snow) is the modern, open-source developer-focused tool that supports Native Apps, Snowpark, Streamlit and more. Snowflake recommends transitioning to Snowflake CLI; all new framework features are added there.