
Searching through piles of raw, unstructured text data manually is virtually impossible. Building custom search systems from scratch can take days or even months of development, requiring you to manage complex vector databases, fine-tune embedding models and maintain infrastructure that often fails when you need it most. Traditional keyword-based search struggles with context and pure vector search often misses exact matches. But if you are already using Snowflake, you can skip most of that pain with Snowflake Cortex Search. It delivers fast, hybrid (vector + keyword) search across your Snowflake data with very little setup or tuning. In minutes, you’ve got a search index that refreshes itself. No servers to manage, no algorithms to hand-tune.
In this article, we’ll cover everything you need to know about Snowflake Cortex Search, from understanding its features and use cases, to how the search pipeline works, supported embedding models and a full step-by-step guide (SQL and UI) to create and deploy your first search service and build real applications.
What is Snowflake Cortex Search?
Snowflake Cortex Search is a fully managed search service built natively into the Snowflake Data Cloud platform. It delivers low-latency, high-quality “fuzzy” search over your text data stored in Snowflake tables and views. The service handles both natural language queries and traditional keyword searches, returning ranked results based on semantic relevance and lexical matching.
Cortex Search addresses two main use cases: retrieval-augmented generation (RAG) and enterprise search. We’ll cover these in detail shortly.
Because Snowflake Cortex Search is built into Snowflake, you don’t need separate servers or external infrastructure. It scales with your existing Snowflake account and leverages the same security and governance controls you already have in place.
Snowflake Cortex Search uses a hybrid search architecture. It combines vector-based embeddings with traditional keyword lookup. There’s also a final step that fine-tunes the results using semantic reranking. Each query runs through vector search, keyword search and semantic reranking to deliver the best possible results without manual tuning. You get high-quality search right away.
Key features of Snowflake Cortex Search
Here are some key features of Snowflake Cortex Search.
Feature 1: Hybrid search architecture (vector + keyword + neural reranking)
Every query generates two sets of candidates: semantically similar results (based on meaning) and lexically similar results (based on exact keyword matches). A neural re-ranker then scores the combined pool for relevance. You get the best of both worlds without wiring anything together yourself.
Feature 2: Zero infrastructure management
Point Snowflake at your data. It handles index building, updates and serving. There are no servers or clusters to manage.
Feature 3: Real-time index updates via TARGET_LAG
Snowflake Cortex Search services use Snowflake’s change tracking to detect row-level changes and incrementally update the index. You set a TARGET_LAG (like, ‘1 hour’ or ‘5 minutes’) and Snowflake handles the refresh automatically as your data changes.
Feature 4: Native Snowflake integration
Snowflake Cortex Search is fully integrated into Snowflake. You can easily create Snowflake Cortex Search services with SQL or Snowsight, query them via SQL or the Snowflake Python SDK and use Snowflake’s security model (roles/privileges) natively.
Feature 5: Automatic index synchronization
When the source tables or query change, the service refreshes itself. You don’t have to manually re-index; just define your target lag and Snowflake does the rest.
Feature 6: Multi-index support (GA as of March 2026)
As of March 2026, Snowflake Cortex Search supports multiple searchable columns within a single service (multi-index). Now you can easily run targeted queries against specific indexes in one service, which is useful when you need to search across, say, both a title column and a body column with separate relevance characteristics.
Feature 7: Custom vector embeddings (GA as of March 2026)
You can now bring your pre-computed vector embeddings into Snowflake Cortex Search instead of (or alongside) Snowflake-managed embeddings. Now you can use your own fine-tuned or third-party models for the vector search stage while still benefiting from Cortex Search’s hybrid retrieval and reranking.
TL;DR: Snowflake Cortex Search provides a powerful, managed search backend directly within your Snowflake account. You focus on your data and queries and Snowflake manages the underlying search infrastructure.
Snowflake Cortex Search use cases
Snowflake Cortex Search has two main uses: retrieval augmented generation, or RAG for short and enterprise search.
- Use Case 1: Retrieval-augmented generation (RAG) for LLM chatbots
- Use Snowflake Cortex Search as the retrieval engine that feeds context to your large language model. It combines vector and keyword search to surface semantically relevant documents for chatbots or AI assistants; no extra embedding pipeline required.
- Use Case 2: Enterprise search and knowledge base applications
- Use Snowflake Cortex Search as a backend for a high-quality search bar embedded in your application.
How Snowflake Cortex Search works: the three-stage pipeline
Snowflake Cortex Search is designed to be high-quality right away. Under the hood it uses an ensemble of retrieval and ranking models to provide you with a high level of search quality with little to no tuning required. The magic happens through a three-stage process:
Stage 1: Vector search (embedding-based semantic similarity matching)
First the query text is embedded into a vector (using your chosen embedding model) and compared to the indexed document vectors. This finds semantically similar results beyond exact keyword matches.
Stage 2: Keyword search (traditional full-text lexical matching)
In parallel, a classic full-text keyword match is performed on the raw text. This checks that no direct term matches are missed.
Stage 3: Semantic reranking (neural network-based result optimization)
Finally, the union of those results is then passed through a neural re-ranker that scores the top candidates for relevance to the query.
Since it combines meaning and keywords, Snowflake Cortex Search tends to outperform traditional keyword engines on fuzzy queries while still catching exact matches. And you don’t touch model parameters or train anything; Snowflake provides the model stack.
Snowflake Cortex Search embedding models
At the vector stage, Snowflake Cortex Search turns text into embeddings. An embedding is simply a numeric vector representation of text that captures meaning.
Snowflake Cortex Search supports several embedding models, each optimized for different use cases:
Model 1: Snowflake-arctic-embed-m-v1.5 (default)
- Dimensions: 768
- Context Window: 512 tokens
- Language Support: English only
- Parameters: 110M
- Use Case: General-purpose English text with balanced performance and cost
Model 2: Snowflake-arctic-embed-l-v2.0
- Dimensions: 1024
- Context Window: 512 tokens
- Language Support: Multilingual
- Parameters: 568M
- Use Case: Higher accuracy requirements and non-English content
Model 3: Snowflake-arctic-embed-l-v2.0-8k
- Dimensions: 1024
- Context Window: 8192 tokens
- Language Support: Multilingual
- Parameters: 568M
- Use Case: Long documents like research papers, books, or extensive documentation
Model 4: Voyage-multilingual-2
- Dimensions: 1024
- Context Window: 512 tokens
- Language Support: Multilingual
- Provider: VoyageAI
- Use Case: Strong multilingual performance across diverse languages
Note: As of March 2026, you can also supply pre-computed custom vector embeddings from your own or third-party models. See the Custom vector embeddings documentation for details.
A few things you should know when choosing a model:
- The embedding model cannot be changed after service creation. To switch models, you’d have to drop and recreate the service
- Your choice affects indexing speed, query quality and credit costs (Snowflake charges per token embedded)
- Not all models are available in every Snowflake region (check the Regional Availability chart for your region)
- The default model (snowflake-arctic-embed-m-v1.5) is English-only. If your data includes non-English text, use a multilingual model
How to create Snowflake Cortex Search Service: step-by-step guide
Now, let’s build a Snowflake Cortex Search service from scratch using SQL commands. This will create an index over your data in Snowflake. We’ll assume you have some text data to search.
Prerequisites and Setup
You need a Snowflake account and a role granted privileges to create:
- Database
- Table and view
- Cortex Search service
- Warehouse for compute
You’ll also need:
- A Snowflake table containing the text data you want to search
- Snowflake Change tracking enabled on that table (if you want real-time updates)
- The SNOWFLAKE.CORTEX_USER role or equivalent permissions
Once all prerequisites are in place, carry out these steps:
Step 1—Log in to Snowflake
Sign in to your Snowflake account (you can use Snowsight or SnowSQL command line). Make sure you’re using a role with sufficient privileges.
Step 2—Create database, warehouse and schema
Set up your environment with the basic Snowflake objects. Create a dedicated Warehouse (for indexing compute) and a database/schema to hold your data and service.
CREATE DATABASE IF NOT EXISTS snowflake_cortex_search_demo;


CREATE WAREHOUSE IF NOT EXISTS snowflake_cortex_search_wh
WITH WAREHOUSE_SIZE = 'SMALL'
AUTO_SUSPEND = 60
AUTO_RESUME = TRUE;


CREATE SCHEMA IF NOT EXISTS snowflake_cortex_search_demo.search_data;


USE DATABASE snowflake_cortex_search_demo;
USE SCHEMA search_data;
USE WAREHOUSE snowflake_cortex_search_wh;
Step 3—Create a table and populate it with sample data
Create a table with sample content to search. For this example, we’ll use company documents:
CREATE TABLE company_docs (
		doc_id INT AUTOINCREMENT,
		 title VARCHAR(500),
		content TEXT,
		 category VARCHAR(100),
		 created_date TIMESTAMP_LTZ DEFAULT CURRENT_TIMESTAMP(),
		updated_date TIMESTAMP_LTZ DEFAULT CURRENT_TIMESTAMP()
);
Let’s now insert some data into company_documents table:
INSERT INTO company_docs (title, content, category) VALUES
('Employee Handbook 2025', 'This handbook covers company policies which includes remote work guidelines, performance review processes and benefits enrollment procedures. All employees must familiarize themselves with these policies.', 'HR'),
('Q4 Financial Report', 'Revenue increased 15% year-over-year, driven by strong product sales in North America. Operating cost remained controlled at 23% of revenue. Cash flow from operations exceeded $100M.', 'Finance'),
('Product Roadmap Update', 'Our platform will launch three new features this quarter: Autonomous AI Agent for Snowflake, Autonomous AI Agent for Databricks and Autonomous AI Agent for AWS EMR.', 'Product'),
('Security Incident Response Plan', 'In case of data breach or security incident, follow these procedures: isolate affected systems, notify security team within 15 minutes, document all actions taken and communicate with stakeholders.', 'Security'),
('Marketing Campaign Results', 'The social media campaign generated 50% more leads than the previous quarter. Email open rates improved to 100%. Conversion rate from lead to customer increased to 60%.', 'Marketing');
(Adapt the table columns and data to your use case.)
Step 4—Enable change tracking on source table for incremental updates (if needed)
If you want Snowflake Cortex Search to refresh as data changes, enable Snowflake change tracking on the base table. Change tracking is required for incremental index updates.
ALTER TABLE company_docs SET CHANGE_TRACKING = TRUE;
Snowflake will now efficiently detect row-level changes. If your role creating the service doesn’t own the table, you need change tracking to allow refresh.
Step 5—Create Snowflake Cortex Search Service
Now create the search service itself with a SQL command. You define: the search column, any filterable attributes, the Warehouse, target lag, embedding model and the source query.
-- Create the Snowflake Cortex Search service
CREATE CORTEX SEARCH SERVICE company_docs_search
ON content	-- Column to search within
ATTRIBUTES title, category, created_date	-- Additional columns to return in results
WAREHOUSE = snowflake_cortex_search_wh
TARGET_LAG = '1 hour'	 -- How fresh results need to be
AS (
		SELECT doc_id, title, content, category, created_date, updated_date
		 FROM company_docs
);
ONcontent tells it which column to index for full-text search.ATTRIBUTEStitle, category, created_date means those columns will be indexed for filtering (faceting).WAREHOUSE = snowflake_cortex_search_whandTARGET_LAG='1 hour'specify indexing, compute and freshness.AS (SELECT ...)query defines the source data. You can even transform or concatenate fields here if needed.
Snowflake will then build the index (this may take a bit of time for larger data).
Note: By default, the snowflake-arctic-embed-m-v1.5 model is used for embeddings. If you want another model, add EMBEDDING_MODEL = ‘model_name’ in the CREATE statement. Note the embedding model cannot be changed after creation – you’d have to recreate the service.
Step 6—Verify the service and run a test query
Check that your service was created successfully.
To show all Snowflake Cortex Search services:
SHOW CORTEX SEARCH SERVICES;
Finally, you can test the service. One way is the SEARCH_PREVIEW function, which takes a JSON query.
SELECT PARSE_JSON(
	 SNOWFLAKE.CORTEX.SEARCH_PREVIEW(
		 'company_docs_search',
		 '{
				"query": "security incident response",
			 "columns": ["title", "content", "category"],
				"limit": 1
		 }'
	 )
)['results'] AS results;
This should return the most relevant to “security incident response” in JSON format. Also, you can use the table function CORTEX_SEARCH_DATA_SCAN to inspect indexed rows:
SELECT
	 *
FROM
	TABLE (
		 CORTEX_SEARCH_DATA_SCAN (
			SERVICE_NAME => 'company_docs_search'
		)
	 );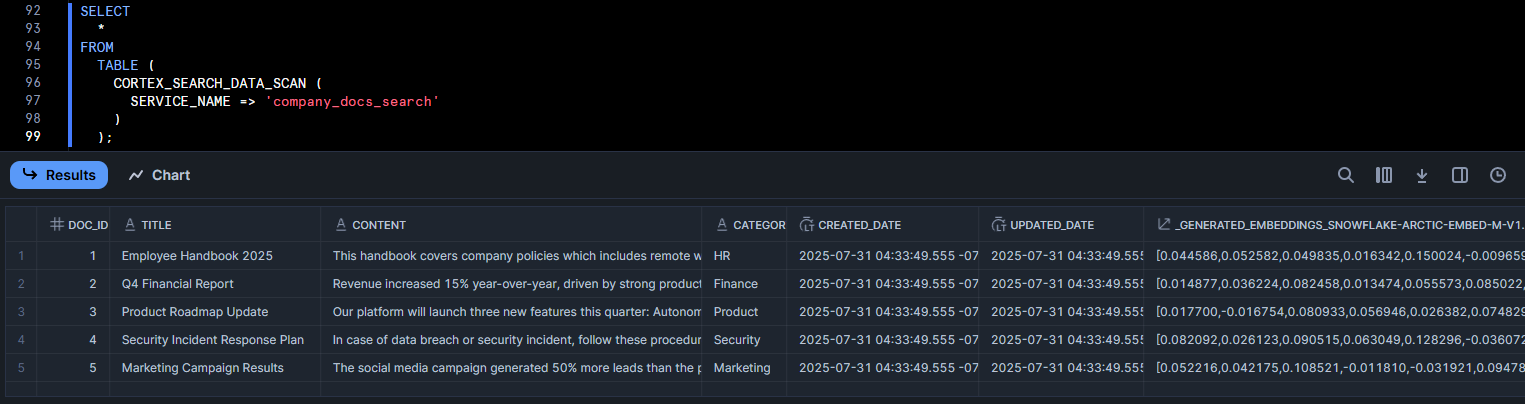
As you can see, it will show the indexed data and even a generated embedding column. If you see your data and reasonable results, your Snowflake Cortex Search service is working perfectly.
How to create Snowflake Cortex Search Service using Snowsight UI?
If you prefer a graphical interface, Snowsight provides a streamlined wizard for creating Cortex Search services.
Prerequisites
You need:
- Snowflake account with Snowsight enabled (it’s enabled by default in most accounts)
- Role with
SNOWFLAKE.CORTEX_USERprivileges plus USAGE on your target database and schema. (By default,CORTEX_USERis granted toPUBLIC) - Active Warehouse
- Database and schema containing your source table or view
- Table with the data you want to index
Step 1—Log in to Snowsight
Navigate to your Snowflake account URL and log in. Snowflake Snowsight is usually the default interface, but you can always access it at
https://app.snowflake.com/Step 2—Switch to the right role
Click your profile icon in the bottom left, then switch to a role that is granted the SNOWFLAKE.CORTEX_USER database role.
Step 3—Navigate to Snowflake AI & ML Studio
In the left navigation menu, look for “AI and ML”. And then click on “Studio”.
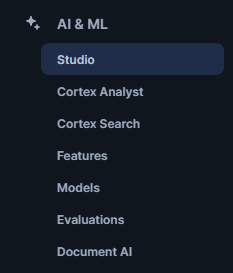
This section houses all Snowflake Cortex services, including Snowflake Cortex Search.
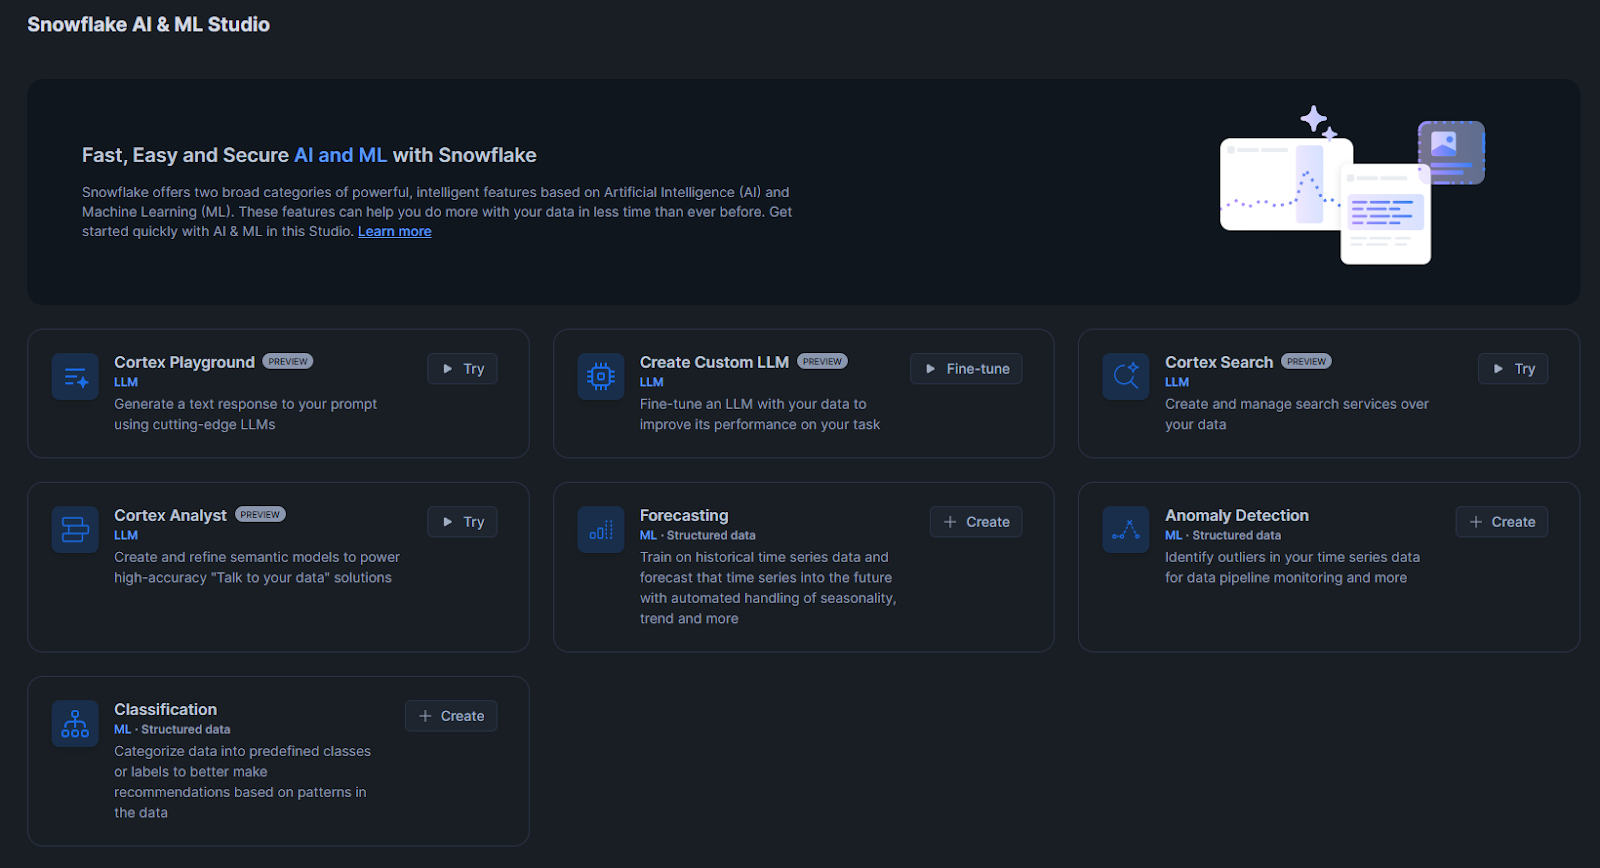
Step 4—Launch the Cortex Search setup wizard
Find the “Cortex Search” section and click the “▶ Try” button. This launches the setup wizard.

Step 5—Select role and warehouse
Choose the role and the Warehouse for indexing.
Step 6—Choose the target database and schema
Select where you want to create the search service. This should be the same database and schema that contains your source table, though it doesn’t have to be.
Step 7—Enter service name
Give your search service a descriptive name. Use something that indicates what you’re searching for. Avoid spaces and special characters.

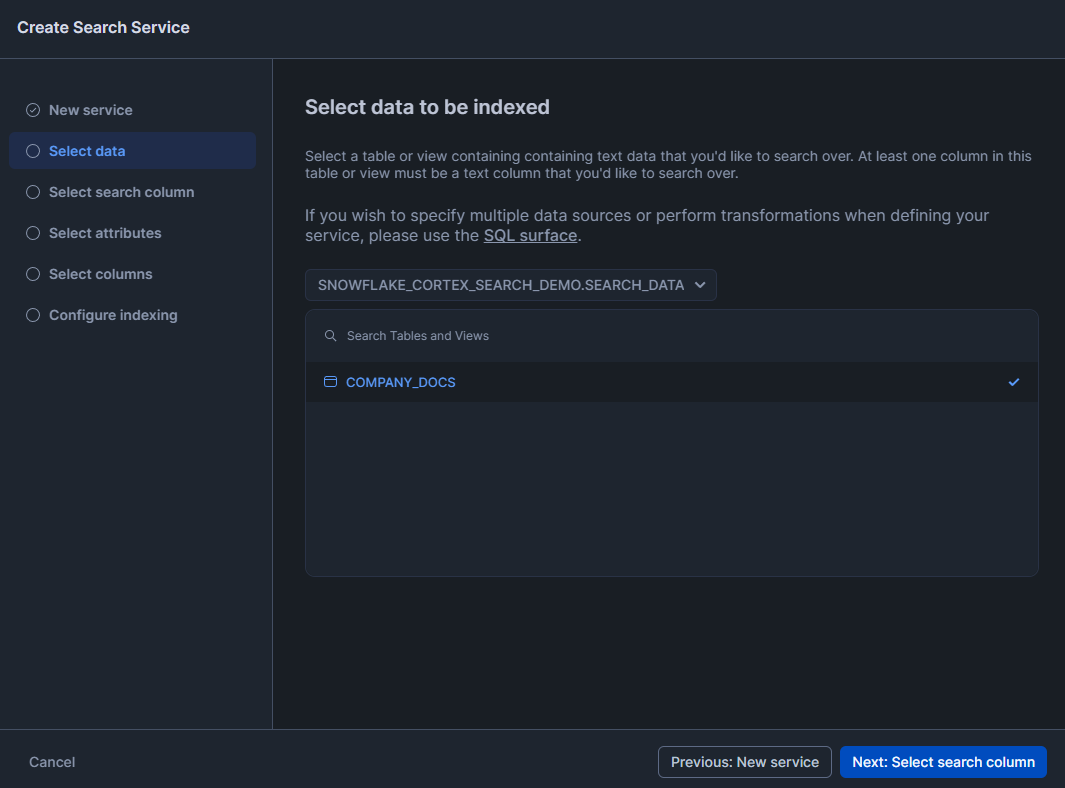
Step 8—Select your source table or view
Select the table containing your searchable content. The interface shows all tables in your chosen schema. You can also select a view if you need to join data from multiple tables or filter rows.
Step 9—Select the search column
This is the text column that Cortex Search will actually search within. Pick the column with the main content. You can only choose one column here.

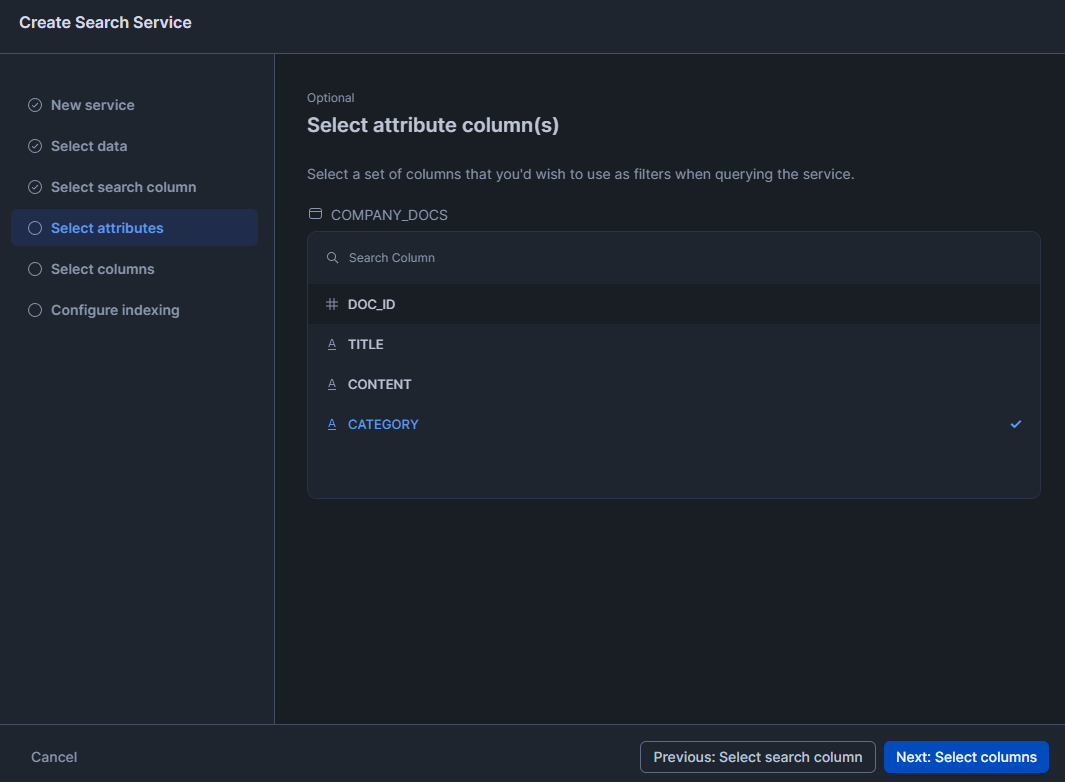
Step 10—Select attribute columns for filtering
Select a set of columns that you want to use as filters when querying the service.
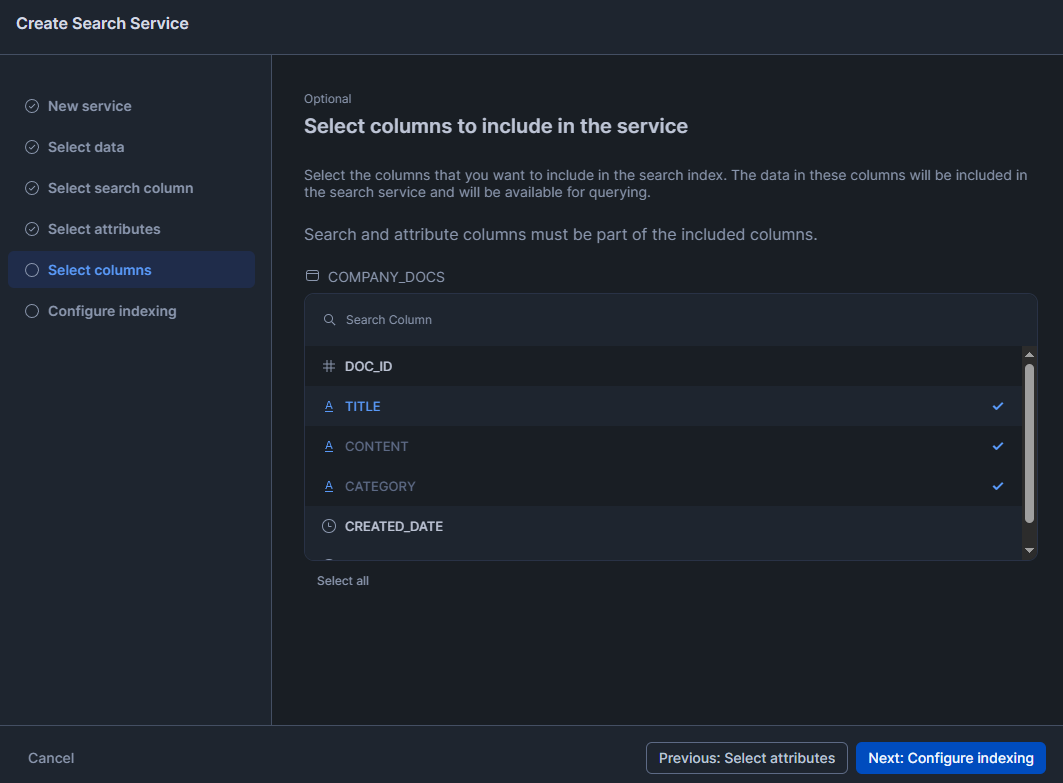
Step 11—Select result columns
Select the columns that you want to include in the search index. The data in these columns will be included in the search service and will be available for querying.
Step 12—Configure the service
Now, finally, select your desired configuration parameters for the service. The first one is Target Lag: it controls how quickly the search index updates when your source data changes. Second, select Embedding Models. Each model may incur a different cost per million input tokens processed. Refer to the Snowflake Service Consumption Table. And finally, select the Warehouse for indexing.
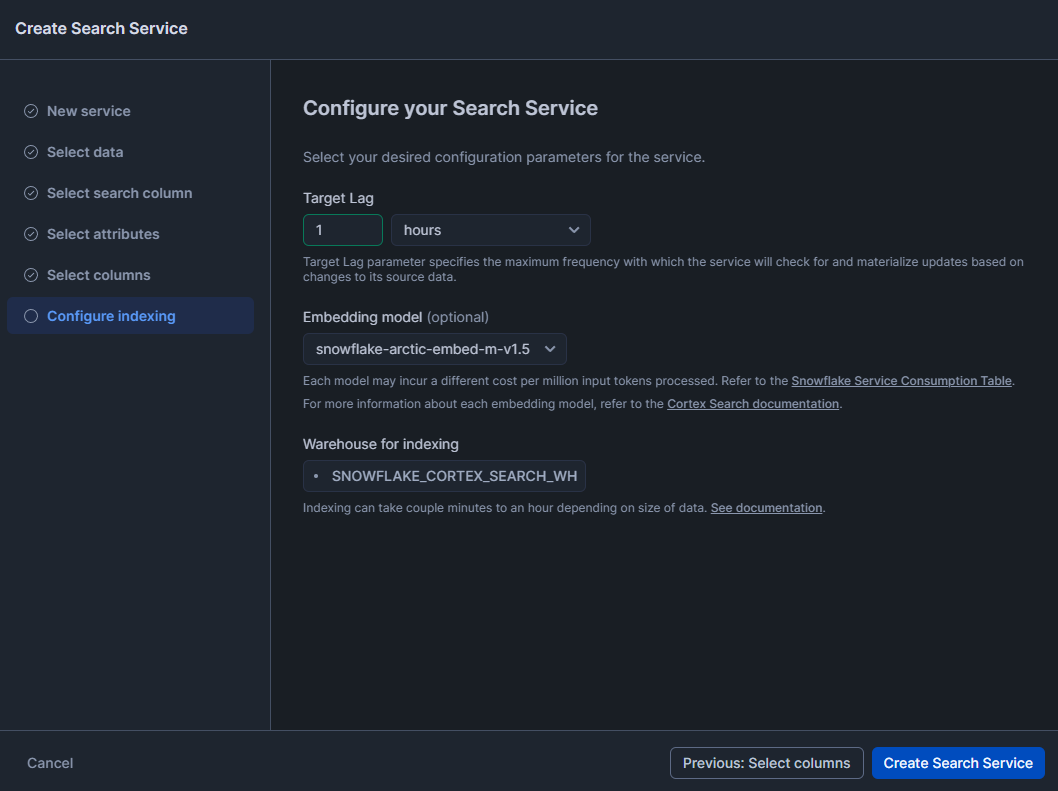
Click “Create Search Service” and wait. Depending on your data volume, initial indexing takes a few minutes to several hours. You can monitor progress in the Snowsight interface.
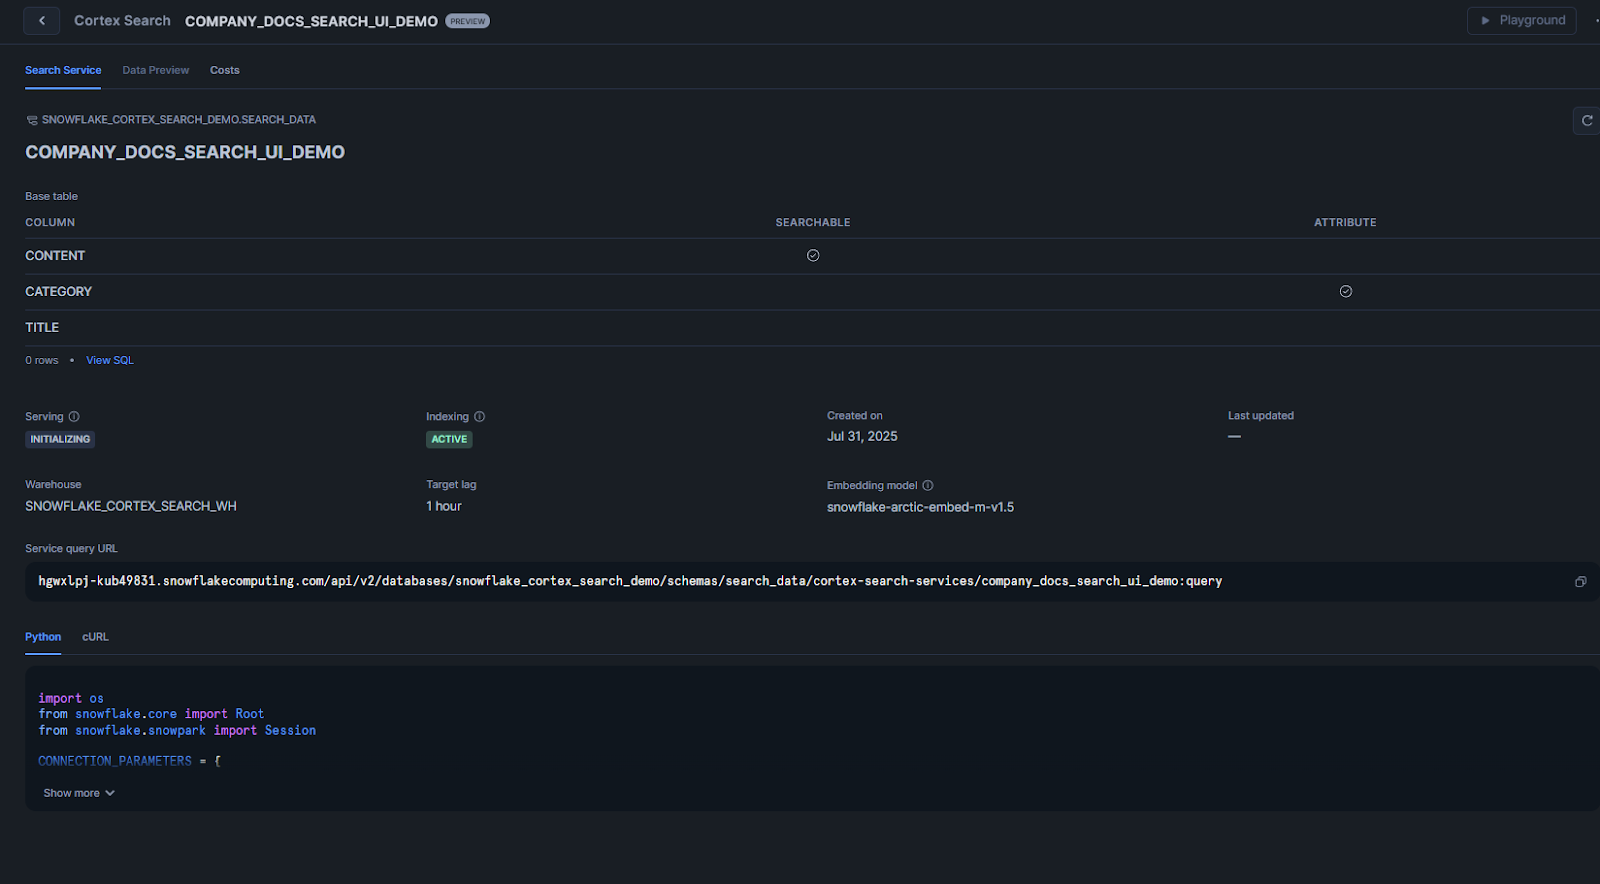
Snowflake Snowsight will confirm creation. Behind the scenes it will run similar SQL to build your search index.
You can grant other roles permission to use the service (for example via GRANT USAGE ON CORTEX SEARCH SERVICE support_search TO ROLE analysts;). Once created, the service appears in your <db>.<schema> and you can query it just like the SQL example above.
Complete example: build a movie search app using Snowflake Cortex Search and Streamlit
Let’s now build a complete search application that demonstrates Snowflake Cortex Search in action.
Prerequisites
You need everything from the SQL guide plus:
- Access to create Snowflake Streamlit apps in your Snowflake account
- A dataset with meaningful, searchable content
Step 1—Log in to Snowflake with appropriate role
(Same as before). Log in to Snowflake. Make sure your role is set to the one that created the service.
Step 2—Create database, warehouse and tables
Run the SQL statements below to create a database and Virtual Warehouse for this tutorial.
CREATE DATABASE IF NOT EXISTS snowflake_cortex_search_demo_db;

CREATE OR REPLACE WAREHOUSE snowflake_cortex_search_demo_wh WITH
			WAREHOUSE_SIZE='X-SMALL'
		 AUTO_SUSPEND = 60
		 AUTO_RESUME = TRUE
			INITIALLY_SUSPENDED=TRUE;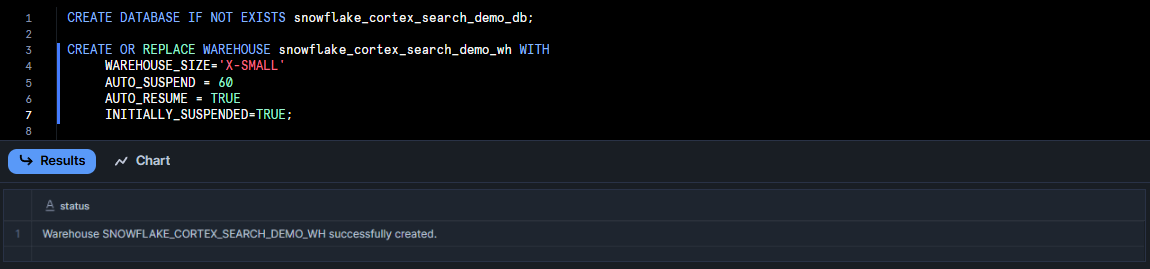
Step 3—Download the movie dataset
Grab a sample dataset from Huggingface (or any source you prefer) and save it as a single CSV (or JSON) file. To follow along with our example, download it directly in your browser using this link:
Step 4—Load the movie dataset into a Snowflake table
Now, load the example data into Snowflake before creating a Snowflake cortex search service. You can use Snowflake Snowsight or run SQL.
In Snowflake Snowsight:
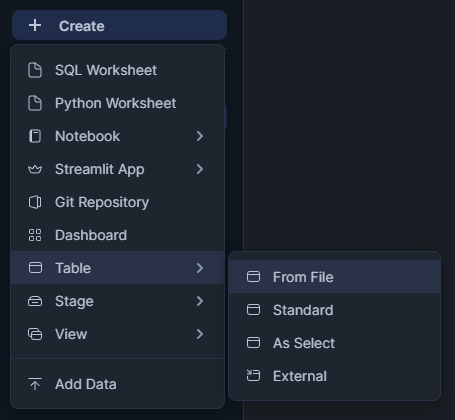
Click + Create above the left nav bar, then choose Table › From File.
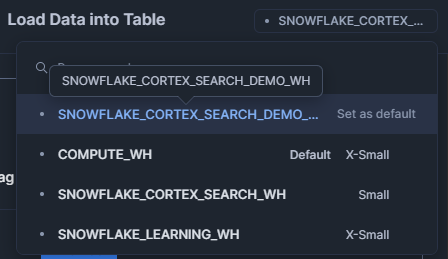
Pick your tutorial Warehouse from the top-right drop-down.
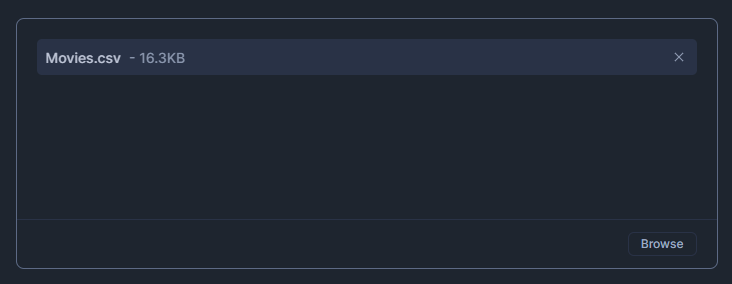
Drag your CSV or JSON file into the upload dialog.
Set the database you created and choose the PUBLIC schema.

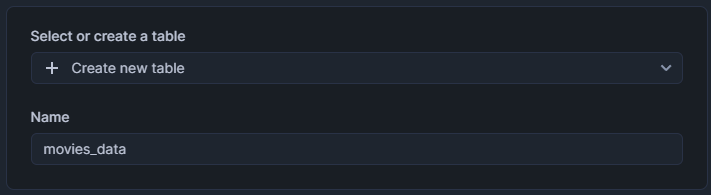
Name the new table movies_data, then click Next.
In Load Data into Table, uncheck anything that you do not want to add to the table.
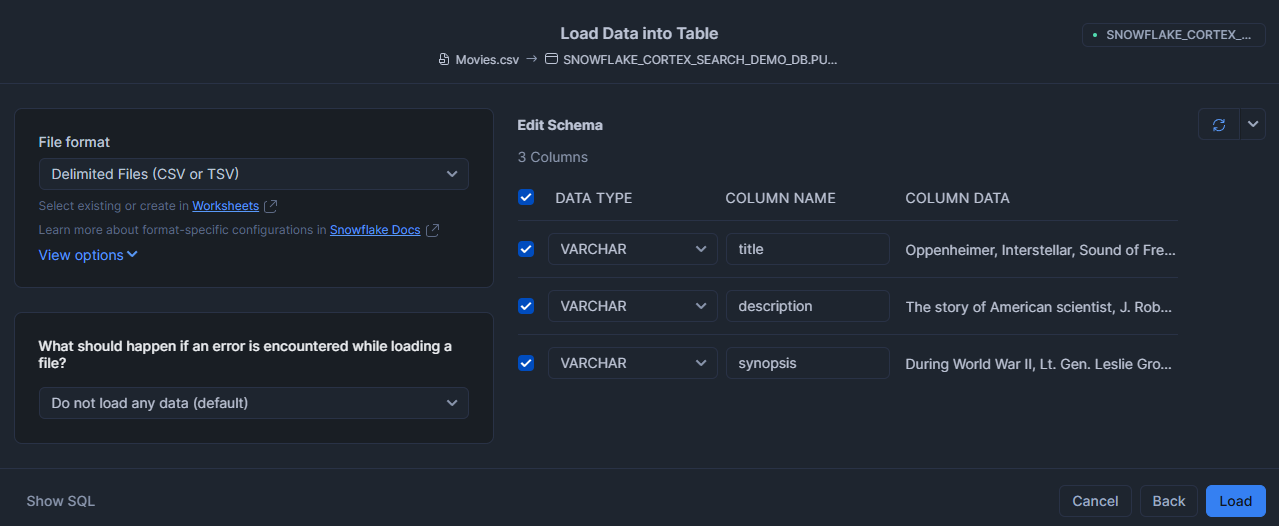
Click Load.
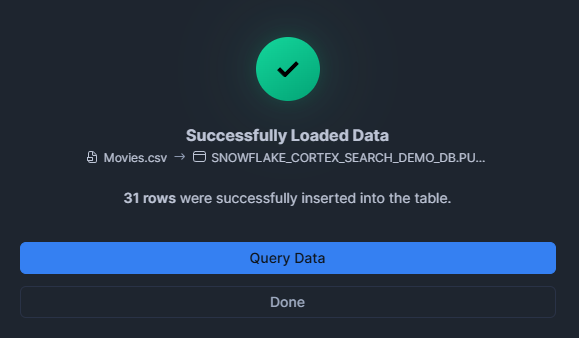
When loading finishes, click Query Data to open a new worksheet.
Via SQL:
Run a PUT command to stage the file and a COPY INTO statement to load it into movies_data.
Step 5—Enable change tracking on the movies table
Enable change tracking on your new table:
ALTER TABLE MOVIES_DATA SET CHANGE_TRACKING = TRUE;
Step 6—Create Snowflake Cortex Search Service for movie descriptions
Now create a Snowflake search service for the movies.
CREATE CORTEX SEARCH SERVICE movie_search
ON description
ATTRIBUTES title, synopsis
WAREHOUSE = snowflake_cortex_search_demo_wh
TARGET_LAG = '1 hour'
AS (
		SELECT title, description, synopsis
		 FROM movies_data
);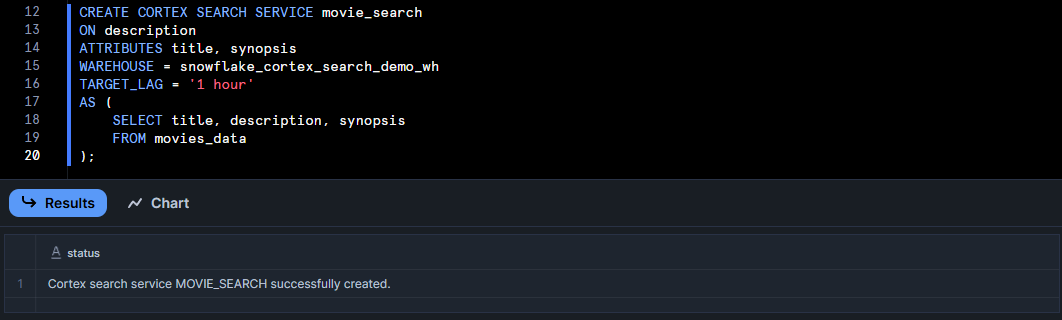
Check that your service was created successfully. To show all Snowflake Cortex Search services:
SHOW CORTEX SEARCH SERVICES;
You can test the service. You can utilize the SEARCH_PREVIEW function, which takes a JSON query.
SELECT PARSE_JSON(
	 SNOWFLAKE.CORTEX.SEARCH_PREVIEW(
		 'movie_search',
		'{
			 "query": "space exploration wormhole future planet",
				"columns": ["title", "description", "synopsis"],
			 "limit": 1
			}'
	)
)['results'] AS results;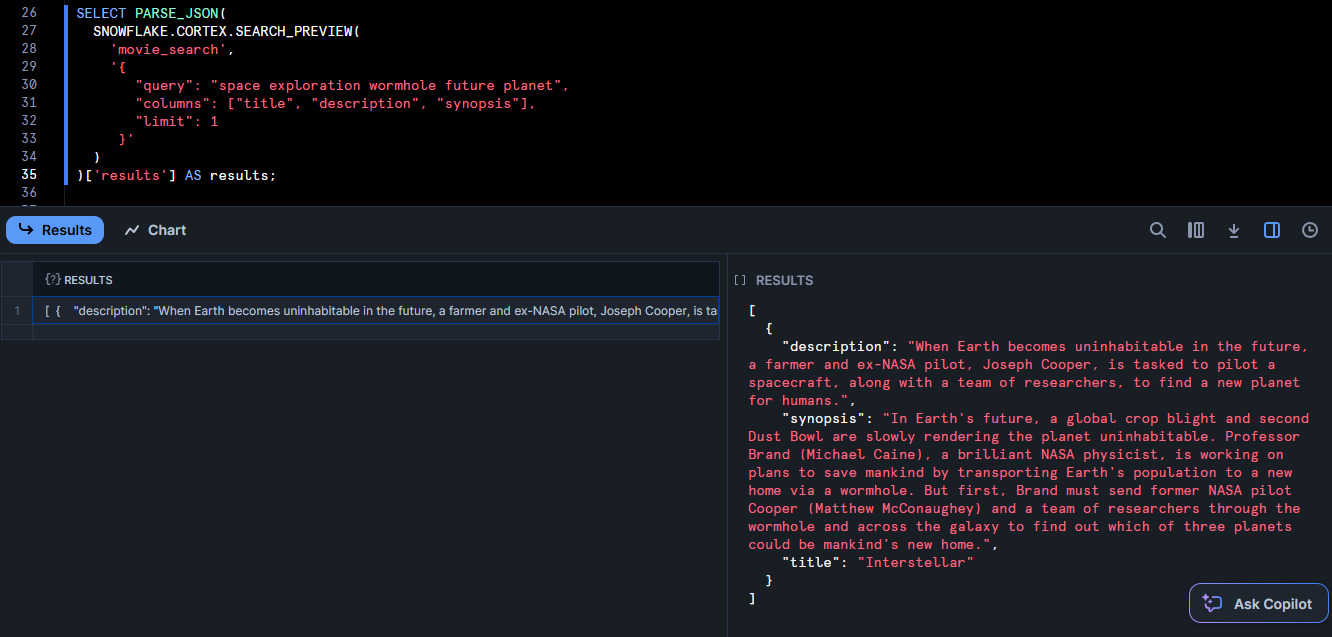
This should return the most relevant to “space exploration wormhole future planet” in JSON format. Also, you can use the table function CORTEX_SEARCH_DATA_SCAN to inspect indexed rows:
SELECT
	 *
FROM
	TABLE (
		 CORTEX_SEARCH_DATA_SCAN (
			SERVICE_NAME => 'movie_search'
		 )
	);
It will list out all the indexed data and even a generated embedding column. If you see your data and reasonable results, your Snowflake Cortex Search service is working perfectly.
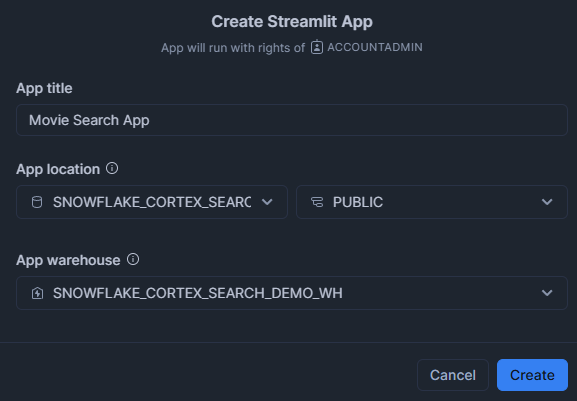
Step 7—Create the Streamlit application in Snowflake
In Snowsight, navigate to “Streamlit” in the left menu and click “+ Streamlit App“:
Application title: Enter the name for your Streamlit application.
Select Database and Schema: Choose your snowflake_cortex_search_demo_db database and schema.
Select Warehouse: Choose your snowflake_cortex_search_demo_wh Warehouse.
Write the application code:
Now replace the default example application code with the following Streamlit app code:
import streamlit as st
from snowflake.core import Root
from snowflake.snowpark.context import get_active_session

# Constants
DB			 = "SNOWFLAKE_CORTEX_SEARCH_DEMO_DB"SCHEMA	= "PUBLIC"SERVICE = "MOVIE_SEARCH"def get_column_specification():
		 """		 Retrieves the search_column and all columns for the Cortex search service
		"""		session = get_active_session()
		desc = session.sql(
				 f"DESC CORTEX SEARCH SERVICE {DB}.{SCHEMA}.{SERVICE}"		).collect()[0]
		st.session_state.search_column = desc.search_column
		 st.session_state.columns				= desc.columns.split(",")

def query_cortex_search(query: str, limit: int):
		 """		 Run the Cortex search and return results
		 """		 session = get_active_session()
		 svc = (
				Root(session)
				 .databases[DB]
				 .schemas[SCHEMA]
				 .cortex_search_services[SERVICE]
		 )
		docs = svc.search(query, columns=st.session_state.columns, limit=limit)
		 return docs.results

def display_results(results):
		 st.header(f"  Found {len(results)} Results")
		for i, row in enumerate(results, start=1):
				data = dict(row)

				# figure out which key is the title (case‐insensitive)
				title_key = next(
						 (k for k in data.keys() if k.lower() == "title"),
						None
				)
				 movie_title = data.get(title_key, "Untitled")

				with st.expander(f"  Result #{i}: {movie_title}", expanded=False):
						 # Movie title
						st.subheader(f"  {movie_title}")

						 # Description (if present)
						 for field, emoji, label in [
								 ("description", " ", "Description"),
								("synopsis",		" ", "Synopsis")
						 ]:
								 # find the actual key for each
								 key = next((k for k in data if k.lower() == field), None)
								if key and data.get(key):
										 st.markdown(f"**{emoji} {label}:** {data[key]}")

						 # Any other fields
						 other = {
								k: v
								for k, v in data.items()
								if k not in {title_key}
								 and k.lower() not in {"description", "synopsis", st.session_state.search_column.lower()}
						 }
						if other:
								 st.markdown("**  Other Details:**")
								 for col, val in other.items():
										 st.markdown(f"- **{col}**: {val}")

def main():
		st.set_page_config(page_title="  Cortex Movie Search", layout="wide")
		st.title("  Movie Search App")
		 st.markdown("Search through your movie dataset (powered by Snowflake Cortex Search) ✨")

		# Sidebar for inputs
		with st.sidebar:
				st.header("⚙️ Controls")
				query = st.text_input("  Enter your search query", placeholder="e.g. Oppenheimer")
				 limit = st.slider("  Max Results", min_value=1, max_value=20, value=5)
				st.markdown("---")
				st.caption("Powered by Snowflake Cortex Search")

		# Load service metadata
		 get_column_specification()

		 # Only run search when the user enters something
		 if query:
				results = query_cortex_search(query, limit)
				 display_results(results)
		 else:
				st.info("  Enter a search term in the sidebar to get started.")

if __name__ == "__main__":
		main()
Here’s a quick overview of the main components in the Streamlit-in-Snowflake code above:
get_column_specification()runs DESC CORTEX SEARCH SERVICE to retrieve and stash the search_column and available columns in st.session_state.query_cortex_search(query, limit)opens a Snowflake session via get_active_session() and Root, then calls .search(query, columns, limit) on your Cortex service and returns the raw rows.display_results(results)shows a hit count, locates the “title” field case-insensitively and for each row renders an expander with the title, optional description/synopsis and any extra fields.main()sets up page config, places “Search Query” and “Max Results” controls in a sidebar, invokes metadata fetch once, then on each query runs the search and renders results (or prompts if no query).
Step 8—Run Streamlit application and test semantic search
Click “Run” to deploy your Streamlit movie search app.
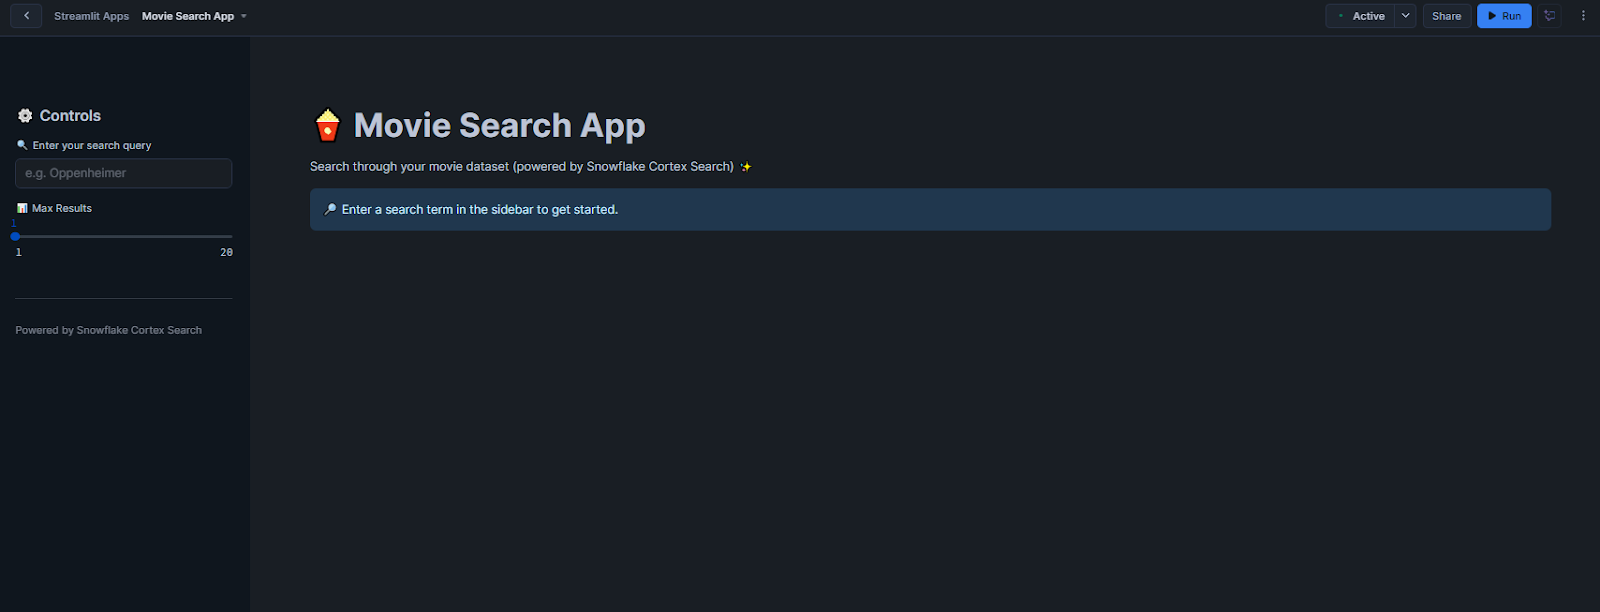
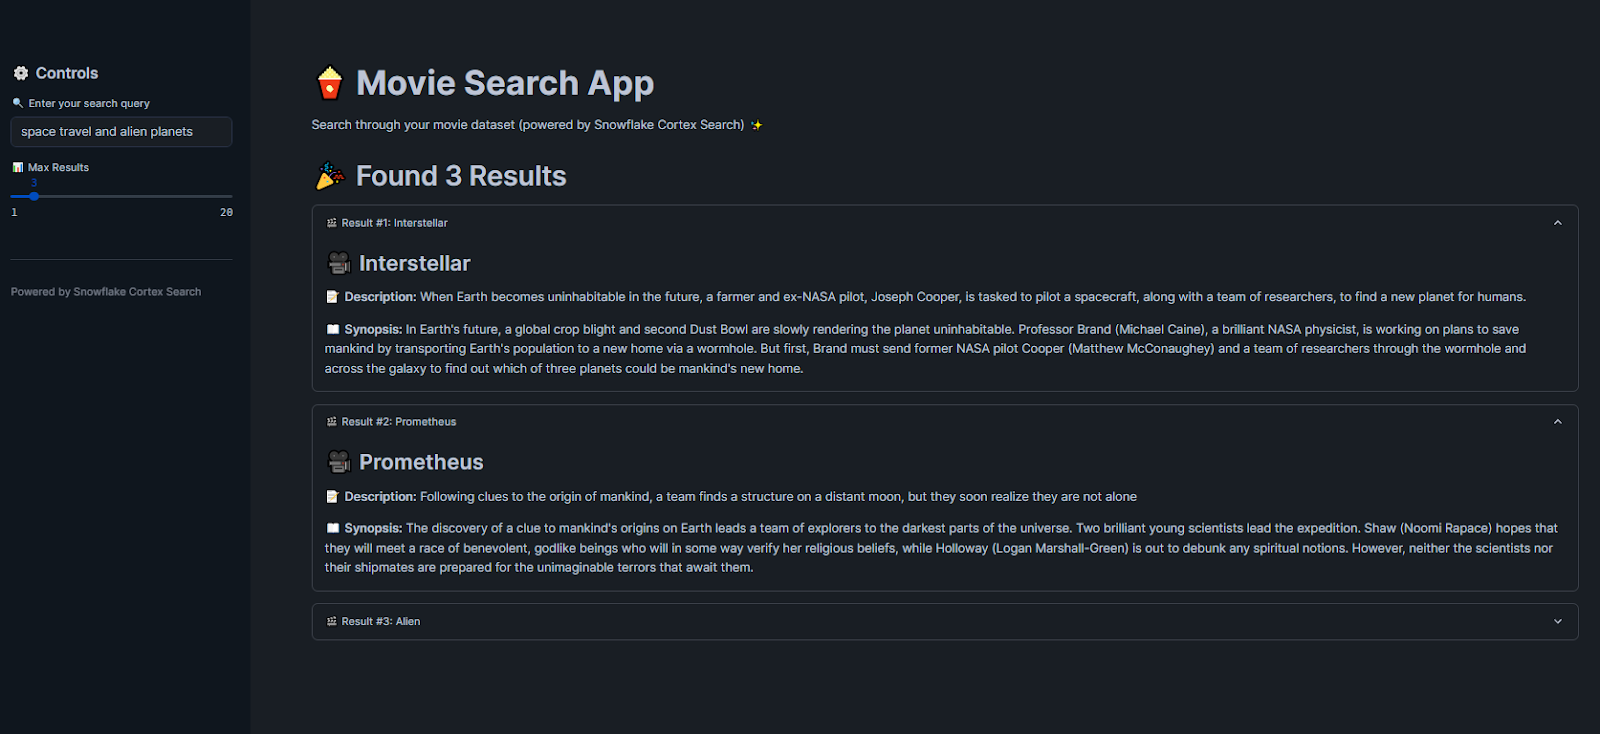
Now, search for movies with queries like “space movies about saving humanity” and get relevant results. As you can see, the app demonstrates how Snowflake Cortex Search handles semantic matching.
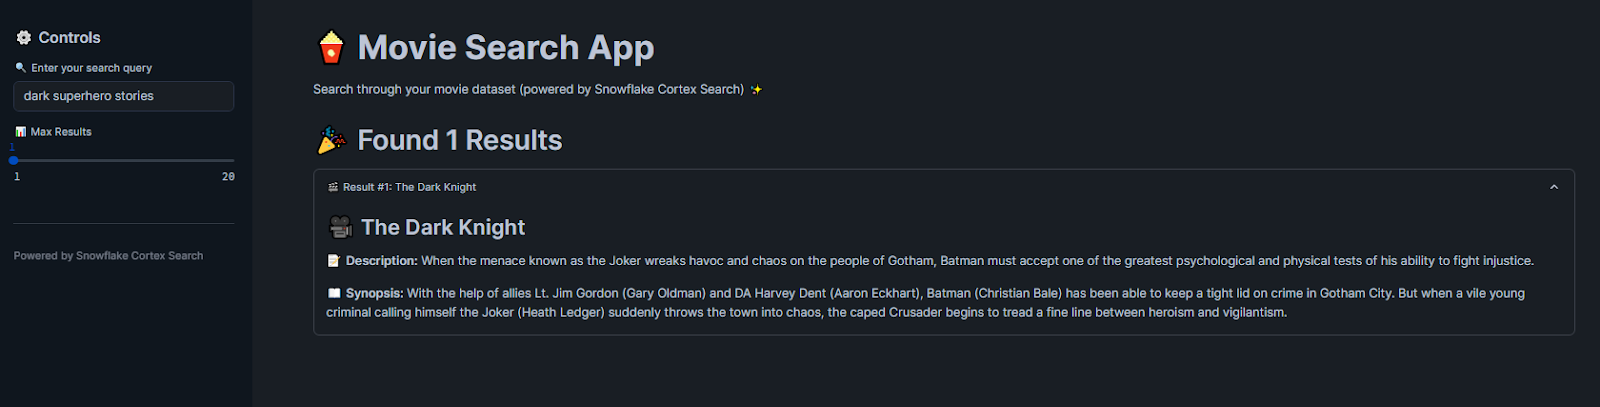
Let’s take another example: if you search for “dark superhero stories”, it will show you “The Dark Knight”, even without exact keyword matches.
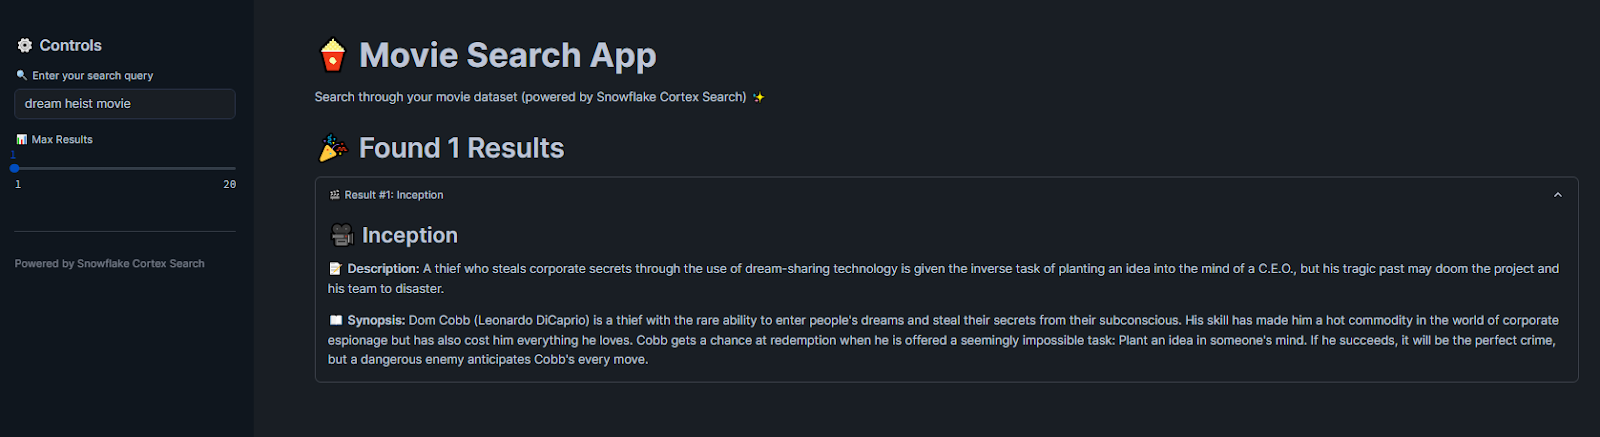
Similarly, if you search for “dream heist movie”, it will show “Inception” based on conceptual understanding rather than literal terms.
Required Snowflake privileges for Snowflake Cortex Search
Make sure users have the right grants to use Snowflake Cortex Search:
> Creating a Service
The role creating the service needs the SNOWFLAKE.CORTEX_USER database role. This special role (shared with Cortex LLM functions) allows the CREATE CORTEX SEARCH SERVICE command.
> Querying a Service
Any user querying the service must have USAGE privilege on the service itself and on its database and schema. For example:
GRANT USAGE ON DATABASE <db> TO ROLE analysts;
GRANT USAGE ON SCHEMA <schema> TO ROLE analysts;
GRANT USAGE ON CORTEX SEARCH SERVICE <service_name> TO ROLE analysts;
> Altering/Suspending
If you want to suspend or resume a service (via ALTER CORTEX SEARCH SERVICE … SUSPEND), the role needs the OPERATE privilege on that service.
Note that, by default, the CORTEX_USER role is granted to PUBLIC, so new users can use it unless you revoke it for tighter security. Always follow your organization’s RBAC policies when granting privileges.
Snowflake Cortex Search Cost Breakdown: Complete Pricing Guide & Optimization
Snowflake Cortex Search Service incurs cost via Warehouse compute for indexing, token embedding charges and GB-month fees for indexed data. Here are the main cost components (for detailed pricing see the Snowflake Service Consumption Table):
Cost Component 1: Warehouse compute for indexing and refresh
Each time the service initializes or refreshes, it runs the source query on a Warehouse. Those credits depend on your Warehouse size and run time. (If no new data, no indexing is triggered, so no cost that cycle).
Cost Component 2: Token embedding charges (EMBED_TEXT Usage)
Every new/changed document’s text gets embedded and Snowflake charges per token embedded. You pay for EMBED_TEXT_768 or EMBED_TEXT_1024 usage. These costs only occur for rows inserted/updated (incrementally). See Vector Embeddings for more on vector embedding costs.
Cost Component 3: Multi-tenant serving layer (GB-month charges)
Snowflake Cortex Search service runs on Snowflake’s multi-tenant serving layer. You pay a monthly rate per GB of indexed (uncompressed) data. This runs continuously while the service is active, even if idle.
Cost Component 4: Snowflake storage for indexed data and materialized tables
The indexed search data (and any materialized table) is stored in your Snowflake account, billed at flat $/TB rate.
Cost Component 5: Cloud Services overhead
Snowflake’s background compute (to detect table changes and schedule refreshes) is billed via the Cloud Services credit bucket. (Snowflake only bills this if it exceeds 10% of your Warehouse costs).
Cost optimization tips
- Use the smallest warehouse that completes indexing in a reasonable time (XSMALL or SMALL often works for typical data volumes)
- Choose an embedding model that matches your accuracy-vs-cost requirements. The default 768-dimensional model is cheaper than the 1024-dimensional multilingual models
- Set a TARGET_LAG that matches your actual freshness requirements. Shorter lags mean more frequent refresh cycles and higher costs
- Index only the text columns you actually need to search
- Monitor usage through Snowflake’s cost dashboards and the ACCOUNT_USAGE.CORTEX_SEARCH_SERVING_USAGE_HISTORY view
Snowflake Cortex Search limitations
Snowflake Cortex Search is powerful, but it has some constraints to be aware of:
Limitation 1: Base table size limit (maximum 100 million rows)
The materialized result of the service’s source query must be under 100 million rows. If your query would yield more, the CREATE CORTEX SEARCH SERVICE will fail. (To index very large datasets, contact Snowflake support to discuss limit increases.)
Limitation 2: Query restrictions in CREATE statement
The SELECT used in CREATE CORTEX SEARCH SERVICE AS (<query>) follows the same rules as Snowflake Dynamic Tables. That means certain expressions (non-deterministic functions, for example) aren’t allowed. See Snowflake Dynamic Table documentation for details on what’s permitted.
Limitation 3: Token context window
When indexing, only the first 512 tokens of each text entry are embedded for vector search. If a document is longer, Cortex Search still includes the full text for keyword search, but anything past 512 tokens won’t affect the semantic vector match. (Snowflake recommends splitting very long texts into smaller chunks for best results).
Limitation 4: No cloning support
Currently, Snowflake Cortex Search Services cannot be cloned using Snowflake’s table/database cloning features.
Limitation 5: Model and regional availability
Not all embedding models are supported in every region. Also, Cortex Search must run in a region that supports the feature. Check the Regional availability chart to be sure your region has the desired models.
Limitation 6: Default 512-Token Context Window for Standard Models
As mentioned above, by default, each model supports 512 tokens except the specialized 8k model. So if you have huge documents, consider pre-chunking or use the -8k model. Even then, Snowflake suggests 512-token chunks for best retrieval accuracy
Limitation 7: Language support varies by model
The default model (snowflake-arctic-embed-m-v1.5) is English-only. If you index non-English text with it, results may suffer. Use a multilingual model for mixed-language data.
Limitation 8: No row-level security (RLS) enforcement
Queries against a Cortex Search service run with the service owner’s rights, bypassing row-level security policies on the underlying tables. This is a meaningful access control gap if your data has fine-grained row-level restrictions. So, plan your security model accordingly.
What is the difference between Snowflake Cortex Search and Cortex Analyst?
Snowflake Cortex Search and Snowflake Cortex Analyst solve different problems, though they’re both part of Snowflake’s AI toolkit:
| Snowflake Cortex Search | Snowflake Cortex Analyst | |
| Full-text search over unstructured text data (documents, logs, pdfs etc.) | Primary Function | Natural language question-answering over structured data (SQL) |
| Text fields in tables or views | Data Type | Columns in relational tables (structured data) |
| Keywords or free-form text; returns relevant document rows | Query Input | Natural language questions (“What were sales last month?”); returns answers |
| List of matching records (text snippets, documents, plus attributes) | Output | Direct answers/insights (with possibly supporting data) |
| Vector embeddings + full-text index + semantic reranker | Tech Stack | LLM-based text-to-SQL engine using semantic models, with Snowflake execution |
| RAG chatbots, enterprise search bars, document retrieval | Usage | Self-service analytics, BI chat assistants, NL-to-SQL queries |
| SQL/JSON API within Snowflake (in-database) | Deployment | REST API integrated into apps; uses LLMs (Mistral/Llama or OpenAI) |
| Credit usage for indexing (Warehouse + Embedding) and serving (GB-mo) | Cost | Credits for LLM inference per query, plus underlying Warehouse usage |
When should you use Snowflake Cortex Search or Snowflake Cortex Analyst?
Choose Cortex Search for:
- Document retrieval and search applications
- RAG implementation for chatbots
- Enterprise knowledge base search
- Content discovery and exploration
Choose Cortex Analyst for:
- Business intelligence and reporting
- Natural language data analysis
- Self-service analytics platforms
- Automated insight generation over structured data
TL;DR: Snowflake Cortex Search is your go-to when you want to search text fields quickly and return data; Cortex Analyst is the service to ask business questions (it generates SQL under the hood) and get answers. Cortex Search does retrieval, while Cortex Analyst does analytics via LLM
Save up to 30% on your Snowflake spend in a few minutes!
Conclusion
And that’s a wrap! Snowflake Cortex Search brings powerful, high-quality search capabilities directly to your data in Snowflake. It combines vector embeddings and keyword lookup and delivers robust search over even messy text without the heavy lifting of building a custom search stack. So if you’re building a RAG-powered chatbot or adding a smart search bar to your app, Snowflake Cortex Search can handle pretty much everything. In the right scenarios, Snowflake Cortex Search can save you weeks of development and tuning while giving you modern search quality in minutes.
In this article, we have covered:
- What Snowflake Cortex Search is and how the three-stage pipeline works
- Which embedding models Cortex Search supports and how to choose one
- A step-by-step SQL guide to create a search service
- A step-by-step Snowsight UI guide for the same
- A complete Streamlit movie search application built on Cortex Search
- The required Snowflake privileges for creating and querying services
- Cost components and how to keep them under control
- Current limitations, including the 100 million-row limit and the lack of cloning support
- The difference between Cortex Search and Cortex Analyst
FAQs
What exactly is Snowflake Cortex Search?
A built-in search engine in Snowflake that combines vector embeddings and keyword matching to run fast, semantic queries over text stored in your tables.
How do I enable change tracking on my table?
Run ALTER TABLE your_table SET CHANGE_TRACKING = TRUE;. This flags new or updated rows so Cortex Search can refresh its index incrementally instead of doing a full re-index each time.
What’s the basic SQL to create a Cortex Search service?
CREATE OR REPLACE CORTEX SEARCH SERVICE <service_name>
	 ON text_column
	 ATTRIBUTES attr1, attr2
	WAREHOUSE = wh_name
	 TARGET_LAG = '1 day'
	 EMBEDDING_MODEL = 'model_name'
	 AS SELECT text_column, attr1, attr2 FROM your_table;=
Which role lets me create a Cortex Search service?
Any role granted SNOWFLAKE.CORTEX_USER can issue CREATE CORTEX SEARCH SERVICE. The newer SNOWFLAKE.CORTEX_EMBED_USER role covers only embedding-related privileges, including service creation with managed embeddings.
What privileges do I need to query a search service?
Grant USAGE on the service plus its database and schema to the relevant role.
Can I change the embedding model after creation?
No. To switch models, drop and recreate the service with a different EMBEDDING_MODEL.
Which embedding models are available?
- snowflake-arctic-embed-m-v1.5 — 768 dimensions, English only, default
- snowflake-arctic-embed-l-v2.0 — 1,024 dimensions, multilingual
- snowflake-arctic-embed-l-v2.0-8k — 1,024 dimensions, 8,192-token context, multilingual
- voyage-multilingual-2 — 1,024 dimensions, multilingual (proprietary model from VoyageAI)
- Custom pre-computed embeddings are also supported as of March 2026
How does Cortex Search incur cost?
Through warehouse compute for indexing, token embedding charges, GB-month fees for indexed data, standard Snowflake storage and a small Cloud Services overhead.
Is there a row-count limit?
Yes. Service creation fails if the AS SELECT returns more than 100 million rows.
Can I clone or replicate a Cortex Search service?
Cloning is not supported. Replication became generally available in April 2026—you can now replicate services to other accounts in the same organization using replication or failover groups.
What happens if my text exceeds the model’s token window?
Text beyond the context window gets truncated for embedding (and therefore won’t influence vector search rankings), but keyword search still sees the full text.
Does Cortex Search respect row-level security?
No. Queries run with the service owner’s rights, bypassing RLS on underlying tables. Design your access model accordingly.
How do I monitor Cortex Search usage and costs?
Use ACCOUNT_USAGE.CORTEX_SEARCH_SERVING_USAGE_HISTORY for serving credits (GB-month). The INFORMATION_SCHEMA.CORTEX_SEARCH_SERVICES view (or its ACCOUNT_USAGE equivalent) lists active services and their indexed data sizes. The Snowflake Service Consumption Table shows current per-model pricing.