AI coding agents are now available everywhere. GitHub Copilot, Cursor, OpenAI’s Codex and Amazon Q Developer are just a few examples. These tools are good at writing and completing code, handling application logic and performing various coding-related tasks. But they have trouble working in the Snowflake environment. Third-party tools often don’t integrate well with Snowflake’s security and metadata services.
To solve this problem, Snowflake introduced its own coding agent, Snowflake Cortex Code. Announced at Snowflake BUILD, Cortex Code knows the Snowflake environment well. It knows well about your databases, schemas, active warehouses, semantic models and governance rules. This knowledge allows it to assist with SQL, Python and dbt projects without making errors like using incorrect table names or violating access controls.
Snowflake Cortex Code is available through two interfaces. You can use Snowflake Cortex Code in Snowsight, which is currently in Open Preview and is free. The Cortex Code command line interface (CLI) is also available in GA on macOS and Linux. It integrates easily with VS Code, Cursor and any terminal-capable editor.
In this article, we will cover what Snowflake Cortex Code is, how it works, how it is different from other Snowflake AI features and exactly how to enable and use it in Snowflake Snowsight and via the CLI.
What is Snowflake Cortex Code?
Snowflake Cortex Code is Snowflake’s own AI coding agent. It is a fully managed, Snowflake native assistant that translates natural language prompts into executable SQL, Python, dbt workflows, Streamlit apps and various other administrative actions. It does not just suggest code fragments. It plans multi-step tasks, executes them against your actual Snowflake environment and uses your account-level context (schemas, roles, semantic models, metadata) to make sure the output is accurate and relevant to your specific setup.
Snowflake Cortex Code is a part of Snowflake’s new Cortex AI suite, which also includes:
Snowflake Cortex Code is the developer-facing component of the suite.
Snowflake Cortex Code is available to all commercial Snowflake accounts with cross-region inference enabled. Government cloud, virtual private Snowflake (VPS) and Sovereign cloud deployments are not supported now. If your account previously opted out of (or disabled) Snowflake Copilot (legacy), Snowflake Cortex Code will also be disabled by default. You will need to contact your Snowflake account team to re-enable it.
Snowflake Cortex Code is accessible via two channels:
- In-platform (Snowflake Snowsight/Snowflake Workspaces) → embedded in the Snowsight UI
- Local CLI (Terminal/IDE) → runs in your local terminal; works inside VS Code, Cursor, or any shell
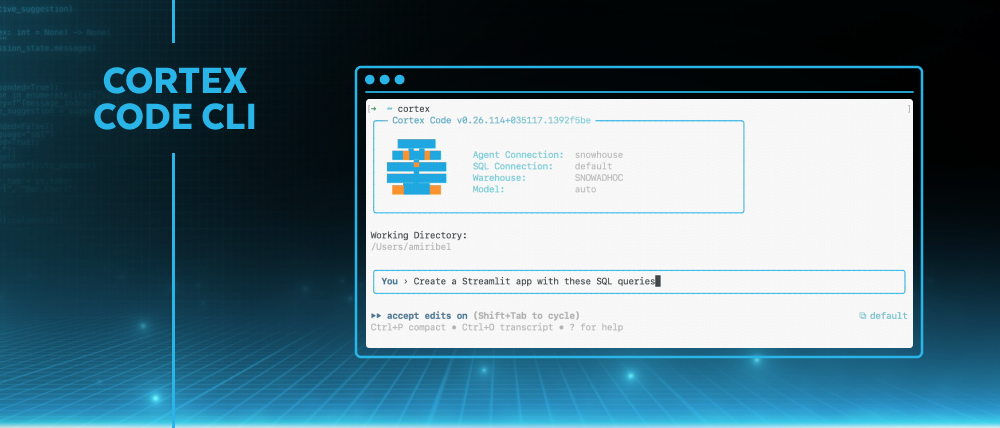
Figure 1: Snowflake Cortex Code (Source: Snowflake)
Snowflake Cortex Code is a Snowflake native tool. It operates on Snowflake’s managed Cortex infrastructure, eliminating the need for a public third-part AI agents API. This allows it to access your account metadata and object details. When running queries or code, Cortex Code functions within your current security framework. It sends commands to your Snowflake warehouses or serverless compute. Due to this, everything is secure since Cortex Code can only access what you already have permission to see and use.
Architecture and how Snowflake Cortex Code accesses context
Snowflake Cortex Code can seem mysterious but is actually pretty straightforward. Once you understand how various parts interact, you will be able to use it more effectively.
Snowflake Cortex Code architecture is straightforward. Here is a detailed look at what goes on inside the Snowflake Cortex code.
The runtime environment
Snowflake Cortex Code runs inside Snowflake Cortex, Snowflake’s fully managed AI infrastructure. It does not hand off your queries or data to third-party model infrastructure outside your Snowflake environment. All models execute under Snowflake’s security and governance umbrella.
When you submit a prompt, Snowflake Cortex Code takes action in a few ways:
- It pulls in metadata from your account and specific object-level context, like schemas and tables
- It reads your current Snowflake workspace context; the SQL file or Snowflake notebook you have open becomes the implicit background context
- If needed, it will execute SQL or Python commands on your authorized warehouses and objects
The agent follows a simple workflow: it figures out what you mean, creates a plan, gathers the right tools and context, takes action and summarizes the results. The agent remembers all this context during the session, so if you ask a follow-up question, you do not have to repeat yourself.
Something to clarify: Snowflake Cortex Code gets its “understanding” of your data from metadata. It does not scan the actual rows, but instead looks at table definitions, column names, tags, lineage, usage stats and semantic model specs. When it needs to get to the row-level data to answer a question, it sends a query to your warehouse, gets the results back and uses them in its response. The agent never sends your actual data to outside model providers. Inputs and outputs are classified based on Snowflake’s AI Terms and Acceptable Use Policy.
The security model
Snowflake Cortex Code really sets itself apart here. Most AI coding tools do not care about your data governance rules. They just spit out code without considering your setup. Cortex Code is different, it works within your secure perimeter, respecting all the safeguards and security measures you’ve put up.
- Full Snowflake RBAC enforcement — Snowflake Cortex Code can only access and act on what your active role permits. If your role can’t read a table, Cortex Code cannot read it either.
- Column-level masking policies respected — Sensitive columns that are masked for your role remain masked. It won’t accidentally expose sensitive columns to the LLM in unmasked form.
- Row access policies respected — Filtered rows stay filtered. If a row access policy filters rows from your session, those rows are invisible to Snowflake Cortex Code too.
- Object scope limitation — The agent operates only within the scope of objects accessible to the current session role. It can’t reach beyond the objects your privileges cover.
- OS-level sandboxing (CLI) — Snowflake Cortex Code CLI operates within sandboxed boundaries and includes a three-tier approval system with automatic risk assessment, which categorizes actions before they’re executed.
- No data leakage to external providers — Your data stays in Snowflake. Model inference is Snowflake-managed. Your data stays in your environment.
The security model is only as good as your Snowflake RBAC configuration. If your team has been lazy about role scoping, Snowflake Cortex Code will have broad access because your role does. Tighten your access control before you expand AI tooling across your organization.
Where code actually executes
It’s important to be clear here. The phrase “AI runs your code” might sound scary. Here’s what’s actually going on with Snowflake Cortex Code:
- Generated SQL runs on your virtual warehouses (or serverless compute, depending on object type). And do not worry, the billing and compute rules are the same as if you had written the query from scratch.
- CLI conversations run locally. Session IDs and conversation metadata may be stored locally.
- Cortex inference (the model calls) runs on Snowflake’s Cortex AI infrastructure.
TL; DR: Snowflake Cortex Code is a context-aware Snowflake agent. It plans a sequence of actions (queries, code edits, calls to Snowflake AI functions) and then executes them within your account. All inference happens on Snowflake’s Cortex nodes, and all queries run on your Snowflake compute, so your data never leaves Snowflake.
Four core pillars of Snowflake Cortex Code
Snowflake Cortex Code is built around four core principles:
1) Intelligence (knows Snowflake)
Snowflake Cortex Code is a built-in expert on Snowflake. Cortex Code uses agentic orchestration. It interprets intent, creates a plan, selects tools and executes steps autonomously. It doesn’t just respond to a single prompt; it maintains context across a session and handles multi-step workflows. On top of that, it also understands Snowflake’s features and terminology (databases, schemas, tables, data types, views, semantic models). It learns about your environment (schema, tags, pipelines) so it can write valid, efficient code.
2) Relevance (context-aware)
Context awareness is built in. Snowflake Cortex Code knows which file you have opened, which role you are using, what objects exist in your account and what your semantic models say. It never treats each request in isolation. Responses are grounded in your environment, not generic Snowflake knowledge alone.
3) Integration (works with your stack)
Snowflake Cortex Code fits into your existing workflow and tools. It handles dbt projects, Streamlit apps, SQL/Python notebooks, etc. It knows how to use your code files directly (via the CLI) or route to the right UI surface. It can orchestrate multi-step pipelines (generate data transformations, tests and docs for a dbt project), work with version control (via bash/git in CLI) and even pull in external tools.
4) Governance (secure by design)
From day one, the Snowflake Cortex Code was built with enterprise governance in mind. Everything Cortex Code does is governed by the same controls as everything else in your account. It uses the Snowflake RBAC model, so it only sees/acts on what your role permits. All outputs stick to row-level security and masking policies. Every action (even what it writes to your DB) happens under your account’s privileges. There is no governance bypass, no shadow execution and no access to data your role cannot touch. For regulated environments, that means Snowflake Cortex Code is safe to try on real data.
Next up, we will dive into the main core features of Snowflake Cortex Code.
Power of Snowflake Cortex Code—features and use cases
Snowflake Cortex Code offers a bunch of AI-powered capabilities for data workflows. The most notable ones are:
- Natural language ⇒ SQL/Python — Simply describe what you want to do. You just have to describe what you want in plain natural language, and Snowflake Cortex Code writes the query or script. The difference from a generic assistant is that it can reference your actual tables by name, apply your schema conventions and generate queries that are accurate for your data model; not a generic approximation.
- Context awareness — The assistant leverages your environment context. In Snowflake workspaces, it knows which file or cell you are editing. In CLI, you can @-inject code files or #-inject tables. Because it “sees” your Snowflake catalog and Snowflake workspace content, it can write more accurate code and answer questions grounded in your actual data.
- Code refactoring and explanation — Snowflake Cortex Code can not only generate code but also improve/fix it. You can ask it to optimize a slow query, fix bugs, or add new logic. In Snowflake Snowsight, it can auto-format SQL or add missing JOINs. You can highlight existing SQL and ask for quick actions (formatting, explain, or “Fix” on error results). It can even comment your code or convert between SQL and other file types. In short, it’s a conversational IDE assistant.
- Automatic error fixing — If a query fails, Snowflake Snowsight results grid shows a “Fix” button. Clicking this will ask Snowflake Cortex Code to diagnose the error and suggest a correction.
- Diff Review (Snowsight only) — When Cortex Code suggests code changes in Snowflake workspaces, it shows them in a side-by-side Diff View. Insertions and deletions are highlighted, so you can audit exactly what the agent wants to do before you accept. The Diff View works for any code edits Cortex Code applies, making it safe to iterate on suggestions.
- Multi-step orchestration — This is where the “agentic” label becomes true. Snowflake Cortex Code plans and executes multi-step tasks intelligently. You might ask it to build a Streamlit dashboard on a dataset. It will generate code, create new files, fetch sample data and even assemble the layout. Each step is orchestrated by the agent, so you do not have to manually carry snippets between tools. It can also chain actions, such as creating a new Snowflake notebook, adding code cells, plotting charts and explaining results, all without interrupting your workflow.
- Local file and tool access (CLI) — Snowflake Cortex Code CLI can read and write local project files and run command-line tools. This makes it practical for managing dbt projects, generating or modifying Streamlit apps, running git operations and orchestrating end-to-end workflows that span your repo and your Snowflake account. The Coretex Code CLI also lets you run shell commands with ! directly inside a Cortex chat; the output feeds back into the agent for analysis. This makes it easy to integrate your normal dev tools.
- Agent customization (AGENTS.md) — You can create an AGENTS.md file in your project root with custom instructions or guidelines. Snowflake Cortex Code will automatically include the contents of AGENTS.md in every conversation context.
- Custom Agent Skills ($ syntax) — Snowflake Cortex Code CLI supports Agent Skills, which are like plugins for common tasks. Skills are invoked with a $ or via the /skill command. This lets you build repeatable workflows that other team members can use without knowing the internals.
- Web search integration (optional) — You can enable a web search feature, so Snowflake Cortex Code can include relevant web results in its reasoning. This is especially useful when you want it to reference current Snowflake documentation, external datasets, or industry context alongside your internal data. Web search is off by default and must be explicitly enabled (see the setup guide below).
- Semantic model (Snowflake Cortex Analyst) support — If you are using Snowflake Cortex Analyst with semantic views or YAML-based semantic models, Snowflake Cortex Code can validate the model, identify ambiguities or inconsistencies and help you debug why a natural language question isn’t returning the right SQL. This is useful for teams managing complex semantic layers. A 500-line semantic view definition is extremely hard to audit manually. Snowflake Cortex Code can analyze the whole thing, generate an entity-relationship diagram, flag conflicting metric definitions and suggest clarifications.
- dbt project automation — There is a powerful agentic workflow for dbt on Snowflake. Snowflake Cortex Code can automatically scaffold staging models from raw data, build full dbt DAGs, add data tests and generate documentation.
- Streamlit app generation — You can easily describe a dashboard you want, and Snowflake Cortex Code will generate a Streamlit app against your specified data source, including filters, charts and interactive elements. Combine this with Snowpark Container Services for deployment within Snowflake.
- Model Context Protocol support — Snowflake Cortex Code CLI supports the model context protocol (MCP), which means you can configure external MCP servers to extend Cortex Code with additional tools and data sources beyond its built-in Snowflake skills.
- Plan Mode (CLI) — In the Snowflake Cortex Code CLI, you can toggle /plan mode. In this mode, the agent pauses before executing any action and presents a “plan” of what it intends to do. It will ask you to confirm each step, which is great for complex or risky tasks, so you can sanity-check everything before it changes your system.
Pricing and cost structure of Snowflake Cortex Code
Snowflake Cortex Code is priced on a pay-as-you-go basis. In practice, that means using Cortex Code CLI will consume Snowflake credits per token of text processed, while Snowflake Snowsight (web UI) version is free during preview. In short, we only pay for what the AI does, not a flat fee. The key thing to know is that each question you ask or code you generate uses tokens, and Snowflake bills credits per million input/output tokens. Snowflake Cortex Code in Snowflake Snowsight (the in-browser agent) is currently free, but once it is generally available, it will also be billed similarly.
Aside from token charges, Snowflake Cortex Code still triggers regular Snowflake compute. Any metadata or SQL operations the agent runs (like DESCRIBE TABLE, querying SNOWFLAKE.ACCOUNT_USAGE). consume your normal warehouse and Cloud Services credits. In fact, Snowflake notes that Cortex Code “charges standard Cloud Services compute costs for accessing metadata” – basically, your existing query costs. But, as of early 2026, Snowflake is not charging extra fees for the Snowflake Cortex Code feature itself. The only “new” charges on your invoice come from the LLM calls (the token usage). In other words, you will see Cortex Code usage under the AI_SERVICES category on your bill (along with any warehouse credits spent on its queries).
Snowflake publishes the exact rates in its Service Consumption Table. Snowflake Cortex Code currently uses Anthropic’s Claude models, each with its own credit-per-token rate. The table of prices (credits per 1 million tokens) includes:
Table 1: Credit Consumption Rates for Snowflake AI Features / Snowflake Cortex Code (Per 1M Tokens)
| Model | Input (Credits/1M tokens) | Output (Credits/1M tokens) | Cache Write | Cache Read |
| claude-4-sonnet | 1.50 | 7.50 | 1.88 | 0.15 |
| claude-opus-4-5 | 2.75 | 13.75 | 3.44 | 0.28 |
| claude-opus-4-6 | 2.75 | 13.75 | 3.44 | 0.28 |
| claude-sonnet-4-5 | 1.65 | 8.25 | 2.07 | 0.17 |
So, let’s say you send 1 million input tokens to the Claude-4-sonnet model; it costs 1.50 credits, and receiving 1 million output tokens costs 7.50 credits. A token is roughly a few characters of text, so typical prompts/responses are a small fraction of a million tokens. Writing to or reading from the agent’s long-term cache (memory) also uses credits (as shown above). Model choice matters: the Opus models are more expensive per token than Sonnet. If one Snowflake credit is ~$3, then 1 million output tokens with Claude-Opus 4.5 would cost about ~$40. A few thousand tokens (a typical short query and answer) would be only a few cents.
Keep in mind the total Cortex Code cost is (AI token credits + normal compute credits). In practice, you should track your AI_SERVICES credit usage in Snowflake’s billing console – this will capture the Cortex Code token fees. Your regular warehouse and Cloud Services usage for any queries the agent runs will show up under the normal compute categories.
TL; DR: Snowflake Cortex Code CLI is metered by token consumption, and Snowflake Snowsight use is free for now.
Snowflake Intelligence vs Snowflake Cortex Code
Snowflake Intelligence and Snowflake Cortex Code are frequently confused because both involve natural language, and both live inside the Cortex ecosystem. They serve different users and solve different problems. Here are the key differences between them.
Table 2: Difference between Snowflake Intelligence vs Snowflake Cortex Code
|
Snowflake Intelligence |
🔮 |
Snowflake Cortex Code |
| Conversational BI agent for business analysts. Ask complex data questions and get answers with charts or explanations. Supports rich queries over structured and unstructured data in one chat | Primary use | AI-assisted development workflow – helps data engineers and analysts author code, explore data and manage accounts. Generates, modifies and explains SQL/Python code in Snowflake, and can automate admin tasks |
| Business analysts, non-technical users, executives | Primary user | Data engineers, analytics engineers, data scientists, DBAs |
| Insights, answers, charts, recommendations | Output type | SQL, Python, dbt models, Streamlit apps, agent code |
| Snowflake Snowsight conversational UI | Primary interface | Snowflake Snowsight panel + local CLI |
| Natural language Q&A over governed data | Interaction mode | Agentic coding, code generation, refactoring and debugging |
| Minimal—answers and visualizations | Code output | SQL, Python, dbt models, Streamlit apps, YAML semantic models |
| No | Local file access | Yes (via Snowflake Cortex Code CLI) |
| No | Code Diff View | Yes (Snowsight) |
| No | dbt/pipeline automation | Yes |
| RBAC + semantic model | Governance scope | Full RBAC + masking + row access + catalog |
| Uses Snowflake’s consumption model. There is no separate “seat” or add-on fee – you pay for AI service usage by the credit. Behind the scenes, each intelligence request incurs Cortex Analyst or Cortex Search credits | Pricing/licensing | Snowflake Snowsight (UI) version is free for now (no charge until announced otherwise). Cortex Code CLI (local) is charged per AI token consumption. You also pay normal Snowflake compute/storage fees. |
Snowflake Cortex Code vs Snowflake Copilot (legacy Copilot)
Snowflake Copilot was the first AI assistant in Snowflake Snowsight (a basic chat panel for SQL help). It is now deprecated and replaced by the Snowflake Cortex Code. Here are the differences:
Table 3: Difference between Snowflake Cortex Code vs Snowflake Copilot (legacy Copilot)
|
Snowflake Cortex Code |
🔮 |
Snowflake Copilot |
| AI-assisted development workflow. It helps data engineers and analysts to write code, explore data and manage accounts. Generates, modifies and explains SQL/Python code in Snowflake, and can automate admin tasks |
Primary use |
Earlier SQL assistant in Snowflake Snowsight – provided basic SQL help and docs lookup. Focused on guiding new users with simple query suggestions and UI tips |
| Built into the Snowflake developer experience. Snowflake Snowsight Workspaces (web) shows a Cortex Code icon in code/Snowflake notebook files, and there’s also a Cortex Code CLI for local dev environments. It plugs into VS Code or terminals, connecting to your Snowflake account | Integration/interface | Embedded in Snowflake Snowsight: you use the Ask Snowflake Copilot panel in Snowflake worksheets and Snowflake notebooks. It was a sidebar assistant for SQL and basic help |
| Supports data engineering and ML workflows end-to-end. Use it to write or refactor queries, build dbt transformations, spin up notebooks, debug pipelines and even handle admin queries | Workflows/tasks | Covered basic data analysis workflows: natural-language to SQL, insights from data and simple UI help. It could scan available tables and suggest SQL or plot snippets, but did not write complex notebooks or handle rich documents |
| Active (CLI: GA; Snowflake Snowsight: Open Preview) | Status | Deprecated |
| Full CLI with local file access | CLI support | None |
| Yes | dbt support | No |
| Yes (CLI) | MCP integration | No |
| Yes (CLI) | Plan mode | No |
| Yes (Snowsight) | Diff View | No |
| Agent Skills system | ||
| Yes (requires admin enablement) | Web search | No |
| Advanced code generation and editing – can translate NL prompts into SQL/Python code, insert or remove lines (with a Diff View for review) and explain existing scripts. It also integrates with Git, bash, or dbt commands in the CLI. Customizable via an AGENTS.md file. Everything runs under Snowflake security (no secret leakage) | Main key features
|
Basic SQL suggestions and answers – it answered simple how-to questions about your data, generated or improved single SQL queries and explained Snowflake features. It was strictly confined to your accessible tables and had minimal context beyond that. Its interaction was more limited than Cortex Code or Intelligence |
| Snowflake Snowsight (UI) version is free for now (no charge until announced otherwise). The Cortex Code CLI (local) is charged per AI token consumption (see Snowflake’s Service Consumption Table). You also pay normal Snowflake compute/storage fees. | Pricing/licensing | Snowflake Copilot was free to use for all eligible Snowflake customers. It ran on Snowflake’s managed Cortex AI service behind the scenes, but users saw no extra billing line. |
TL; DR: Snowflake Copilot was an early, simpler chat helper for SQL. Snowflake Cortex Code is its powerful replacement: a full coding agent that runs in Snowflake workspaces and the CLI. (Note: if an account had Snowflake Copilot disabled, Cortex Code will also be disabled for that account
Step-by-step guide to set up and configure Snowflake Cortex Code (via Snowsight)
Let us dive right into the main part of the article. Here, we will set up and configure Snowflake Cortex Code from scratch directly within the Snowflake Snowsight web interface.
Prerequisites and setups:
Here is what you will need to have ready before getting started.
- A Commercial Snowflake account (non-Government, non-Sovereign, non-VPS) with Cortex AI enabled.
- A Snowflake user with access to Snowflake Snowsight (the web UI).
- ACCOUNTADMIN role access for enabling cross-region inference and web search
- Cross-region inference enabled on your account (Snowflake Cortex Code won’t function without this)
- Two specific database roles granted to your user’s role:
- SNOWFLAKE.CORTEX_USER
- SNOWFLAKE.COPILOT_USER
⚠️ Important (Legacy Copilot Accounts – If your account had Copilot (legacy) disabled, Snowflake will also disable Cortex Code on that account, so ask your admin to re-enable it if needed.
Step 1—Log in to Snowflake Snowsight
Open a browser and navigate to your Snowflake account URL (https://<…..>.snowflakecomputing.com) and log in with your Snowflake credentials. Make sure you are using an account in the commercial tier (not a government or VPS deployment).
Step 2—Enable cross-region inference (ACCOUNTADMIN required)
Cross-region inference is a Snowflake account-level parameter that permits the Cortex AI service to route inference requests to whichever Snowflake cloud region hosts the requested model, rather than restricting requests to your account’s home region. This is a hard requirement for Snowflake Cortex Code.
If you haven’t already done this as part of the prerequisites, run this SQL as ACCOUNTADMIN to turn on cross-region AI model access:
ALTER ACCOUNT SET CORTEX_ENABLED_CROSS_REGION = 'ANY_REGION';
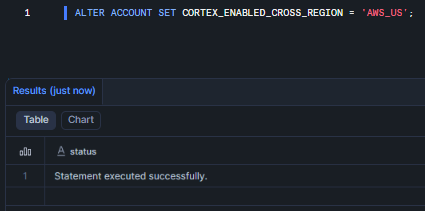
Figure 2: Executing the ALTER ACCOUNT command to enable global cross-region inference routing—Snowflake Cortex Code
As you can see, this single command lets Snowflake route Cortex Code requests to any available cloud region (ANY_REGION) so you get access to top models like Claude Sonnet or Opus. You can also use a specific region, like:
- AWS_US (AWS US regions. It is recommended for Claude Sonnet 4.5 and above)
- AWS_EU (AWS EU regions)
- AWS_APJ (AWS Asia-Pacific/Japan regions)
Replace ANY_REGION with the identifier for the target region if needed. Once this is run, Snowflake will handle model routing automatically. No need to restart anything; the change is almost immediate.
Step 3—Grant the required database role to your user role (if not done)
Snowflake Cortex Code access in Snowflake Snowsight is governed by two Snowflake-managed database roles. These roles are defined within the built-in SNOWFLAKE database and must be granted to the Snowflake role that your user will be operating under. The two required roles are:
- SNOWFLAKE.CORTEX_USER
- SNOWFLAKE.COPILOT_USER
The recommended approach is to create a dedicated role for Cortex Code access, grant the required database roles to it and then assign that role to the relevant users. Perform the following steps as ACCOUNTADMIN or SECURITYADMIN:
Create a new role to serve as the Cortex Code access role.
CREATE ROLE IF NOT EXISTS cortex_code_role;
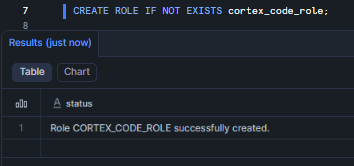
Figure 3: Creating a new custom role specifically for Snowflake Cortex Code usage
Once the role is created, now grant it. Grant both Snowflake-managed database roles to cortex_code_role. The GRANT DATABASE ROLE syntax (not GRANT ROLE) is required because SNOWFLAKE.CORTEX_USER and SNOWFLAKE.COPILOT_USER are database-level roles defined within the SNOWFLAKE shared database, not an account-level roles:
GRANT DATABASE ROLE SNOWFLAKE.CORTEX_USER   TO ROLE cortex_code_role;

GRANT DATABASE ROLE SNOWFLAKE.COPILOT_USER  TO ROLE cortex_code_role;
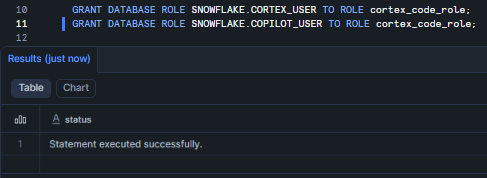
Figure 4: Granting the SNOWFLAKE system database roles to the custom developer role—Snowflake Cortex Code
Assign the cortex_code_role to the Snowflake user who will be using Snowflake Cortex Code. Replace <username> with the actual Snowflake login name:
GRANT ROLE cortex_code_role TO USER <username>;
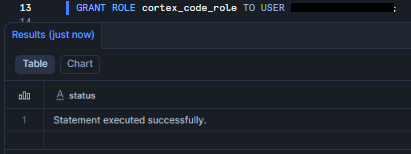
Figure 5: Assigning the fully configured cortex_code_role to the target user account—Snowflake Cortex Code
Now switch to the role that you just created:
USE ROLE cortex_code_role;
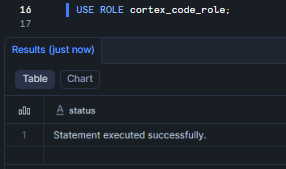
Figure 6: Switching the active session context to the newly created cortex_code_role—Snowflake Cortex Code
After running these, verify your session’s current role includes those roles (for example, via SHOW ROLES;).
Step 4—Enable web search (ACCOUNTADMIN)
Snowflake Cortex Code can optionally use real-time web search as a tool during inference, which significantly improves the quality of responses for questions involving recently released features, third-party library documentation, or external data context not available in your Snowflake environment. Web search is an account-level toggle that must be enabled by an ACCOUNTADMIN. It does not require any per-user configuration once enabled.
To enable web search:
- Log in to Snowflake Snowsight with a user whose active role is ACCOUNTADMIN
- In the left navigation pane, select Admin > AI & ML > Agents > Settings
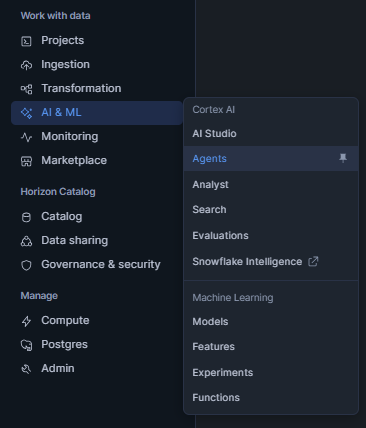
Figure 7: Navigating to the AI & ML settings menu within Snowflake Snowsight Administration panel—Snowflake Cortex Code
- On the Settings page, locate the Web Search toggle and set it to Enabled

Figure 8: Enabling the Web Search capability in the Cortex settings—Snowflake Cortex Code
Once web search is enabled at the account level, all users with the Cortex Code access roles will benefit from it automatically.
Step 5—Open a Snowflake workspace and access the Snowflake Cortex Code panel
In the Snowflake Snowsight left navigation pane, select Projects > Workspaces. Open an existing Snowflake workspace that contains one or more SQL files or create a new one with a new SQL worksheet.
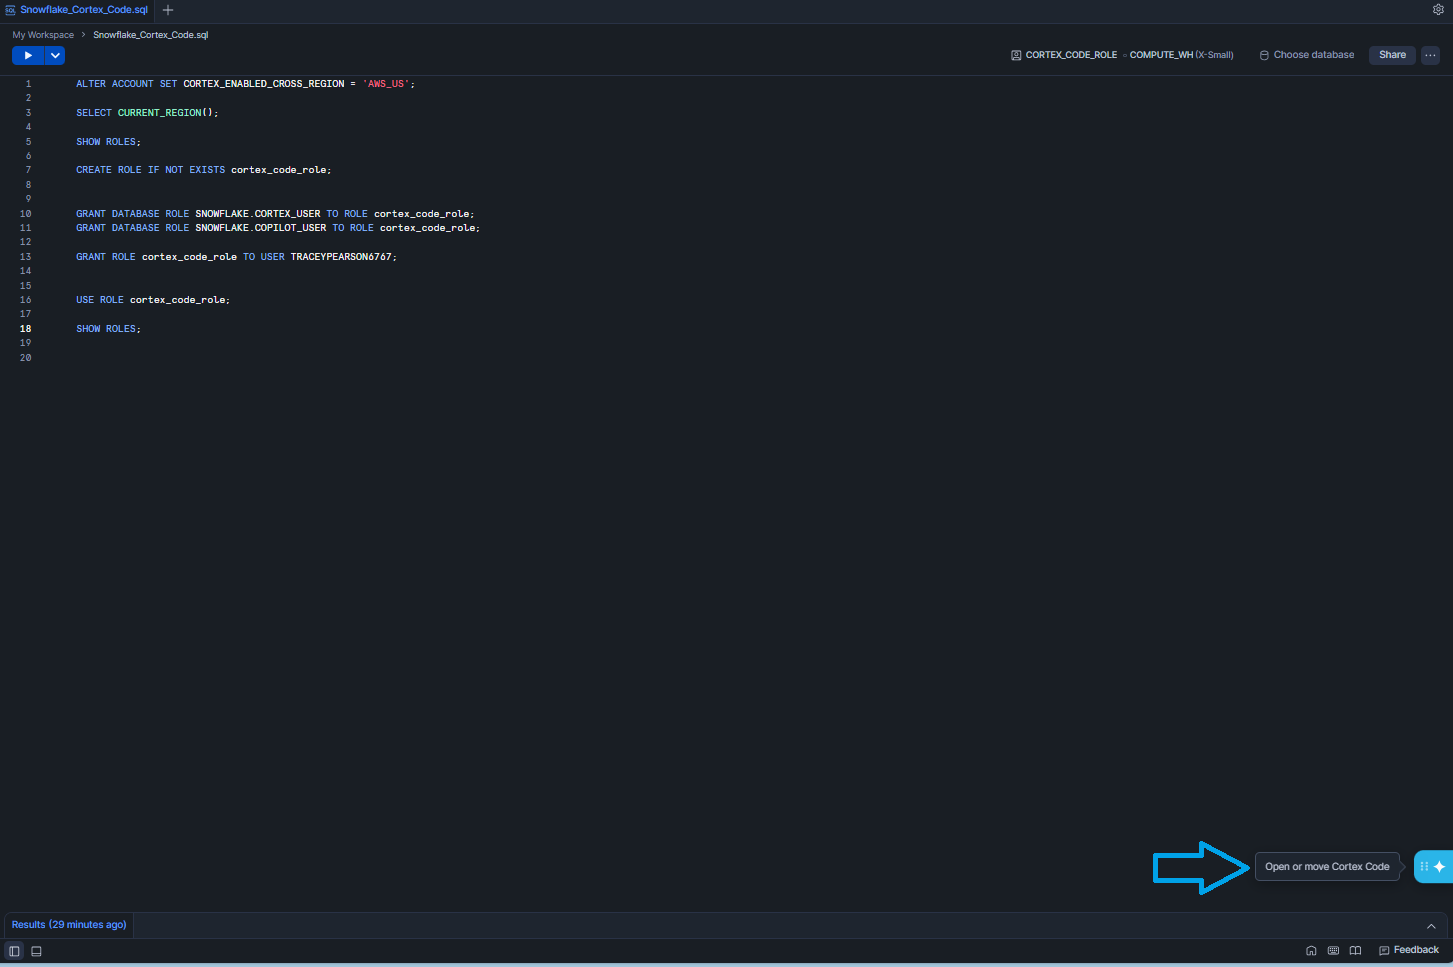
Figure 9: Locating the Snowflake Cortex Code floating action button in the bottom-right of the worksheet
Once inside the Snowflake workspace, look for the Snowflake Cortex Code icon (a star ✦ icon) located in the lower-right corner of Snowflake workspace editor area.
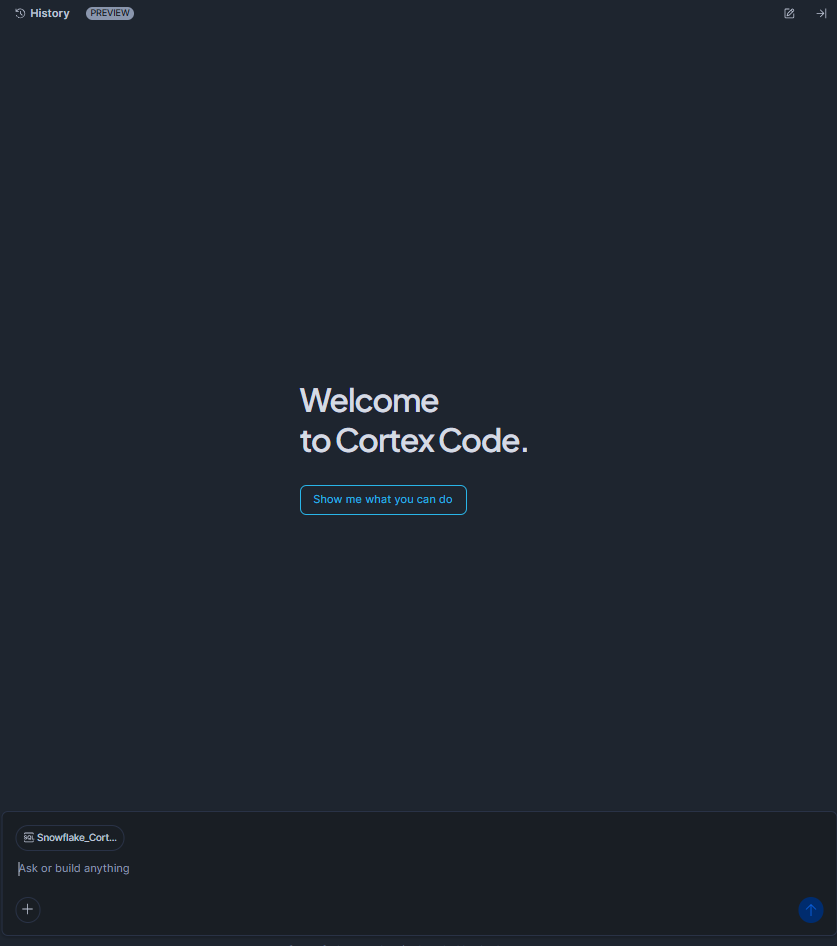
Figure 10: Snowflake Cortex Code side panel expanding next to the SQL editor
Click the star ✦ icon. Snowflake Cortex Code panel will slide open on the right side of the Snowflake workspace, like a chat sidebar. It contains a message history area at the top and a text input box at the bottom.
If the icon is not visible, confirm that the COPILOT_USER and CORTEX_USER roles are properly granted and that cross-region inference is enabled.
Step 6—Submit your prompt
Now that you have your Snowflake Cortex Code panel open, start interacting with the AI assistant. Click inside the message input box at the bottom of the panel and type a natural-language prompt. Press Enter or click the send icon to submit. For best results, include fully qualified object names (database.schema.table) and sufficient context about what you want to achieve.
The following two examples show the range of tasks Snowflake Cortex Code can handle.
Example prompt 1 – What databases do I have access to?
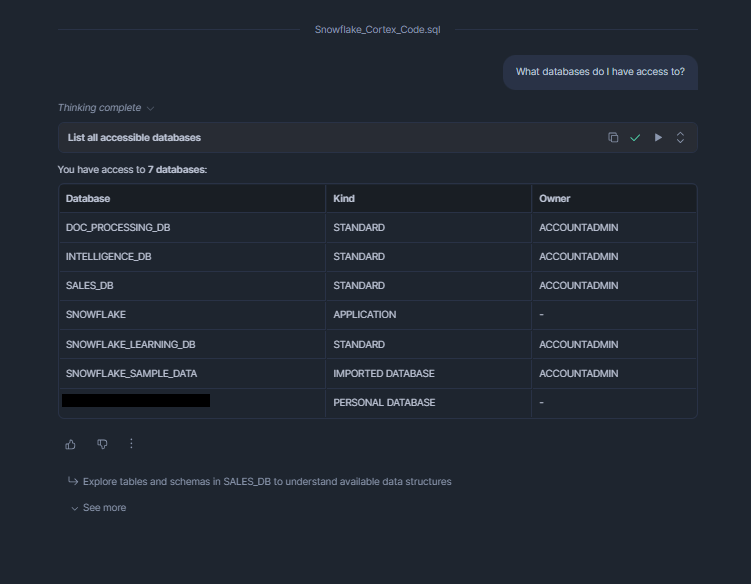
Figure 11: Submitting a natural language question to the Cortex Code agent—Snowflake Cortex Code
Example prompt 2 – Explain all the code and logic in the current SQL file I have open
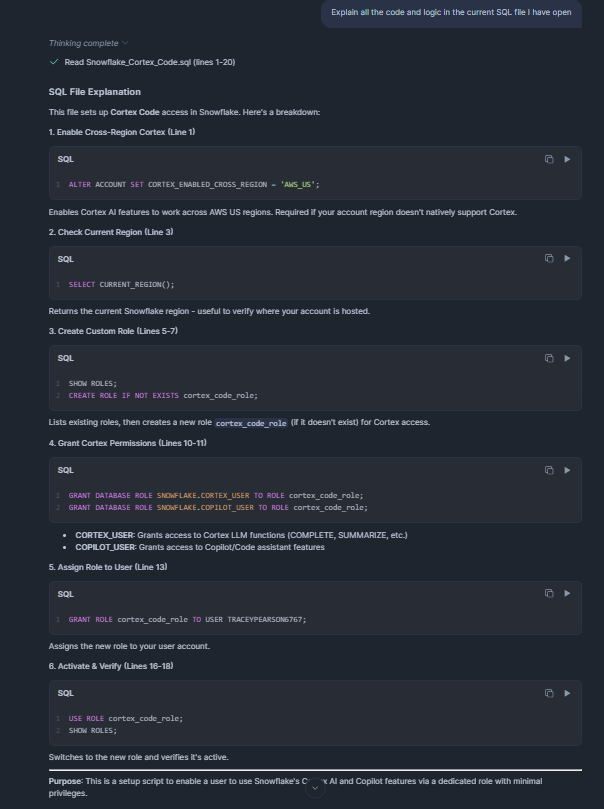
Figure 12: Asking Snowflake Cortex Code to analyze and explain the SQL code currently visible in the editor
Snowflake Cortex Code follows a multi-stage reasoning process to respond to each prompt: it parses the user’s intent, plans the sequence of actions needed, retrieves relevant context from the open file and your Snowflake session environment and synthesises a response, all within a few seconds.
Step 7—Review AI-Suggested changes
If your prompt involves modifying or generating SQL code, Snowflake Cortex Code may provide you a side-by-side Diff View within the panel (or inline in the editor), clearly distinguishing proposed additions from removals using standard diff colouring:
- Insertions (new lines) are highlighted in green
- Deletions (removed lines) are highlighted in red
- Unchanged context lines are shown without highlighting for reference
Carefully review this Diff View. The UI will usually show a checkbox or “Apply” button to accept the changes. Check out the differences to make sure the logic and syntax are correct.
Note: Snowflake Cortex Code will not change your code without confirmation.
Don’t skip this step, especially for anything touching production workloads.
Step 8—Execute SQL generated by Snowflake Cortex Code
Once you are happy with the changes, apply them. The updated SQL will now be in your worksheet. You can then run it as normal in Snowflake Snowsight (for example, by clicking the “Run” button or pressing Shift+Enter). Snowflake Cortex Code generates the SQL for you, but you still execute it in your Snowflake environment. If your prompt asks for a new query (rather than modifying an existing one), simply copy the generated SQL from the panel into a worksheet and run it.
Step 9—Use follow-up prompts to refine and iterate
Snowflake Cortex Code maintains context across the session. The conversation does not end after one query. Cortex Code remembers context in your Snowflake workspace. You can follow up with questions, request modifications, add conditions, or ask it to explain what the generated SQL does. Each turn builds on the previous one. You do not have to start over every time.
Use this iterative flow to improve code, convert between SQL and Python (for Snowflake notebooks), or even have Cortex Code perform administrative insights (like showing credit usage or lineage) all within Snowflake Snowsight.
At this point, Snowflake Cortex Code is fully enabled and configured within your Snowsight environment. You have enabled cross-region inference, granted the necessary roles and know how to open the assistant panel. From here, you can enjoy an interactive coding assistant that can boost productivity and reduce manual effort.
Step-by-step guide to set up and configure Snowflake Cortex Code (via Snowflake Cortex Code CLI)
For power users or those who prefer a local development environment, Snowflake offers the Cortex Code CLI. It runs in your terminal and can interact with Snowflake directly. Here are the steps to install and configure it:
Prerequisites and setups:
Here is what you will need to have ready before getting started.
- Commercial Snowflake account with cross-region inference enabled (see Step 2 above)
- Snowflake user with SNOWFLAKE.CORTEX_USER database role granted (see Step 3 above)
- A supported operating system: macOS on Apple Silicon or Intel x86_64, Linux on Intel x86_64, or Windows with Windows Subsystem for Linux 2, aka WSL2. Native Windows (CMD or PowerShell) is not currently supported
- Network access to your Snowflake account over HTTPS (port 443). If your organization uses a proxy or private link configuration, ensure that outbound connections to your Snowflake account URL are permitted
- Snowflake CLI (snow) is optional but recommended. If you have it installed and configured, the Snowflake Cortex Code CLI can reuse the connection profiles stored in ~/.snowflake/connections.toml, which eliminates the need to re-enter account details. Note: Snowflake Cortex Code CLI and the Snowflake CLI (snow) share the same connection configuration file (~/.snowflake/connections.toml). Any connection that works with the Snowflake CLI will automatically be available for selection in the Cortex Code CLI setup wizard.
Now, let us jump into the step-by-step guide to configure Snowflake Cortex Code via CLI:
Step 1—Install Snowflake Cortex Code CLI
Open your terminal and execute the official Snowflake install script using the following command:
curl -LsS https://ai.snowflake.com/static/cc-scripts/install.sh | sh
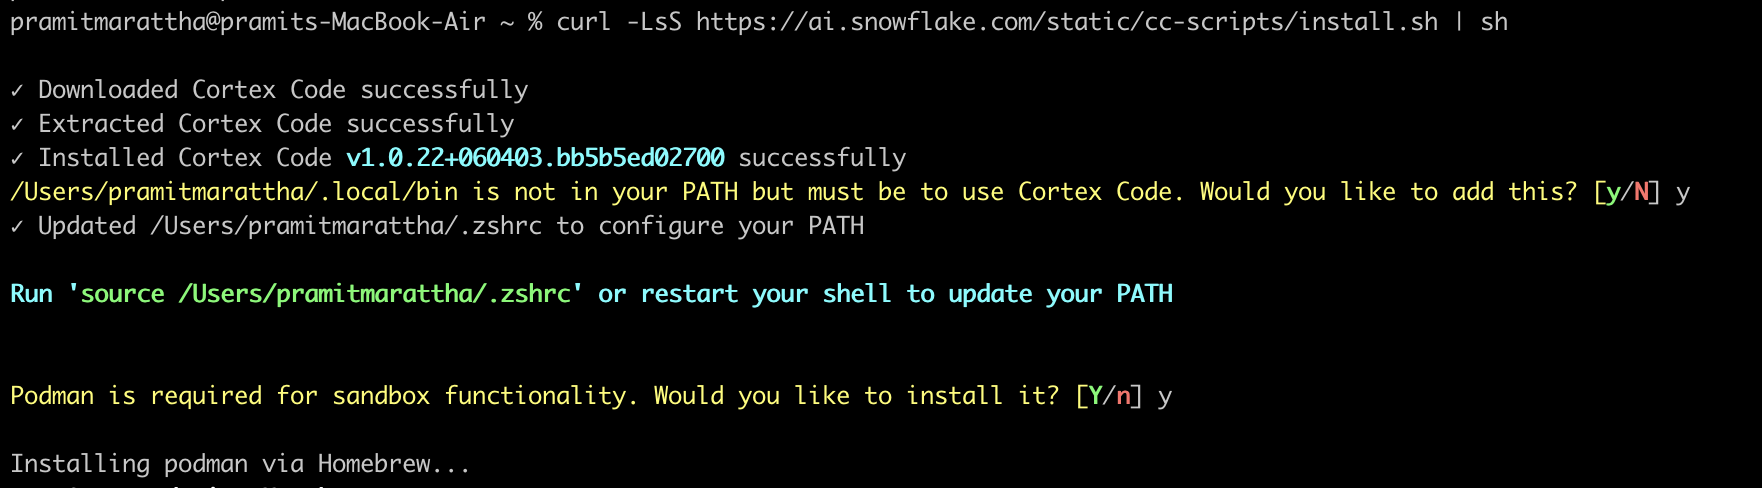
Figure 13: Executing the curl command to download and pipe the installation script to the shell—Snowflake Cortex Code CLI
This command uses curl to download the installation shell script from Snowflake’s servers and pipes it directly to sh for execution.
- -L – Follows HTTP redirects automatically
- -s – Operates in silent mode, suppressing the progress meter
- -S – Re-enables error messages even in silent mode (so failures are visible)
The script detects your operating system and CPU architecture, downloads the appropriate cortex binary and installs it to ~/.local/bin/cortex by default.
After installation completes, verify that the binary is accessible from your shell by running:
cortex --version

Figure 14: Verifying Snowflake Cortex Code CLI installation
If it throws an error, in that case, simply restart a new terminal session (so the profile changes are sourced)
Step 2—Run the interactive setup wizard
Launch the Cortex Code CLI by simply typing Cortex and pressing Enter. On first launch, the CLI detects that no connection has been configured and automatically starts an interactive setup wizard that guides you through the configuration process.
The wizard first asks you to select a text display style for the Cortex Code CLI interface. The available options control how code, markdown and AI responses are rendered in your terminal. Use the arrow keys to highlight your preferred option and press Enter to confirm.
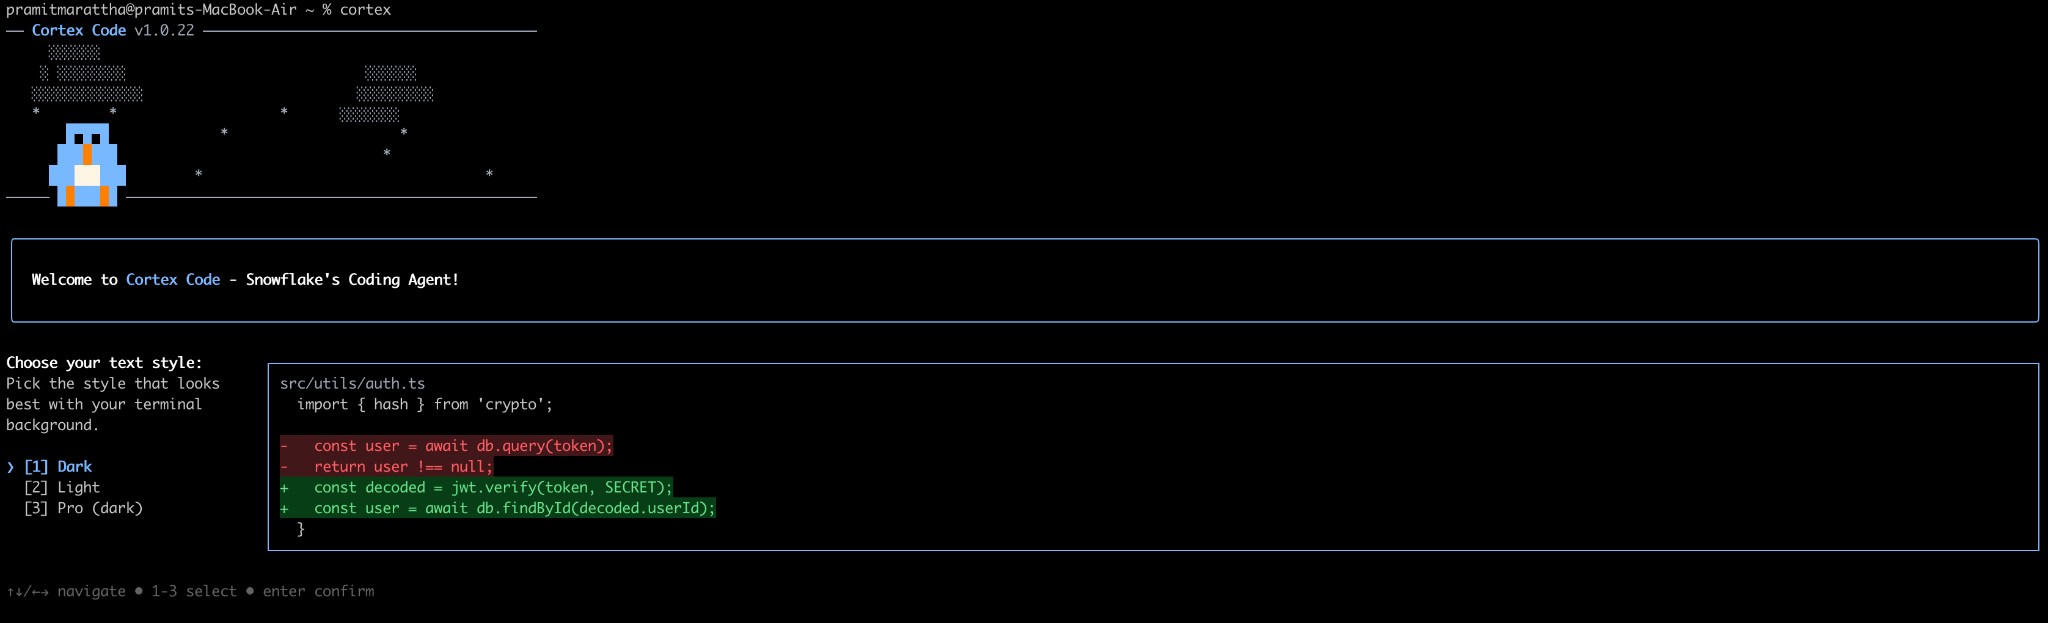
Figure 15: Selecting the text display style within the Cortex interactive setup wizard—Snowflake Cortex Code CLI
Next, the wizard displays a security and data-handling notice. This notice explains how the Cortex Code CLI transmits prompts and query context to Snowflake’s Cortex AI service. Review the notice thoroughly before proceeding. To continue, confirm your acceptance when prompted.
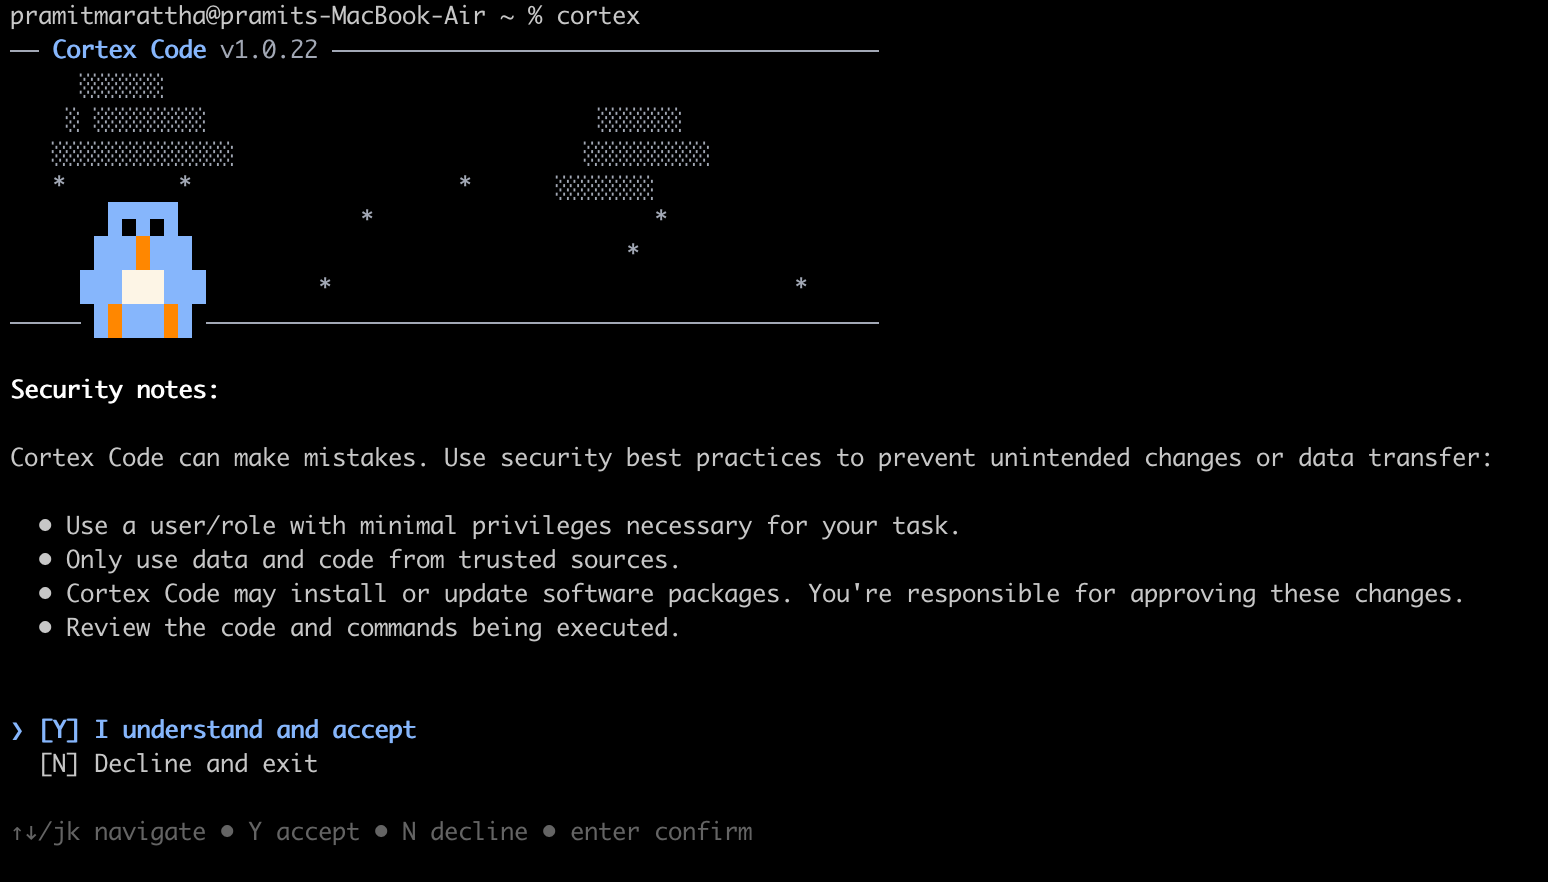
Figure 16: Reviewing and accepting the security and data privacy usage terms—Snowflake Cortex Code CLI
Step 3—(Optional) Configure Snowflake connection manually
At this stage, the wizard prompts you to configure a Snowflake connection. You have two options available:
Option A – Use an existing connection
If you already have the Snowflake CLI installed and have previously configured connections in ~/.snowflake/connections.toml, the wizard will automatically detect and display those named connection profiles. Use the arrow keys to navigate the list, highlight the desired connection and press Enter to select it. The wizard will then attempt to establish a test connection using the selected profile.
Option B – Create a new connection manually
If there are not any connections available or you want to set up a dedicated connection for Cortex Code, select “More options” from the bottom of the list. The wizard will then prompt you for your Snowflake account details step by step.
To locate your account identifier, log in to app.snowflake.com, click your avatar in the bottom-left corner of the navigation pane, select Account and then View Account Details. Your account identifier follows the format <orgname>-<accountname> (myorg-myaccount). This is distinct from your account URL, which takes the form https://myorg-myaccount.snowflakecomputing.com.
Either format is accepted by the Cortex Code CLI.
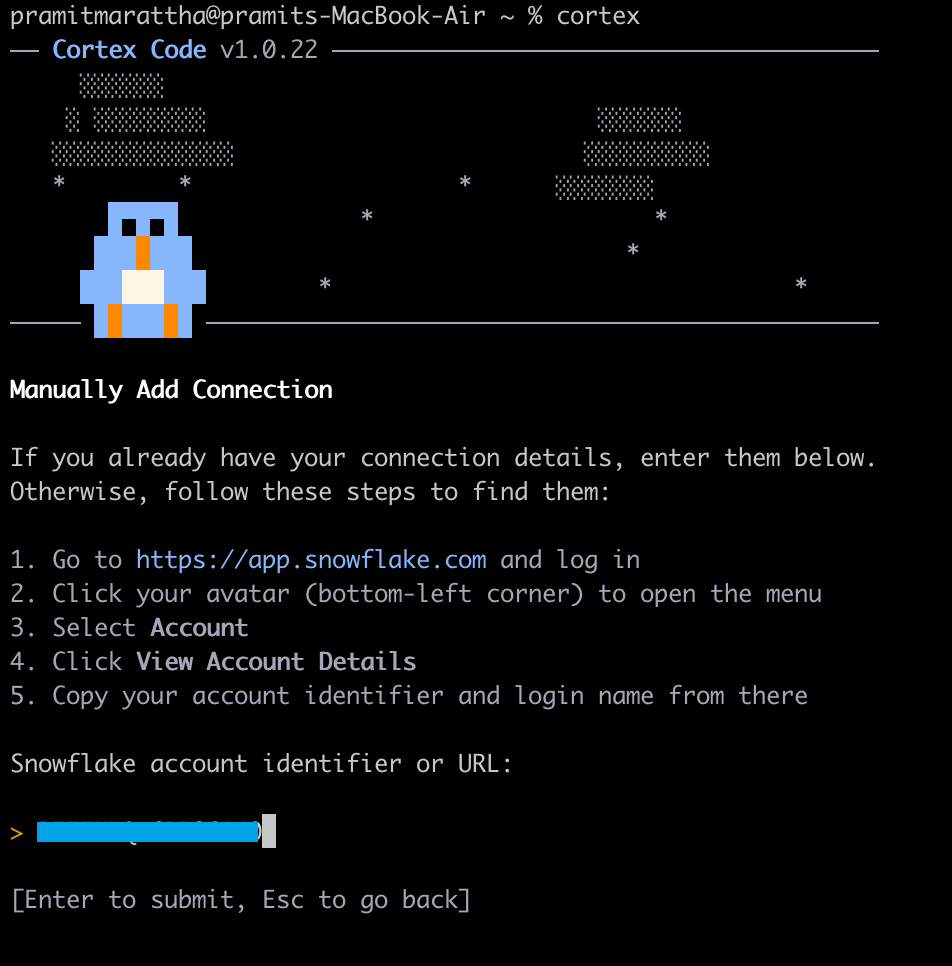
Figure 17: Entering the Snowflake Account Identifier into the Snowflake Cortex Code CLI prompt
And next, enter the login name associated with your Snowflake user. This is the username you use to authenticate to Snowsight or via the Snowflake CLI.
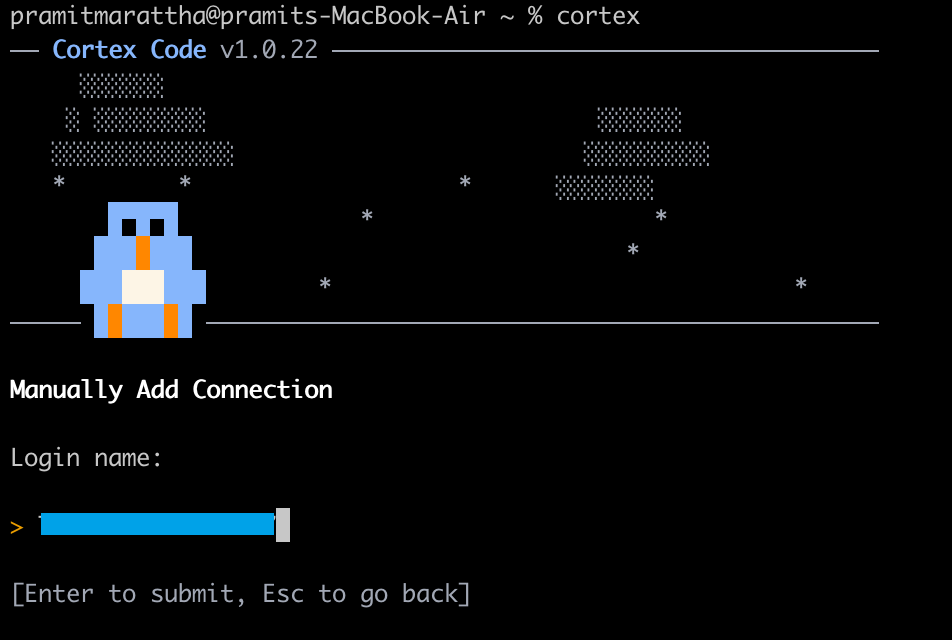
Figure 18: Entering the Snowflake username associated with the Cortex role—Snowflake Cortex Code CLI
The CLI supports multiple authentication mechanisms. For this guide, we will use a programmatic access token (PAT), which is the most secure and convenient option for automated and CLI-based workflows. Select the third option from the authentication method list and press Enter.
🔐 Security Note: PATs are self-contained, time-limited bearer tokens issued by Snowflake. Unlike passwords, PATs can be scoped to a specific role and expire after a configurable number of days, reducing the impact of credential compromise.
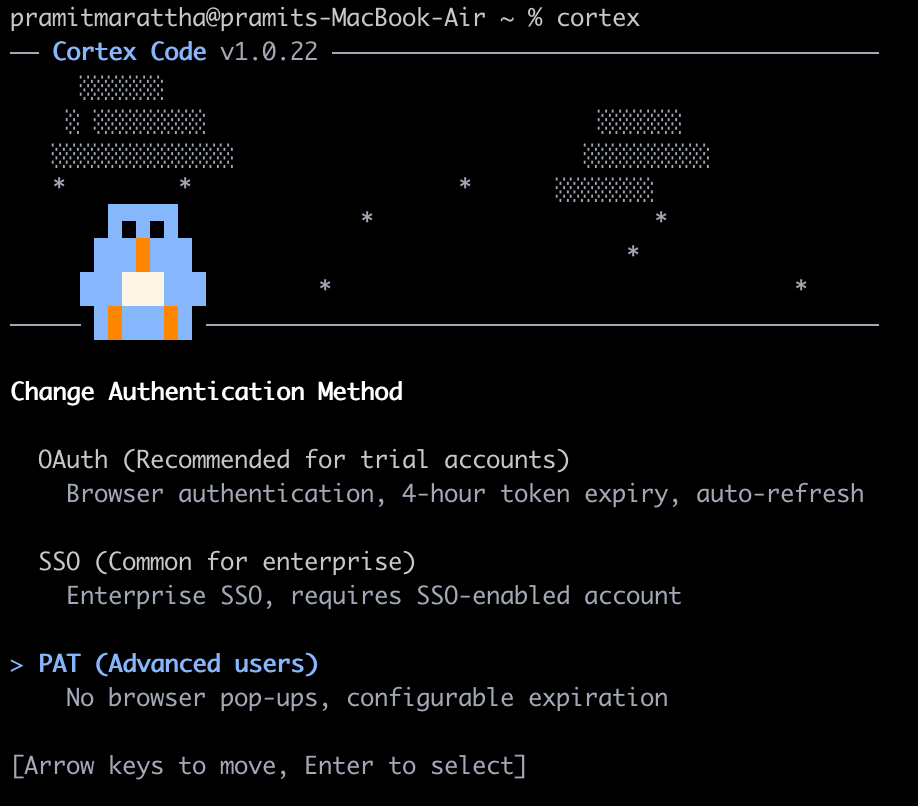
Figure 19: Selecting ‘Programmatic Access Token’ from the list of authentication mechanisms—Snowflake Cortex Code CLI
To generate a PAT, perform the following steps in the Snowflake Snowsight web interface:
- In Snowflake Snowsight, open the navigation menu and select Governance & Security > Users & Roles
- Locate and click the user account for which you want to generate the token
- Scroll down to the Programmatic Access Tokens section and click Generate New Token
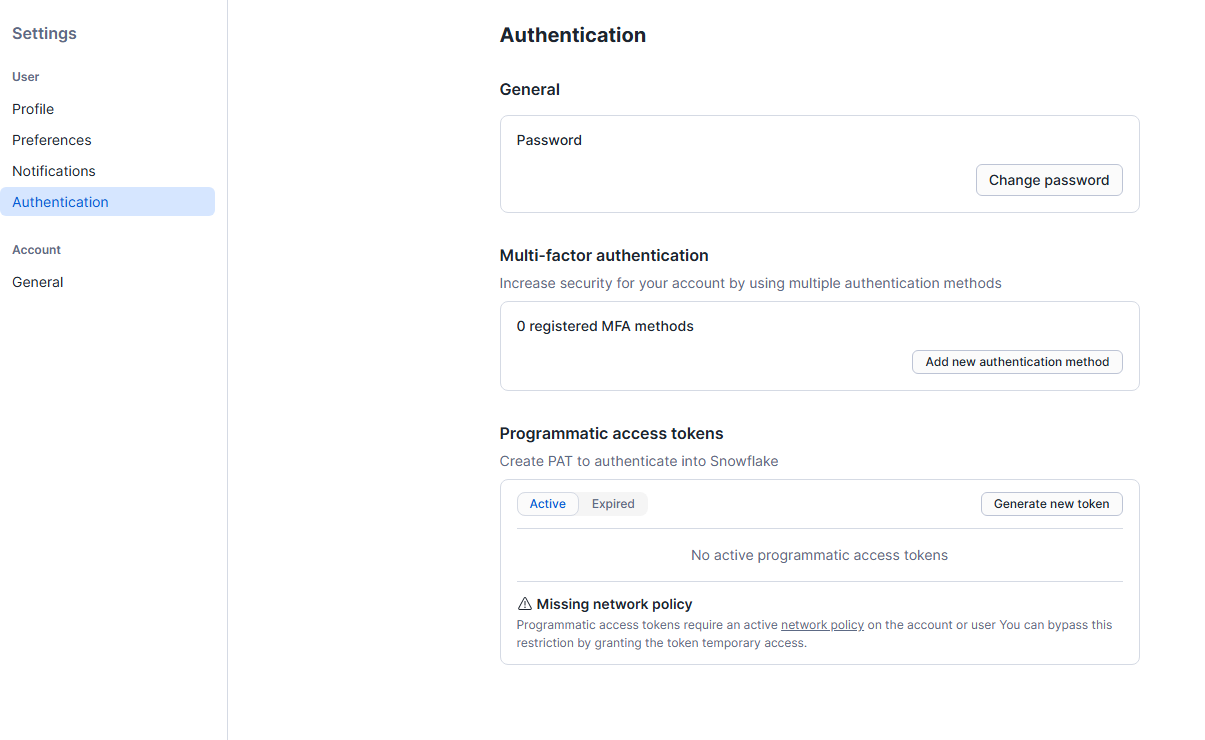
Figure 20: Navigating to the User Profile security settings to initiate token generation—Snowflake Cortex Code CLI
In the token generation dialog, complete the following fields:
- Name: A short, descriptive identifier for the token (CortexCodeCLI)
- Comment: An optional free-text description of the token’s intended use
- Expiration: The number of days until the token expires. Snowflake recommends 30 – 90 days for developer tokens
- Privilege Evaluation: Select One Specific Role to restrict the token’s operations to a designated role. Selecting Any of My Roles causes Snowflake to evaluate privileges against all roles available to the user, which is less restrictive
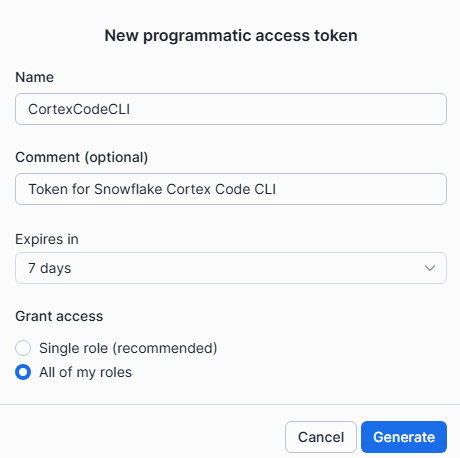
Figure 21: Configuring the PAT scope, role constraints and expiration policy in the UI—Snowflake Cortex Code CLI
Click Generate. Snowflake Snowsight will display the generated token exactly once. Copy it immediately; it cannot be retrieved again after you close the dialog.
Return to your terminal. At the Enter your Programmatic Access Token: prompt, paste the token you copied and press Enter.
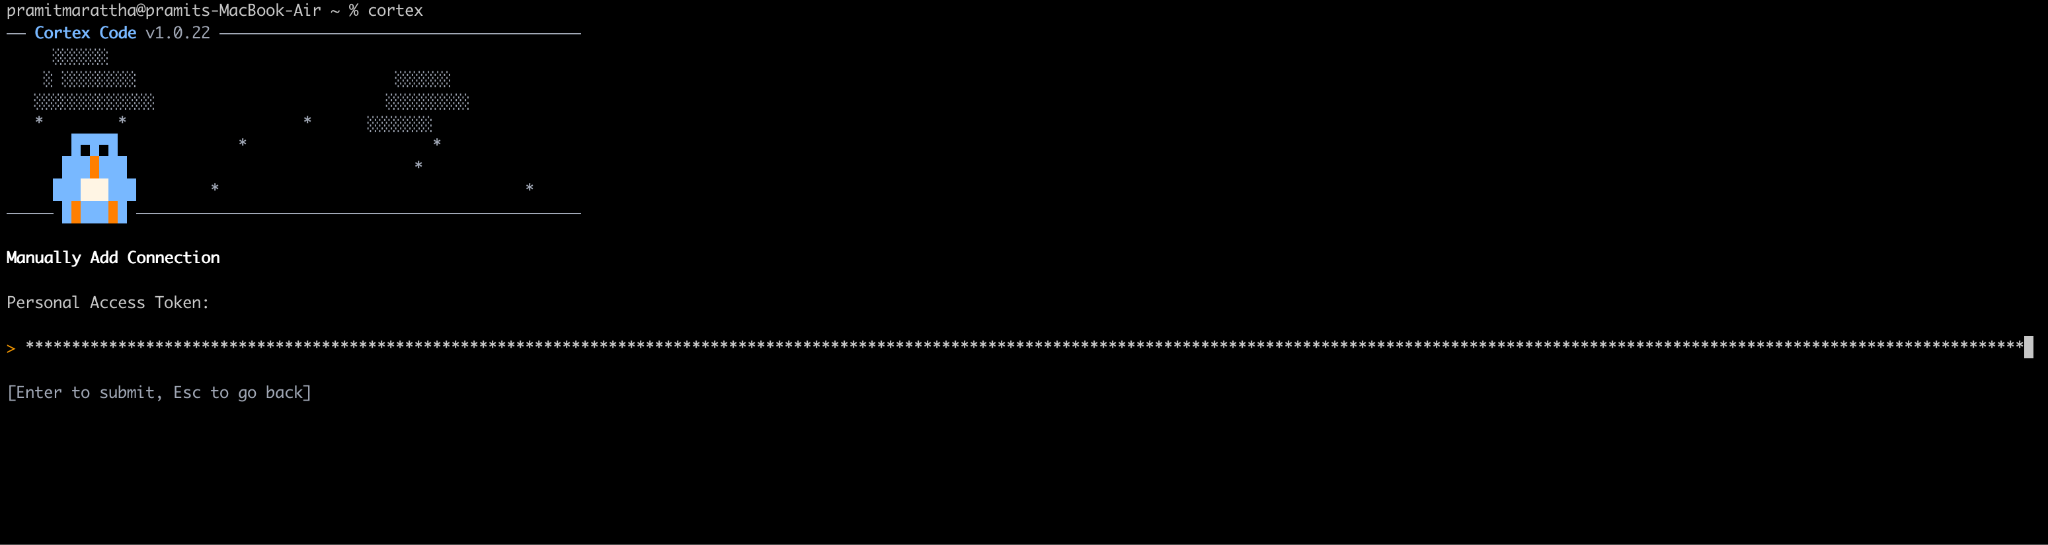
Figure 22: Pasting the generated secret token into the terminal’s hidden input field—Snowflake Cortex Code CLI
The wizard will now prompt for additional optional parameters. These set default values for your Snowflake session. You may press Enter at any prompt to accept the shown default.
Default Role – The Snowflake role the Cortex Code CLI assumes for each session. If left blank, the wizard defaults to ACCOUNTADMIN. For least-privilege configurations, specify a role with only the permissions required for Cortex AI queries (like a role with the SNOWFLAKE.CORTEX_USER database role granted).
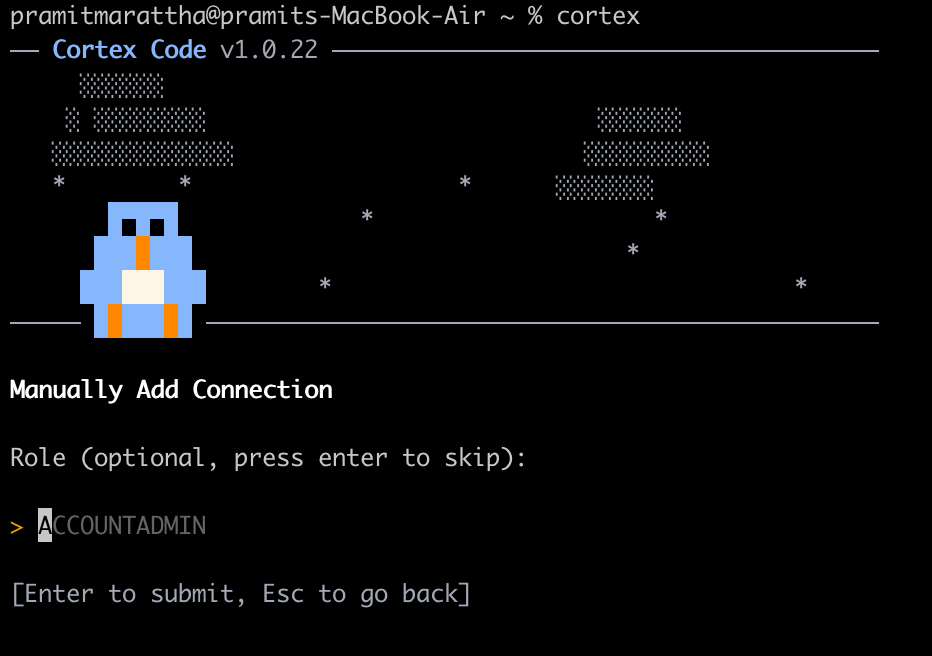
Figure 23: Setting the default active role for the session—Snowflake Cortex Code CLI
Default Warehouse – The virtual warehouse used to execute queries. If left blank, default to COMPUTE_WH. Make sure the specified warehouse is accessible to the configured role and is sized appropriately for your workload.
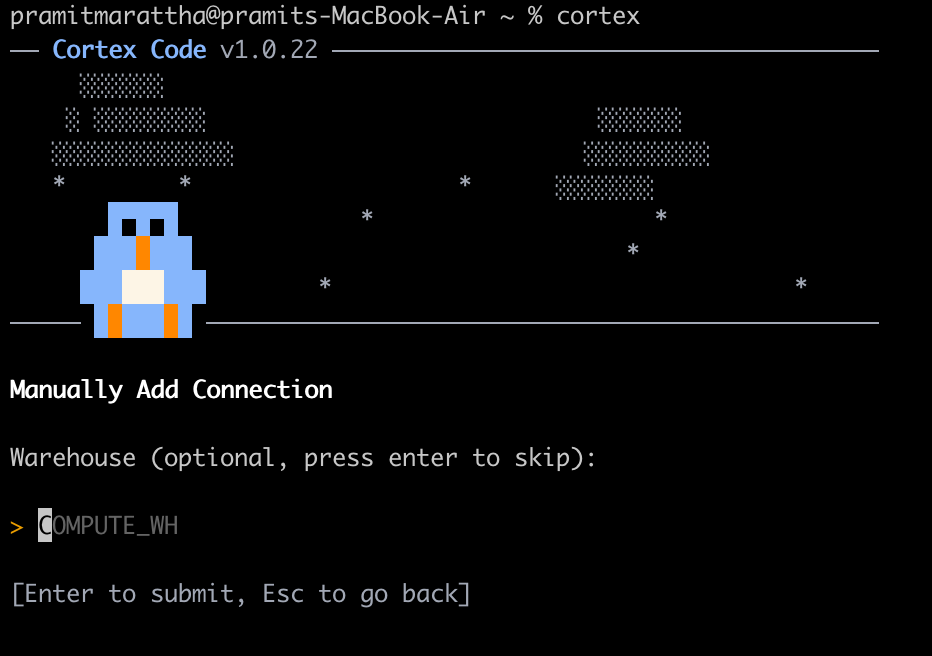
Figure 24: Defining the default virtual warehouse for compute operations—Snowflake Cortex Code CLI
Default Database – The database that serves as the default context for SQL queries. This is optional and can be left blank if you intend to always qualify object names with a fully-qualified database.schema.object reference.

Figure 25: Specifying the default target database context—Snowflake Cortex Code CLI
Default Schema – The schema used as the default context within the configured database. Also, optional.

Figure 26: Specifying the default target schema context—Snowflake Cortex Code CLI
Connection Name – A unique, human-readable name for this connection profile. This name is used as the profile key in ~/.snowflake/connections.toml and when selecting connections in future CLI sessions.
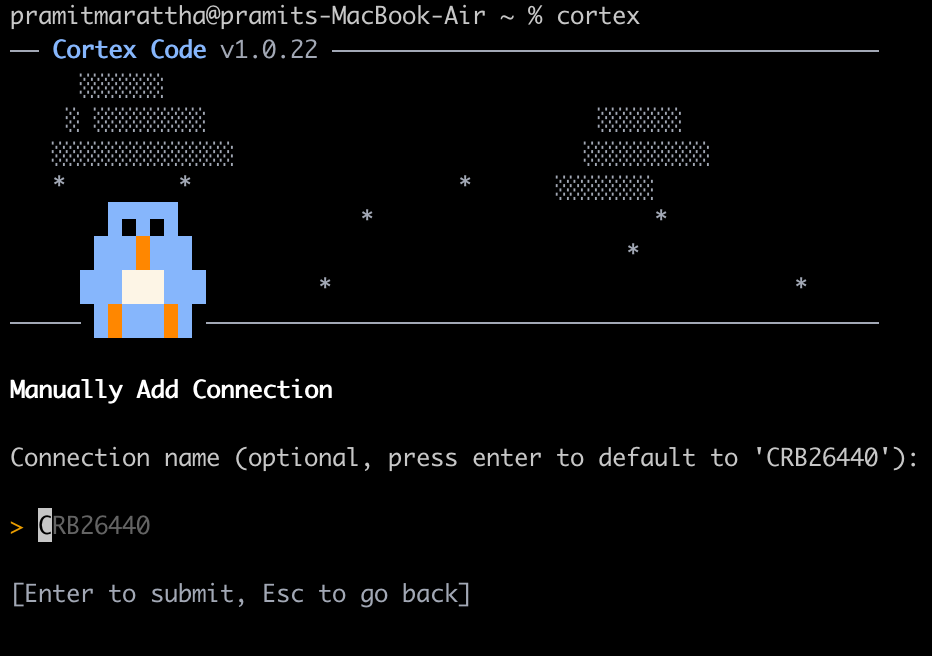
Figure 27: Naming the connection profile to be saved in connections.toml—Snowflake Cortex Code CLI
After the final prompt, the wizard validates the connection by authenticating against Snowflake using the supplied credentials. A successful validation confirms that the credentials, account identifier and network path are all correct.

Figure 28: Viewing the confirmation summary of the newly created connection profile
If this is your first time using Snowflake Cortex Code, you will be prompted to activate a trial subscription before the Cortex Code CLI becomes fully operational.
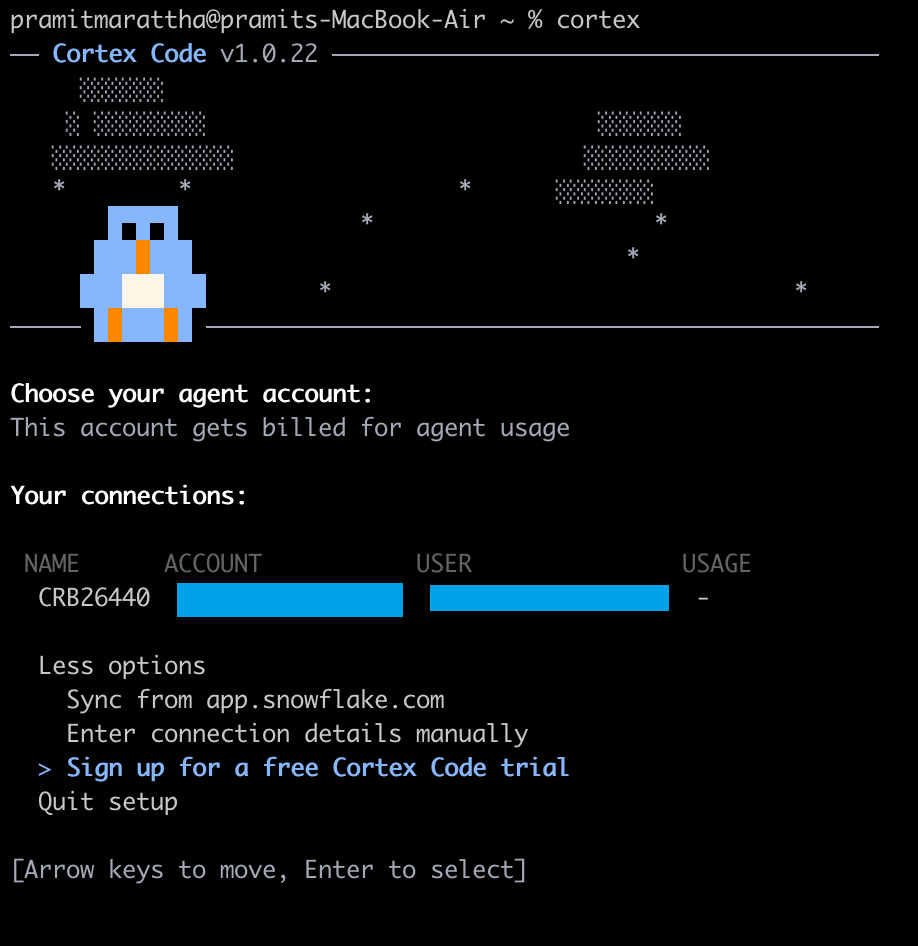
Figure 29: Terminal displaying a Cortex Code trial activation prompt—Snowflake Cortex Code CLI
💡 Subscription details – Snowflake Cortex Code is a paid subscription feature priced at $20 USD per user per month. The trial period begins upon activation. Billing starts the day after the trial period ends. A valid credit card must be on file to activate the trial, but it will not be charged during the trial. You may cancel at any time during or after the trial period without incurring charges beyond the current billing cycle.
Follow these steps to activate the trial:
Check the inbox of the email address associated with your Snowflake account for an activation email from Snowflake (sender: no-reply@snowflake.com or similar).
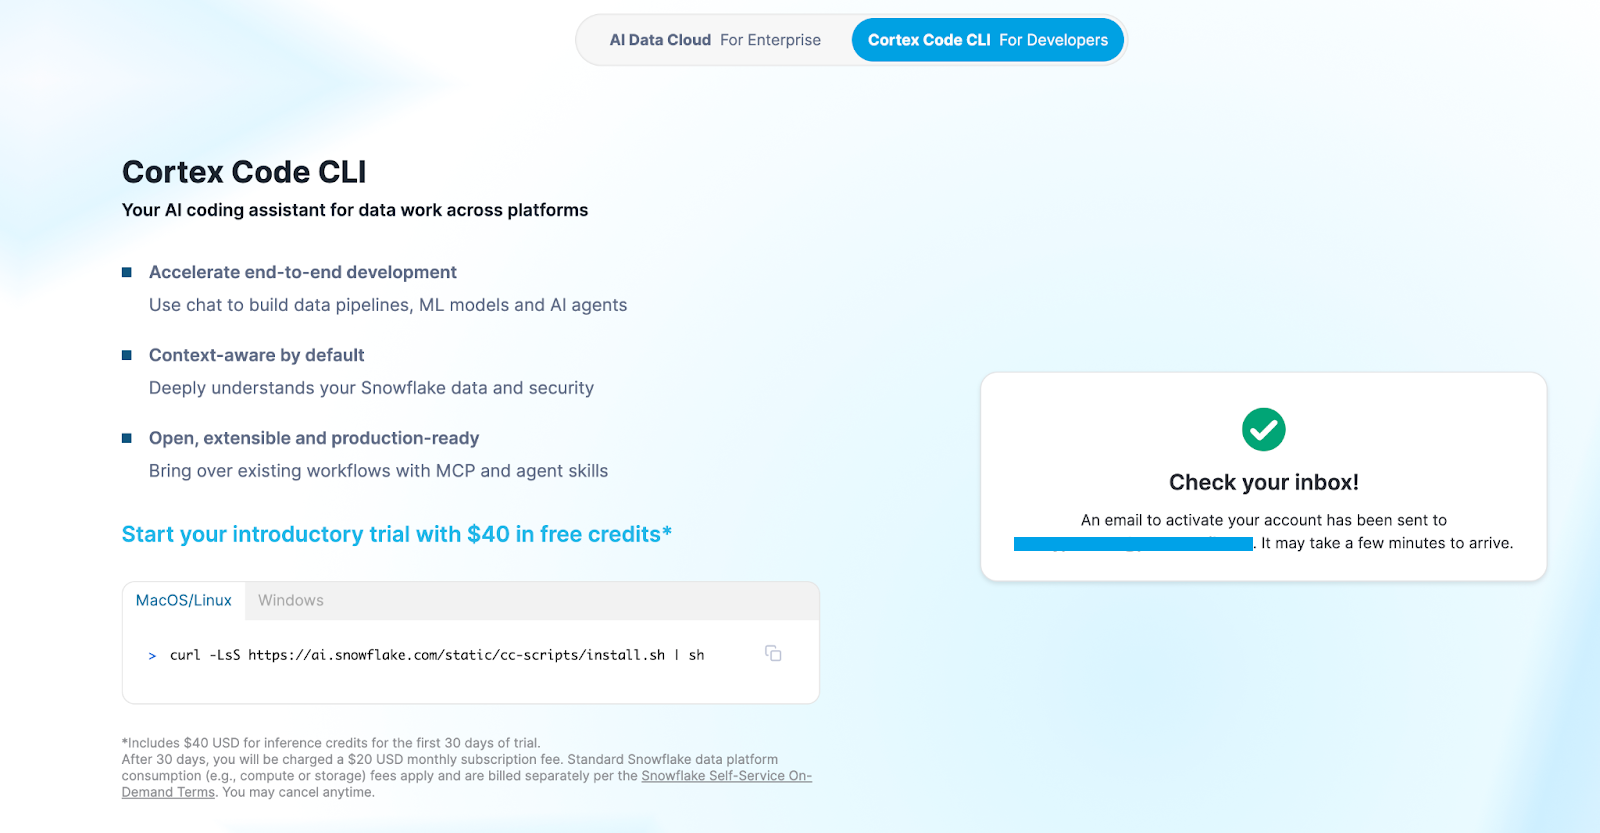
Figure 30: Signing up for Snowflake Cortex Code CLI
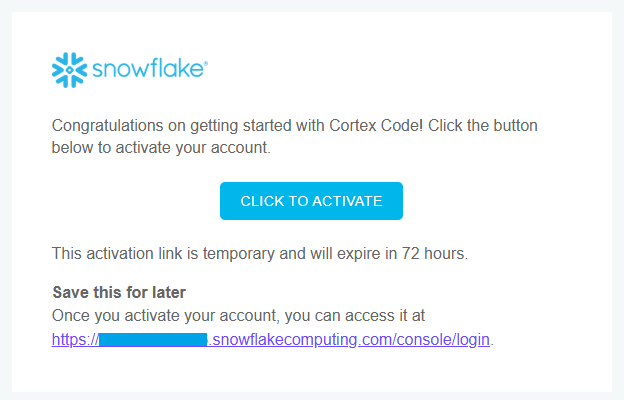
Figure 31: Clicking the activation link to confirm the seat license—Snowflake Cortex Code CLI
Click the activation link in the email. Your browser will open a Snowflake account setup or subscription activation page. Follow the on-screen prompts to complete account verification.
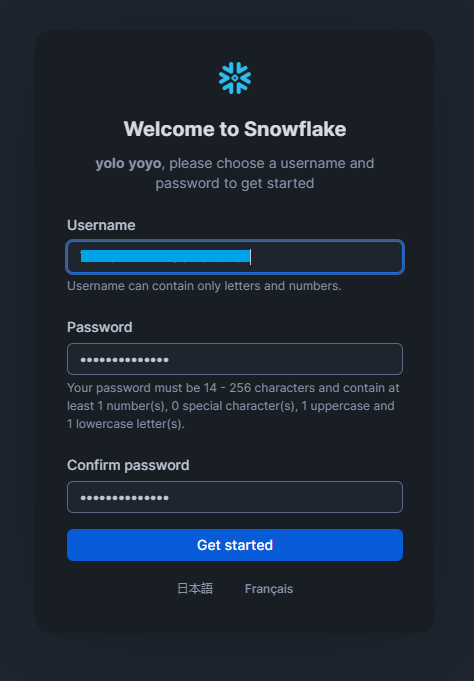
Figure 32: Signing up for Snowflake Cortex Code CLI
After that, enter valid credit card information. This is required to activate the trial and guarantees continuity of service after the trial period, but no charge is applied until the trial ends.

Figure 33: Entering credit card details to activate Snowflake Cortex Code CLI trial
After completing the activation flow, return to the terminal. The CLI will be waiting for you to press Enter to synchronize the new subscription status with your configured connection. Press Enter to proceed.
Step 4—Validate connection
After completing setup, verify that the Cortex Code CLI can successfully communicate with Snowflake. Run the following command to launch the interactive CLI shell:
cortex

Figure 34: Running a connection test to ensure network reachability and authentication—Snowflake Cortex Code CLI
If the connection is successful, the Cortex Code CLI will display a welcome message and present an interactive prompt (typically > Try “What can you help me with?”). You can also issue a one-off test prompt directly from the shell:
cortex -p "<your_prompt_message>"
The CLI should execute the query against your Snowflake account and return the result inline. This confirms end-to-end connectivity: authentication, network routing, warehouse activation and query execution.
⚠️ Troubleshooting tips – If the command hangs or returns an authentication error, verify the following:
- Your account identifier is correct and does not include the .snowflakecomputing.com suffix (use the identifier format, not the full URL, unless the full URL was explicitly accepted during setup)
- Your PAT has not expired
- The role specified in your connection profile has the SNOWFLAKE.CORTEX_USER database role granted
- And no firewall or proxy is blocking outbound HTTPS traffic to Snowflake
Step 5—Select or change your model
Snowflake Cortex Code CLI delegates inference to Snowflake Cortex AI, which provides access to a curated set of large language models (including Anthropic’s Claude model family). Cortex Code CLI operates in auto mode by default, which instructs Snowflake to select the highest-capability model that is available in your account’s home region (or across regions, if cross-region inference is enabled).
To explicitly specify a model, use the -m flag at startup:
cortex -m claude-sonnet-4-5
To switch models within an active interactive session, use the /model command:
/model claude-opus-4-5
The recommended high-quality model is Claude Sonnet 4.5, or Opus 4.5 if available.
🔮 Model Availability – Model availability in Snowflake Cortex is region-dependent. If you specify a model that is not hosted in your account’s home region and cross-region inference is disabled, the Snowflake Cortex Code CLI will return a model availability error. Enabling cross-region inference (setting it to ANY_REGION in the Cortex AI settings) allows requests to be routed to the region that hosts the requested model, resolving most availability issues.
Step 6—(Optional) Enable web search (ACCOUNTADMIN required)
Snowflake Cortex Code can augment its responses with real-time web search results when answering questions that require up-to-date external information. This feature must be enabled at the account level by an ACCOUNTADMIN in Snowflake Snowsight before the CLI can use it.
To enable web search:
- Log in to Snowflake Snowsight and navigate to Admin > AI & ML > Agents > Settings.
- Locate the Web Search toggle and enable it.
Figure 35: Toggling the Web Search capability in the Snowflake Cortex administration panel—Snowflake Cortex Code CLI
Once enabled at the account level, Snowflake Cortex Code CLI will automatically detect and use this setting in subsequent sessions. You do not need any additional CLI-level configuration.
Step 7—Submit your first CLI prompt
Now try asking Snowflake Cortex Code CLI a question or task. Start the interactive shell by running Cortex with no arguments or use a one-off prompt.
At the > prompt, type a natural-language instruction or question.
Snowflake Cortex Code will interpret your instruction, generate the appropriate SQL, execute it against your Snowflake account and return both the generated query and the result set inline in the terminal. You can also run a single non-interactive prompt without entering the shell:
cortex -p "<your_prompt_message>"
The -p flag (short for –prompt) accepts a quoted natural-language string, sends it to the Cortex AI backend and prints the response before exiting.
Step 8—Reference tables directly with # syntax
A powerful feature of the Snowflake Cortex Code CLI is its ability to reference Snowflake database objects, such as tables, views and stages, directly in your prompts. To do this, you use the # prefix. When Snowflake Cortex Code CLI sees a token starting with #, it treats the rest as a reference to a Snowflake object. It then resolves this reference against the Information Schema, gets the object’s DDL definition and some sample data and injects this context to the prompt it sends to the AI model.
> Describe the schema of #PRODUCTS_DB.PUBLIC.ORDERS and suggest composite indexes for typical analytical queries.
This guarantees the model’s response is grounded in the actual column names, data types and row-level patterns of your table, rather than generating generic SQL that may not match your schema. The syntax supports any fully-qualified three-part object name:
> Join #ANALYTICS_DB.MARTS.FCT_SALES with #ANALYTICS_DB.MARTS.DIM_CUSTOMER and generate a monthly revenue cohort analysis
You can reference multiple objects in a single prompt. Snowflake Cortex Code CLI will resolve each # reference independently and aggregate their schemas into a combined context block before sending the request to the model.
Step 9—Invoke custom Agent Skills with $ syntax
Snowflake Cortex Code CLI supports a concept called Agent Skills. It is a predefined prompt template that encapsulates domain-specific instructions, constraints and context for common development tasks. Agent Skills are invoked using the $ prefix followed by the skill name.
For example, to invoke the built-in dbt engineering skill:
> $dbt-engineering Create a new mart model for customer lifetime value
Or $developing-with-streamlit to get Streamlit app guidance. You can type $ alone and press Tab or Up/Down to browse available skills.
To browse available skills, type $ followed by Tab, or use the following introspection command:
/skill
Custom skills are defined as Markdown files (.md) placed in a designated .cortex/skills/ directory within your project. A skill file uses structured sections (delimited by Markdown headings) to define the skill’s name, description, behavioral constraints and example invocations. Once defined, the custom skill is immediately available via the $ prefix from any CLI session launched within that project directory.
Step 10—Configure an AGENTS.md file for project-level customization
For project-specific customization, Snowflake Cortex Code CLI recognizes an AGENTS.md file placed at the root of your project directory. This file is an open-format Markdown document that provides persistent, session-wide instructions to the Cortex AI agent. Every time you launch the Cortex Code CLI from within that project directory, the contents within the AGENTS.md are automatically injected into the system context of each conversation, giving the model project-specific knowledge about your data architecture, naming conventions, coding standards and operational constraints.
Create the file at the root of your project:
# Project Context

## Database

Target database: PRODUCTS_DB, schema: PUBLIC


## Naming conventions

- Fact tables: fct_*

- Dimension tables: dim_*

- Staging tables: stg_*


## Coding Standards

- Always qualify object references with database.schema.object

- Use parameterised date filters; never hardcode date literals

- Add a header comment block to all new SQL files with:

    -- Author, creation date, description, and downstream dependencies

- Prefer CTEs over nested subqueries for readability


## Constraints

- Do NOT modify tables in RAW_DB directly; use staging layers only

- All new models must include a dbt YAML schema file with column tests

- Incremental models must use the unique_key strategy with a surrogate key
The AGENTS.md file is particularly valuable in team settings: when all developers on a project use Snowflake Cortex Code CLI from the same repository root, they all benefit from the same shared project context.
Step 11—(Optional) Disable automatic updates
Snowflake Cortex Code CLI updates automatically by default. In production environments or locked-down machines, you may want to disable this. Edit (or create) the file ~/.snowflake/cortex/settings.json and set “autoUpdate”: false.
{

  "compactMode": false,

  "autoUpdate": false,

  "theme": "dark"

...

}
Setting “autoUpdate”: false, Snowflake Cortex Code CLI will stop checking for updates. Save the file, and you’ll skip the automatic update prompts. You can still run the Cortex update manually whenever you want to upgrade.
📁 File Location – The settings file path is ~/.snowflake/cortex/settings.json. If this file does not exist, you can create it manually. The directory ~/.snowflake/cortex/ is created automatically when the CLI is first run.
Now, with these steps done, Snowflake Cortex Code CLI is ready. You can now interact with Snowflake using natural language right in your terminal. The CLI will execute SQL on your behalf, show query results and even interact with your local files (Git, Bash commands) as needed.
For further details, see the Snowflake Cortex Code documentation, Cortex Code CLI documentation and the Snowflake CLI integration guide for advanced configuration options.
Limitations of Snowflake Cortex Code—what you need to know
Snowflake Cortex Code is extremely powerful, but it has some limitations to consider:
1) Regional availability
Snowflake Cortex Code is only available in Commercial Snowflake accounts with cross-region inference enabled. It is not supported in the Government cloud, the Sovereign cloud, or certain isolated deployments.
2) Legacy Snowflake Copilot opt-out blocks Snowflake Cortex Code
If anyone on your account team historically disabled Snowflake Copilot, Cortex Code will be disabled too. You cannot enable it yourself from the Snowflake Snowsight UI; you need to contact your Snowflake account team to resolve it.
3) No persistent memory by default
Context is maintained within a session, but not across sessions. Each new session starts fresh. If you have project-level context, you want Snowflake Cortex Code to always know, put it in an AGENTS.md file.
4) Role-based access limits apply—always
The agent can only access data that your current role permits. It will not bypass any security policies. If a table is hidden or has masking, the agent will not reveal it.
5) Diff view and context limited to Snowflake Snowsight
The visual Diff View, workspace context awareness and some admin-facing features only exist in the Snowflake Snowsight interface. The CLI is more powerful for local development but doesn’t replicate everything from the UI.
6) Web search is not enabled by default
The web search feature must be explicitly enabled with ACCOUNTADMIN access.
7) MCP server configuration complexity
MCP integration is powerful but not trivial to set up. You will need to configure MCP server connections manually, understand the tool schema and handle authentication for each external service. It’s not a one-click integration.
8) Windows native support doesn’t exist
macOS and Linux are supported natively. Windows users have to go through the WSL2 setup, which might add setup complexity.
Be aware of these limitations. Snowflake Cortex Code still handles most common data-engineering and analytics tasks reliably.
Snowflake Cortex Code best practices—tips for effective use
Here are some tips and tricks to help you achieve excellent results and maintain safety while working with Snowflake Cortex Code:
1) Be specific and detailed in your prompts
Vague prompts produce vague results. Be very thorough and detailed. “Write a revenue query” is less effective than “Write a query against ANALYTICS_DB.SALES_MART.ORDERS that calculates weekly revenue by region, filtered to 2025, using the REGION column and ORDER_DATE field”.
Give the agent context it can work with.
2) Use fully qualified object names in prompts
Reference tables as DATABASE.SCHEMA.TABLE_NAME whenever possible, rather than just the table name. On large accounts with many databases, ambiguity causes the agent to pick the wrong object.
3) Use # table references in the CLI
In the CLI, use # before a table name to auto-load its schema and sample rows. This guarantees the model knows your table’s structure without you describing it.
4) Always use Diff View before accepting changes (Snowflake Snowsight)
Do not skip the review step. Always check for suggested code changes in the Diff View (Snowsight) or plan output (CLI). Do not blindly accept large edits without inspection.
5) Create AGENTS.md for project-specific workflows
Put any recurring guidelines, style rules, or context in an AGENTS.md file so the agent always sees them.
6) Build Agent Skills for repeated workflows
Anything you regularly explain in sessions, such as data quality checks, audit column requirements, or tagging validation, should be in a custom Agent Skill. This will save you from having to re-explain the context every time.
7) Use Plan Mode for complex or write operations
Any operation that touches the schema, modifies data, or has consequences you can’t easily undo should go through plan mode. Confirm each step explicitly rather than letting the agent run to completion unattended.
8) Secure your connections.toml
The ~/.snowflake/connections.toml file contains your Snowflake connection details. Set appropriate file permissions (chmod 600 ~/.snowflake/connections.toml).
Don’t commit it to version control.
9) Use programmatic access tokens (PATs) for CI/CD
If you’re integrating Snowflake Cortex Code CLI into automated pipelines or GitHub Actions, use PATs rather than passwords or SSO-based auth. PATs are scoped, revocable and designed for machine-to-machine use.
10) Pair Snowflake Cortex Code CLI with VS Code or Cursor
Open VS Code, start your terminal inside it and run Cortex from there. Files Cortex Code generates land in your Snowflake workspace where you can immediately review, edit and commit them. You’re not jumping between a terminal and an IDE.
11) Start with read-only tasks before write operations.
Especially at first, ask the agent to generate queries or show plans before running any data-modifying commands. Once you trust it, you can move on to DDL/DML changes.
12) Monitor model selection and switch when needed
The default model (auto) should pick a good large language models (LLMs), but sometimes a specific model is better for your region. If answers seem off, try switching models with /model (CLI) or the Snowsight model selector.
13) Enable cross-region inference—always
To get the best models (Claude Sonnet/Opus), make sure CORTEX_ENABLED_CROSS_REGION is set. Without it, you’ll be limited to older models in your region.
Follow these practices to make the most of Snowflake Cortex Code’s features and reduce risks.
Conclusion
And that is a wrap! Snowflake Cortex Code is a substantive leap forward from generic AI coding assistants, specifically because it does not pretend your data platform doesn’t exist. It knows your catalog, honors your governance controls and understands your semantic models. Seamlessly, it operates within the security perimeter your data team’s trust. Yet the Snowflake Cortex Code isn’t a magic wand that solves everything automatically. You will still need to peruse its outputs and direct it with thoughtful prompts. However, it can slice through tedious development tasks, helping you prototype in a flash. In mere seconds, install the CLI or toggle the Snowflake Snowsight switch to unveil fresh suggestions. Try it on a small task to see how it integrates into your workflow. Always double-check the SQL and Python it generates, especially for critical data. Utilize the Diff View and plan modes to maintain control. With care, Snowflake Cortex Code could be your new right-hand companion in the Snowflake toolkit.
In this article, we have covered:
- What is Snowflake Cortex Code?
- Architecture & How Snowflake Cortex Code accesses context
- Four core pillars of Snowflake Cortex Code
- Power of Snowflake Cortex Code—Features and use cases
- Pricing and cost breakdown of Snowflake Cortex Code
- Snowflake Intelligence vs Snowflake Cortex Code
- Snowflake Cortex Code vs Snowflake Copilot (legacy Copilot)
- Step-by-step guide to set up and configure Snowflake Cortex Code (via Snowsight)
- Step-by-step guide to set up and configure Snowflake Cortex Code (via Cortex Code CLI)
- Limitations of Snowflake Cortex Code
- Snowflake Cortex Code best practices
… and so much more!
Want to learn more? Reach out for a chat
FAQs
What is Snowflake Cortex Code?
Snowflake Cortex Code is an AI coding assistant built into Snowflake. You can use natural language to generate or modify SQL/Python, build pipelines and explore data, all within the context of your Snowflake account. It comes as both a Snowsight panel and a local CLI tool.
Is Snowflake Cortex Code free to use?
Snowflake Snowsight (UI) version is currently free for eligible accounts. The CLI will eventually incur charges based on token usage (like other AI features). Your regular Snowflake compute/storage costs still apply when the agent runs queries.
Can Snowflake Cortex Code see and use my data?
Yes, but only under your permissions. Cortex Code runs inside Snowflake’s secure infrastructure, so your data and schemas stay inside your account. It can access tables, schemas and metadata that your role can see, but it will not share data externally or bypass any security rules.
How does Snowflake Cortex Code respect masking and row access policies?
Snowflake Cortex Code fully inherits Snowflake’s security model. If your role has a column masked or row restrictions, the agent will not expose that data. In practice, Snowflake Cortex Code only operates with the privileges of the current user.
Where are conversation logs stored for the CLI?
The CLI stores your session transcripts on your local machine (typically under the Snowflake config directory). You can resume previous sessions by ID. These logs are not sent to Snowflake; they reside on your local machine for privacy.
What is the difference between Snowflake Cortex Code and Snowflake Copilot?
Snowflake Copilot was a simpler chat-based assistant that suggested SQL in Snowsight. It’s deprecated. Cortex Code replaces it with a fully agentic system that can execute multi-step workflows, access your local file system (via CLI), build dbt projects, generate Streamlit apps and integrate with external tools via MCP, all governed by Snowflake’s RBAC.
What models does Snowflake Cortex Code use?
Snowflake Cortex Code uses automatic model selection by default, drawing from the models available on Snowflake’s Cortex AI infrastructure. You can view and change the active model using /model in the CLI. Specific model availability depends on your account’s region and the models Snowflake currently provides.
Can I use Snowflake Cortex Code CLI with VS Code or Cursor?
Yes. Open VS Code or Cursor, launch the integrated terminal and run Cortex from there. Files generated by Snowflake Cortex Code will appear in your Snowflake workspace for immediate review. This is the recommended workflow for active development.
What is an AGENTS.md file, and do I need one?
AGENTS.md is a special markdown file you can put in your project root. Any instructions or context you write in that file will be automatically included in every Snowflake Cortex Code conversation for that project. It’s optional but useful for codifying project-specific rules or objectives.
Is Snowflake Cortex Code available in Snowflake Government or Sovereign cloud deployments?
Not yet. Snowflake Cortex Code (Snowsight and CLI) currently requires a Commercial Snowflake account with cross-region inference. It is not supported in FedRAMP/Government, International Sovereign, or other isolated cloud instances now.
Can I use Snowflake Cortex Code CLI in automated pipelines or GitHub Actions?
Yes, using programmatic access tokens (PATs) for authentication. Configure your connections.toml with a PAT credential, reference that connection in your pipeline and invoke Cortex non-interactively. For CI/CD workflows, disable auto-updates (“autoUpdate”: false) to prevent unexpected version changes in production.