
Snowflake Notebooks is a powerful new interactive development environment that was just launched and made available in public preview during the Snowflake Summit 2024. This new development interface in Snowsight offers an interactive, cell-based programming environment where you can write raw SQL and Python code. Snowflake Notebooks enable users to easily perform data analysis, develop machine learning models and carry out numerous data engineering tasks; all within the Snowflake ecosystem.
In this article, we will cover everything you need to know about Snowflake Notebooks, including its key features, an overview of the Snowflake Notebook interface, tips and tricks for using Snowflake Notebooks effectively and a step-by-step guide to setting up and using this powerful interactive development environment.
Note: As of March 2026, the original Snowflake Notebooks experience has been officially renamed to Legacy Snowflake Notebooks. Snowflake is actively migrating users to the newer Notebooks in Workspaces experience, which offers Jupyter compatibility, file-based organization and even deeper Git integration. New accounts created after April 2026 cannot create Legacy Notebooks. If you’re on a new account, jump straight to the Notebooks in Workspaces section.
What is Snowflake Notebooks, anyway?
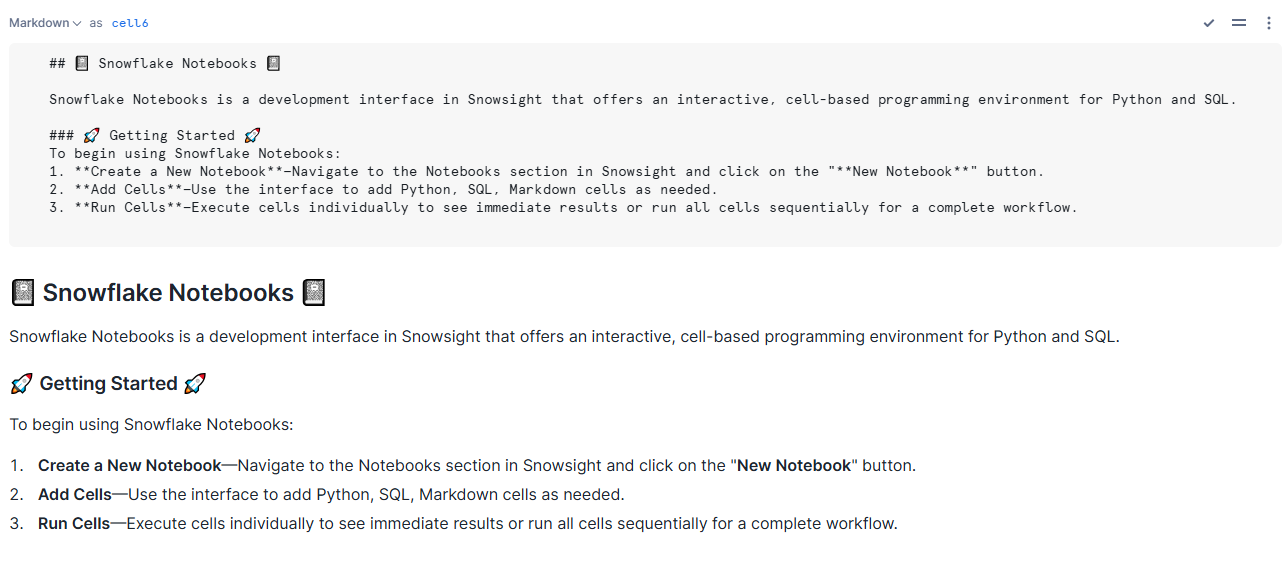
Snowflake Notebooks is an integrated development environment within Snowsight that supports Python, SQL and Markdown. It is designed to help users to perform exploratory data analysis, develop machine learning models and carry out other data science and data engineering tasks seamlessly—all within the Snowflake ecosystem.
Snowflake Notebooks is designed to integrate deeply with the Snowflake ecosystem, leveraging the power of Snowflake Snowpark, Streamlit, Snowflake Cortex and Iceberg tables, allowing users to perform complex data operations and data visualizations, build interactive applications and manage large-scale data workflows efficiently.
Snowflake Notebooks in 2026: what’s changed
Here’s the quick version of where things stand:
| Legacy notebooks | Notebooks in Workspaces | |
| Status | Deprecated (still available for existing accounts) | Generally available (GA) since February 5, 2026 |
| Runtime | Warehouse Runtime (Python 3.9) or Container Runtime (Python 3.10) | Container Runtime only (CPU and GPU compute pools) |
| Package installation | Snowflake Anaconda channel | pip, uv pip, PyPI, or file upload |
| Python environment | Python 3.9 (Warehouse) / 3.10 (Container) | Python 3.10+ |
| Jupyter compatibility | Partial | Full (standard magic commands supported) |
| File management | Notebook objects in a schema | File-based, inside a Workspace directory |
| Scheduling | Tasks tied to notebook ownership role | Notebook Project Object (NPO) with versioned deployments |
| Collaboration | Role-based (share role, share notebook) | Git-integrated or Shared Workspaces with fine-grained access |
Snowflake will migrate all users to Notebooks in Workspaces over the next few quarters. A Behavior Change Request (BCR) will be issued before any mandatory migration is enforced.
The rest of this guide walks through the Legacy Notebook interface in full detail (since most existing users are still there), then covers what’s new and different in Notebooks in Workspaces.
Key features and capabilities of Snowflake Notebooks
Snowflake Notebooks offer a ton of features that help users harness the full potential of data within the Snowflake ecosystem. Here are all the features that this interactive development environment offers:
1) Interactive, cell-based development
Both notebook experiences give you a cell-by-cell development environment where you write and execute SQL, Python and Markdown. You can iterate on individual cells, see results inline and combine narrative text with live code. This cell-by-cell model makes iterative development fast because you’re not re-running the entire notebook every time you make a small change.
2) Scalability, security and governance
Snowflake notebooks inherit the platform’s role-based access control (RBAC), data encryption and governance features. Your notebook runs inside your Snowflake account, which means access policies, data masking and object-level permissions all apply without any extra configuration.
Sharing notebooks with other roles isn’t supported in Legacy Notebooks; each notebook is owned by the role that created it. Notebooks in Workspaces improves on this with Shared Workspaces and Git-integrated workspaces that support proper multi-user collaboration.
3) AI/ML and data engineering workflows
You can use the full Python data science stack (pandas, NumPy, scikit-learn, XGBoost and more) alongside Snowflake Snowpark for distributed data processing. Legacy Notebooks run Python on your warehouse or a Container Runtime. Notebooks in Workspaces run on dedicated CPU or GPU compute pools, making them a better fit for serious ML training workloads.
4) Git integration for collaboration
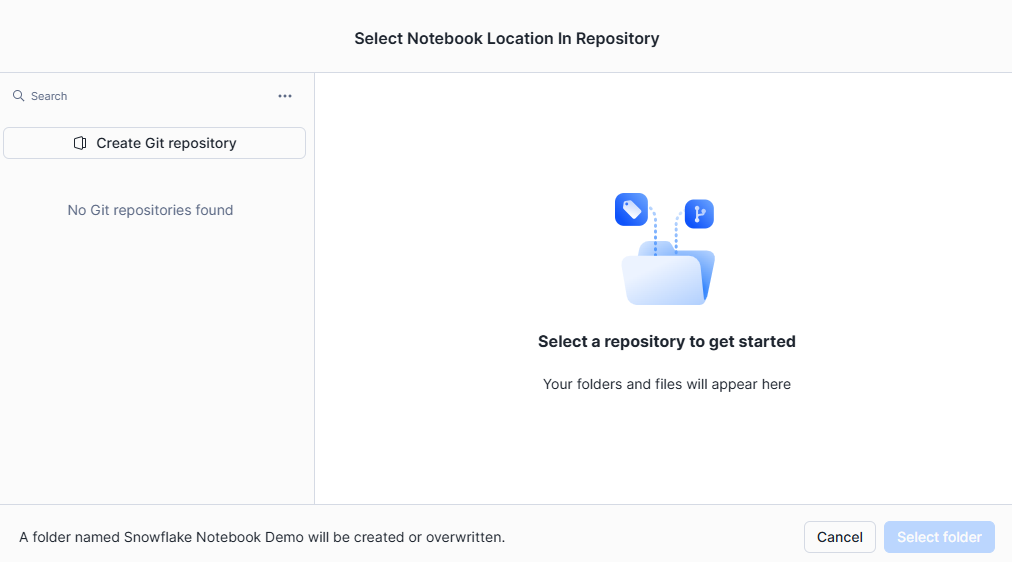
You can integrate with Git to collaborate with effective version control. Snowflake syncs notebooks with GitHub, GitLab, BitBucket, or Azure DevOps repositories. In Notebooks in Workspaces, this extends to full Git-integrated workspaces where the entire workspace directory is version-controlled.
This integration not only promotes code sharing and collaboration but also enhances efficiency by enabling users to track changes, revert to previous versions and merge updates from multiple contributors.
5) Scheduling and automation
Both experiences support scheduled runs. Legacy Notebooks use Snowflake Tasks tied to the notebook’s owning role. Notebooks in Workspaces introduce the notebook project object (NPO), which encapsulates the entire workspace directory, supports versioned deployments and can be targeted by multiple task schedules.
6) Snowflake Cortex Code integration
Snowflake Cortex Code understands your specific Snowflake environment, including your schemas, roles, active warehouses and governance rules. It can generate SQL and Python, explain code, suggest optimizations and plan multi-step tasks. It’s meaningfully more capable than the original Copilot, which was primarily a SQL autocomplete tool.
A walkthrough of the Legacy Snowflake Notebook interface
This section covers the original Snowflake Notebooks interface (now called Legacy Notebooks). If your account was created before April 2026, this is likely what you’re working with. We will explore it in greater detail in a later section.
When you create a notebook for the first time, three example cells appear by default. You can modify or delete those and add new ones.
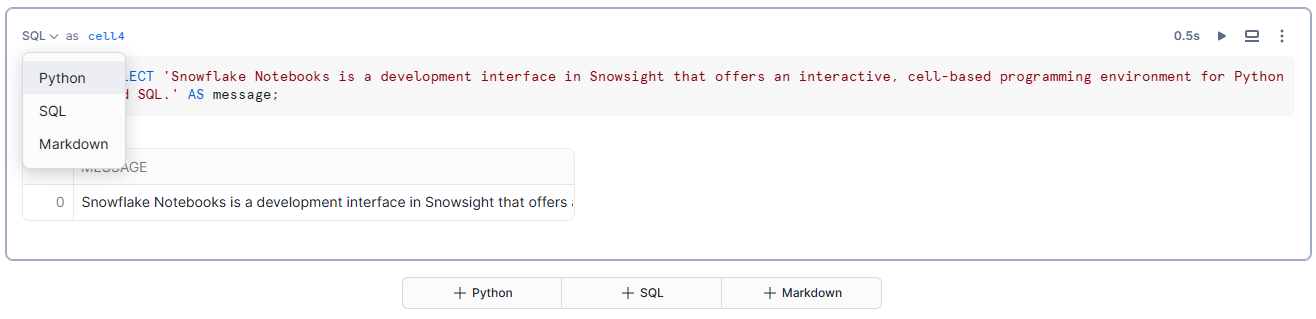
1) Creating new cells in Snowflake Notebooks
To create a new cell, select the desired cell type button—SQL, Python, or Markdown. You can change the cell type anytime using the language dropdown menu.

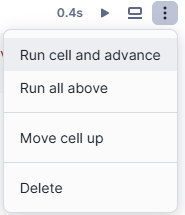
2) Moving cells in Snowflake Notebooks
Cells can be moved by dragging and dropping or using the actions menu.
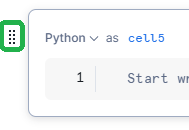
Option 1—Hover your mouse over the cell you want to move. Select the drag-and-drop icon and move the cell to its new location.
Option 2—Click the vertical ellipsis (more actions) menu for the worksheet. Select the appropriate action from the menu.
3) Running cells in Snowflake Notebooks
Cells can be run individually or in sequence.
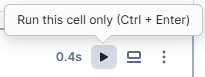
1) Run a single cell
When making frequent code updates, you can run a single cell to see the results immediately. To do this, press CMD + Return on a Mac or CTRL + Enter on Windows. Alternatively, you can select “Run this cell only” from the cell’s menu by clicking on the vertical ellipsis (more actions).
2) Run all cells in a Notebook
Before presenting or sharing your Snowflake notebook, it’s important to ensure that all cells are up-to-date. To run all cells sequentially, press CMD + Shift + Return on a Mac or CTRL + Shift + Enter on a Windows keyboard. You can also select “Run all” from the notebook menu to execute every cell in the notebook in order.

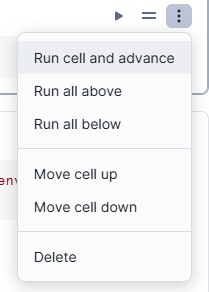
3) Run a cell and advance to the next cell
To run a cell and quickly move to the next one, press Shift + Return on a Mac or Shift + Enter on Windows. This option allows for a smooth workflow when you need to check the results of each cell consecutively. Also, you can select “Run cell and advance” from the cell’s actions menu by clicking the vertical ellipsis.
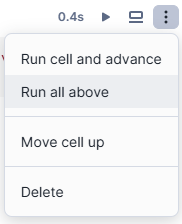
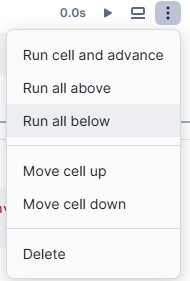
4) Run all above
If you need to run a cell that references the results of earlier cells, you can execute all preceding cells first. This is done by selecting “Run all above” from the cell’s actions menu, ensuring all necessary previous computations are complete.
5) Run all below
When running a cell that later cells depend on, you can execute the current cell and all subsequent cells by selecting “Run all below” from the cell’s actions menu. This ensures that all dependent cells are processed in sequence.
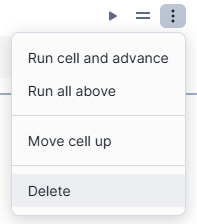
4) Deleting cells in Snowflake Notebooks
Cells can be deleted using the actions menu or keyboard shortcuts. Select the vertical ellipsis, choose delete and confirm the action.
5) Inspecting cell status in Snowflake Notebooks
The status of a cell run is indicated by color codes and displayed in the cell’s left wall and right navigation map.
- Blue dot: Indicates the cell has been modified but hasn’t run yet.
- Red: An error has occurred.
- Green: The run was successful.
- Moving green: The cell is currently running.
- Blinking gray: The cell is waiting to be run, typically occurring when multiple cells are triggered to run.
Note: Markdown cells do not show any status indicators.
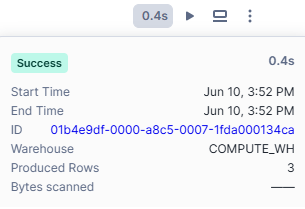
After a cell finishes running, the time it took to run is displayed at the top of the cell. You can select this text to view the run details window, which includes the execution start and end times and the total elapsed time.
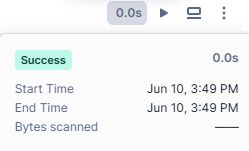
SQL cells provide additional information, such as the warehouse used to run the query, the number of rows returned and a hyperlink to the query ID page for further details.
6) Stopping a running cell in Snowflake Notebooks
To stop a running cell, select the stop button on the top right of the cell. This stops the current cell and any subsequent cells scheduled to run.

7) Formatting text with markdown in Snowflake Notebooks
Markdown cells allow you to format text within the notebook. Add a Markdown cell and type valid Markdown syntax to format your text. The formatted text appears below the Markdown syntax.
Step-by-step guide to setting up and using Snowflake Notebooks (Legacy)
Follow these detailed steps to get started with Snowflake Notebooks and unlock their full potential for your data analysis and machine learning tasks.
Prerequisites:
Make sure you have the following:
- A Snowflake account (sign up for a 30-day free trial if needed)
- Access to the Snowsight interface
- The following privileges on your role:
-
- USAGE on the database where the notebook will live
- USAGE or OWNERSHIP on the schema
- CREATE NOTEBOOK on the schema
- USAGE, CREATE TASK on the schema (required for scheduling)
- EXECUTE TASK on the account (required for scheduling)
- Familiarity with Python and SQL
- Access to GitHub, GitLab, Bitbucket or Azure DevOps if you plan to use version control
- An .ipynb file ready if you plan to import an existing notebook
Step 1—Log in to Snowflake
First, sign in to your Snowflake account using the Snowsight interface.
Step 2—Access Snowflake Notebooks
Once logged in, navigate to the “Projects” pane and select “Notebooks” within the Snowsight interface.
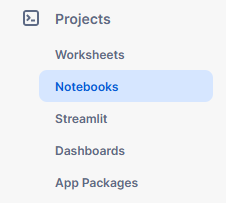
This will open the Snowflake Notebooks interface where you can create, manage and run notebooks.
Step 3—Start a Notebook session
Create a new notebook or open an existing one to start your session. Click on the “+ Notebook” button located at the top right corner to create a new notebook.

Step 4—Select or create a dedicated Database and Schema
Choose an existing database and schema or create new ones where your notebook will be stored. Note that these cannot be changed after creation.
CREATE DATABASE snowflake_notebooks_db;
CREATE SCHEMA snowflake_notebooks;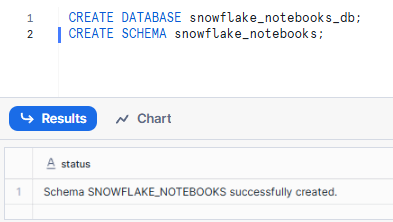
Step 5—Select a Warehouse for running Snowflake Notebooks
Select an appropriate warehouse to run your notebook. The warehouse should have sufficient compute resources for your tasks.
CREATE WAREHOUSE snowflake_notebook_wh WITH
	 WAREHOUSE_SIZE = 'XSMALL'
	AUTO_SUSPEND = 60
	 AUTO_RESUME = TRUE;
USE WAREHOUSE snowflake_notebook_wh;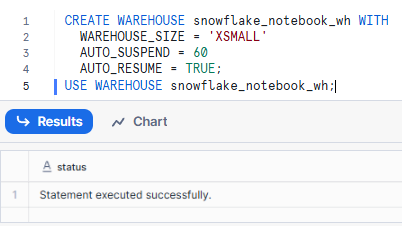
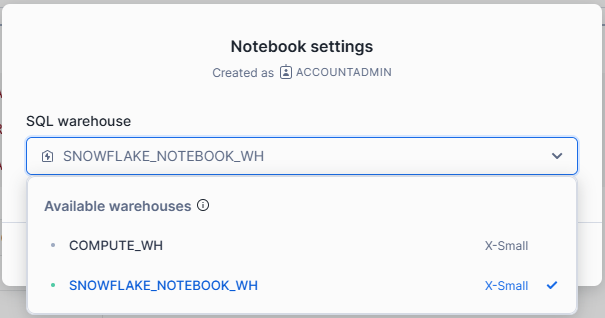
Step 6—Changing the Notebook Warehouse if needed
If needed, you can change the warehouse from the notebook settings to match the computational needs of your analysis.
Step 7—Assign required privileges
To manage who can create and modify notebooks, Snowflake provides a dedicated schema-level privilege. Each notebook is owned by the active role in your session at the time of creation and any user with that role can open, run and edit the notebooks owned by that role. Sharing notebooks with other roles is not allowed, so consider creating a dedicated role for notebook management.
To create a notebook, you must use a role that has the following privileges:
| Privilege | Object |
| USAGE | Database |
| USAGE or OWNERSHIP | Schema |
| CREATE NOTEBOOK | Schema |
Granting required privileges
Grant the necessary privileges on the database and schema intended to contain your notebooks to a custom role. Below is an example of how to grant these privileges for a database named snowflake_notebooks_db and a schema named snowflake_notebooks to a role named create_notebooks:
- Grant USAGE privilege on the database:
GRANT USAGE ON DATABASE snowflake_notebooks_db TO ROLE create_notebooks;- Grant USAGE privilege on the schema:
GRANT USAGE ON SCHEMA snowflake_notebooks TO ROLE create_notebooks;- Grant CREATE NOTEBOOK privilege on the schema:
GRANT CREATE NOTEBOOK ON SCHEMA snowflake_notebooks TO ROLE create_notebooks;If you assign these privileges, you guarantee that the designated role has the necessary permissions to create and manage notebooks within the specified schema. This setup helps maintain a controlled and secure environment for notebook creation and modification.
Step 8—Executing Snowflake Notebooks
Let’s dive into the first demo notebook in Snowflake and unravel its secrets.
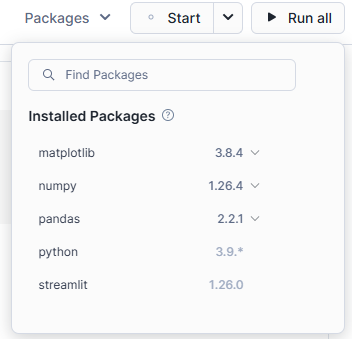
Add necessary Python packages
Snowflake Notebooks come pre-installed with common Python libraries for data science and machine learning, such as numpy, pandas, matplotlib and so much more. But, if you need to use other packages, you can easily add them via the Packages dropdown on the top right of the notebook interface.
Here’s how to add additional packages and use them in your notebook:
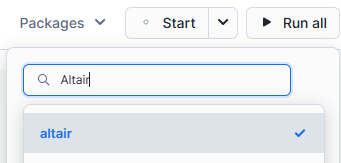
First—Click on the Packages dropdown at the top right of your notebook interface.
Second—Type the name of the package you need and add it to your notebook environment.
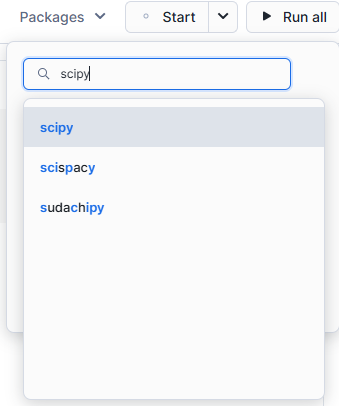
Third—Once added, you can import and use these packages just like any other Python library.
# Import Python packages used in this notebook
import streamlit as st
import altair as alt

# Pre-installed libraries that come with the notebook
import pandas as pd
import numpy as np

# Package that we just added
import matplotlib.pyplot as plt
import scipy
Switching between SQL and Python cells
Switching between SQL and Python at various stages in your data analysis workflow can significantly enhance your productivity and flexibility.
When creating a new cell in Snowflake Notebooks, you have the option to choose between SQL, Python and Markdown, allowing you to select the most appropriate language for each task; whether it’s running SQL queries, executing Python scripts, or adding documentation and notes.
Each cell in the notebook has a dropdown menu located at the top left corner. This dropdown not only shows the type of cell (SQL, Python, or Markdown) but also displays the cell number, making it easier to navigate and organize your notebook efficiently.

Let’s write some simple SQL to generate sample student data to play with.
SELECT
		CONCAT('STUDENT-', UNIFORM(1000, 9999, RANDOM())) AS STUDENT_ID,
		UNIFORM(6, 18, RANDOM()) AS AGE,
		'Class ' || UNIFORM(1, 10, RANDOM()) AS CLASS
FROM
		TABLE(GENERATOR(ROWCOUNT => 200));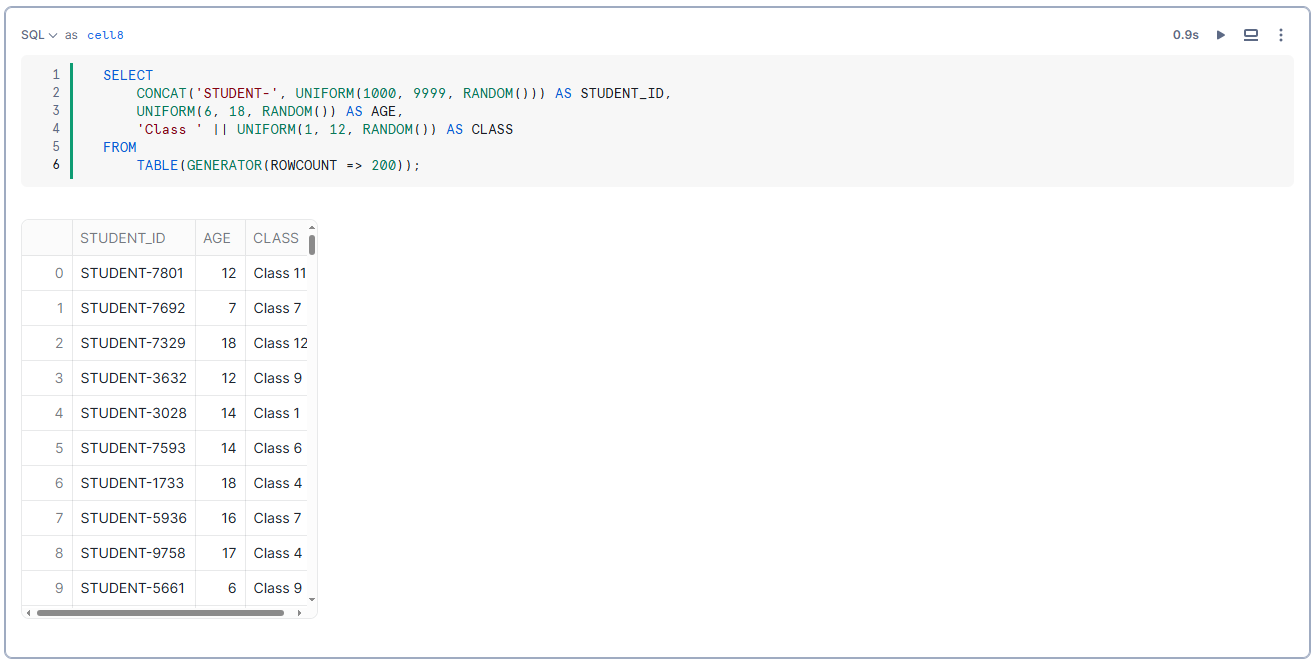
Simple and advanced Data Visualization
Visualizing data is a crucial aspect of data analysis and understanding. Snowflake Notebooks support a variety of libraries for creating data visualizations, such as:
Here, we’ll focus on using Altair, Matplotlib and Plotly to demonstrate how to visualize data effectively in Snowflake Notebooks.
Example 1—Visualizing data by using Altair
Altair is a declarative statistical data visualization library for Python and is included by default in Snowflake Notebooks as part of Snowflake Streamlit. Currently, Snowflake Notebooks support Altair version 4.0.
Step 1—Install Matplotlib
From the notebook, select Packages and locate the Altair library to install it.
Step 2—Import the necessary libraries:
import pandas as pd
import altair as alt
import random
Step 3—Generate synthetic data
data = {
		 'STUDENT_ID': [f'STUDENT-{random.randint(1000, 9999)}' for _ in range(200)],
		 'AGE': [random.randint(6, 18) for _ in range(200)],
		'CLASS': [f'Class {random.randint(1, 10)}' for _ in range(200)]
}
Step 4—Create a DataFrame
df = pd.DataFrame(data)Step 5—Create a Bar Chart to visualize the number of students in each class
chart = alt.Chart(df).mark_bar().encode(
		 x=alt.X('CLASS', axis=alt.Axis(labelAngle=0)),
		 y='count()',
		 color='CLASS'
).properties(
		 title='Number of Students per Class'
)
Step 6—Display the Chart
chart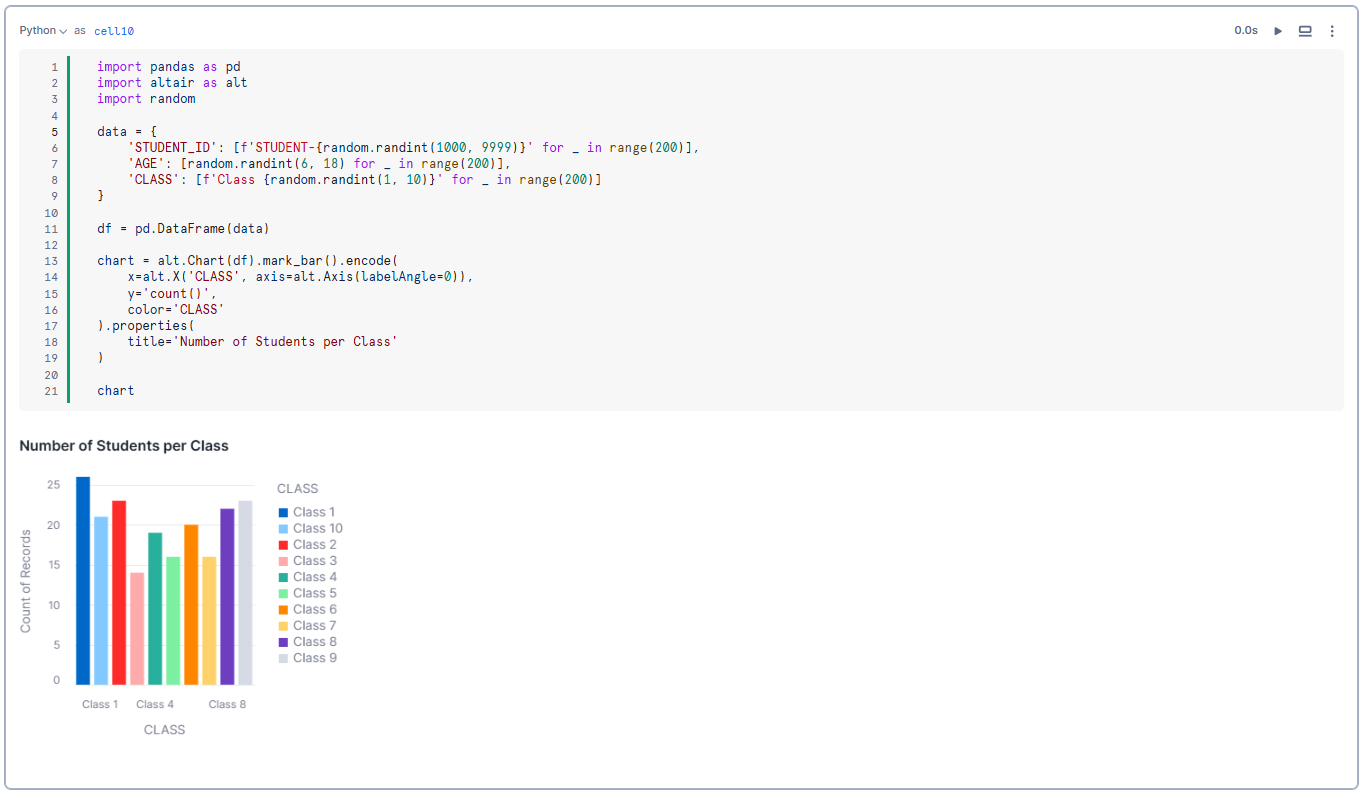
Example 2—Visualizing data by using Matplotlib
Matplotlib is a widely used plotting library in Python. To use Matplotlib in Snowflake Notebooks, you need to install the library first.
Step 1—Install Matplotlib
From the notebook, select Packages and locate the Matplotlib library to install it.
Step 2—Import the necessary libraries
import pandas as pd
import matplotlib.pyplot as plt
import random
Step 3—Generate synthetic data
data = {
		 'STUDENT_ID': [f'STUDENT-{random.randint(1000, 9999)}' for _ in range(200)],
		 'AGE': [random.randint(6, 18) for _ in range(200)],
		'CLASS': [f'Class {random.randint(1, 12)}' for _ in range(200)]
}
Step 4—Create a DataFrame
df = pd.DataFrame(data)Step 5—Count the number of students in each class
class_counts = df['CLASS'].value_counts().sort_index()Step 6—Create a Bar Chart to visualize the number of students in each class
plt.figure(figsize=(20, 6))
plt.bar(class_counts.index, class_counts.values, color='skyblue')
plt.xlabel('Class')
plt.ylabel('Number of Students')
plt.title('Number of Students per Class')
plt.xticks(rotation=45)
plt.tight_layout()
Step 7—Display the Chart
plt.show()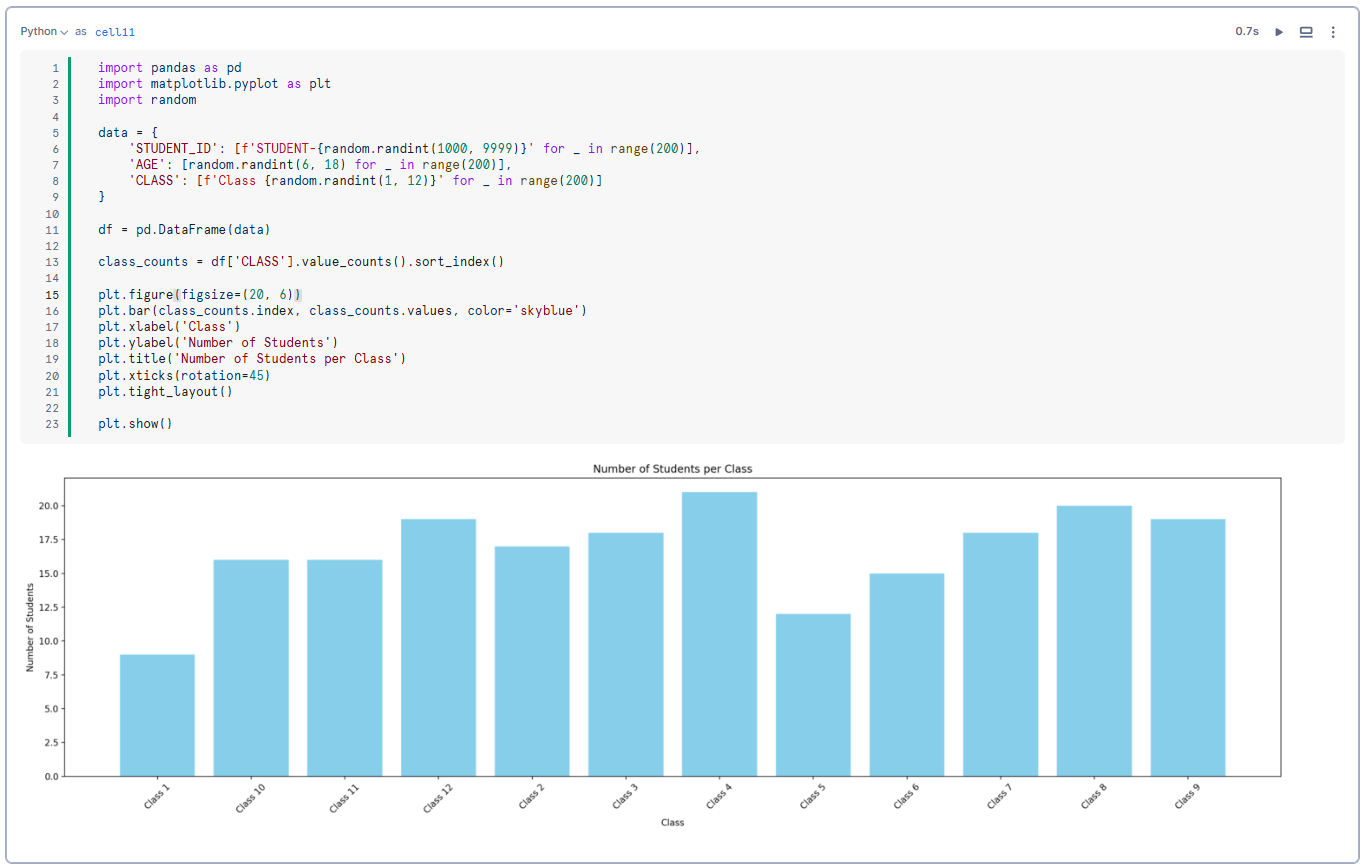
Example 3—Visualizing data by using Plotly
Plotly is an interactive graphing library for Python. To use Plotly in Snowflake Notebooks, you need to install the library first.
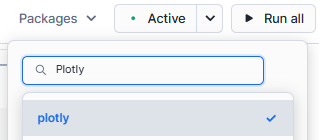
Step 1—Install Plotly
From the notebook, select Packages and locate the Plotly library to install it.
Step 2—Import the necessary libraries
import pandas as pd
import plotly.express as px
import random
Step 3—Generate synthetic data
data = {
		'STUDENT_ID': [f'STUDENT-{random.randint(1000, 9999)}' for _ in range(200)],
		'AGE': [random.randint(6, 18) for _ in range(200)],
		 'CLASS': [f'Class {random.randint(1, 12)}' for _ in range(200)]
}
Step 4—Create a DataFrame
df = pd.DataFrame(data)Step 5—Count the number of students in each class
class_counts = df['CLASS'].value_counts().reset_index()
class_counts.columns = ['CLASS', 'COUNT']
Step 6—Create a Bar Chart to visualize the number of students in each class:
fig = px.bar(class_counts, x='CLASS', y='COUNT', title='Number of Students per Class')Step 7—Display the Chart
fig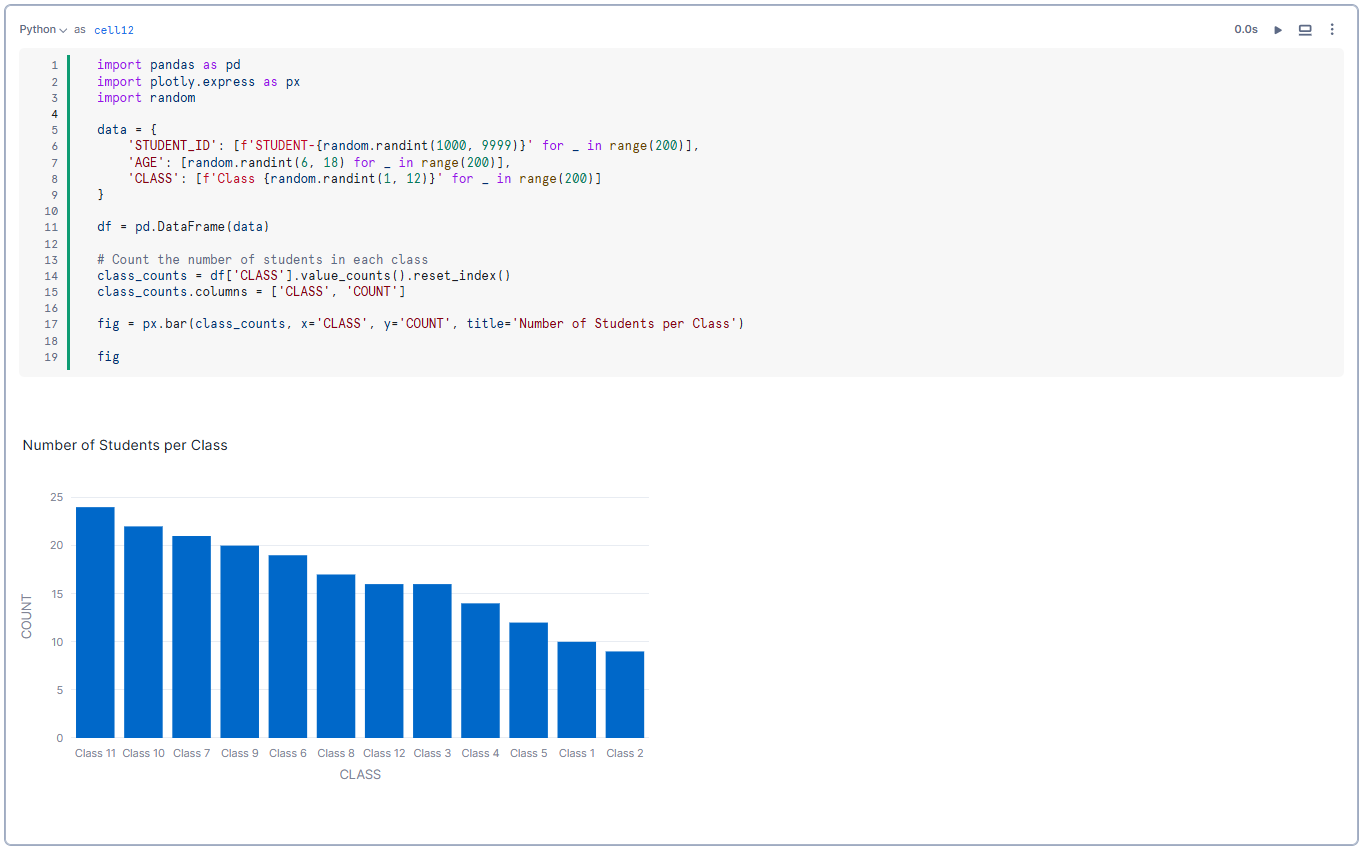
For an in-depth guide on creating advanced visualizations with Snowflake Notebooks, check out this video:
Now, let’s move on to explore how you can use Snowflake Snowpark API to process data.
Using Snowflake Snowpark Python API to process data
Snowflake Notebooks not only support your favorite Python data science libraries but also integrate seamlessly with the Snowflake Snowpark Python API, enabling scalable data processing within the notebook environment.
Snowpark Python API allows you to execute complex data transformations and operations directly on Snowflake tables using Python, providing a powerful toolset for data engineers and scientists.
To start using the Snwoflake Snowpark Python API, first you need to initialize a session. The session serves as the primary interface to interact with Snowflake’s Python API within the notebook.
from snowflake.snowpark.context import get_active_session

session = get_active_session()
The session variable is the entry point that gives you access to Snowflake’s Python API.
Here, we use the Snowpark Python API to write a pandas DataFrame as a Snowpark table named DEMO_CATALOG.
session.write_pandas(df,"DEMO_CATALOG",auto_create_table=True, table_type="temp")Now that we have created the DEMO_CATALOG table, we can reference the table and compute basic descriptive statistics with Snowpark.
df = session.table("DEMO_CATALOG")
df.describe()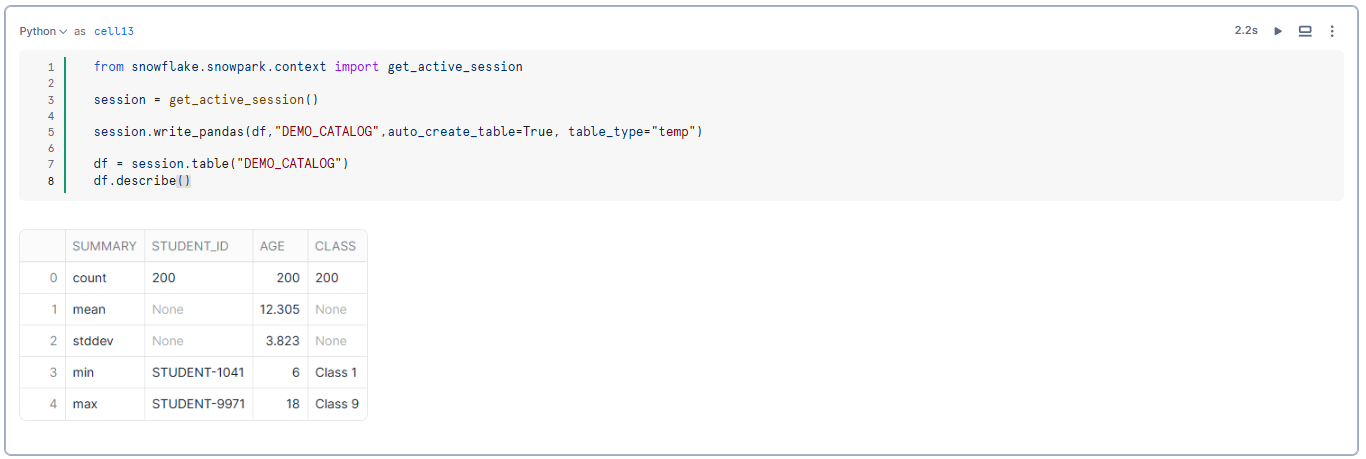
As you can see, this streamlined integration helps you to leverage Snowflake’s robust processing capabilities directly within your Python-based workflows.
Referencing cells and variables across cell types
Referencing cells and variables in Snowflake Notebooks allows for seamless integration of outputs across different cell types, which enhances workflow efficiency and dynamic data interaction.
Now, let’s dive in and see how you can reference cells and variables in Snowflake Notebooks.
1) Referencing SQL output in Python cells
You can assign names to SQL cells and reference their outputs in subsequent Python cells. This feature is particularly useful for transforming SQL query results into Dataframes for further analysis using Snowflake Snowpark Python API or Pandas Dataframes.
Here is how you can convert SQL cell output to Snowpark or Pandas Dataframes:
To reference the output of a named SQL cell and convert it into a Snowpark Dataframe:
my_snowpark_df = cell8.to_df()Similarly, to convert the SQL cell output into a Pandas Dataframe:
my_df = cell8.to_pandas()2) Referencing Python variables in SQL cells
Snowflake Notebooks support the use of Jinja syntax {{…}} to dynamically reference Python variables within SQL cells. This allows for the creation of flexible and parameterized SQL queries.
limit = 10
SELECT * FROM DEMO_CATALOG where AGE > {{limit}}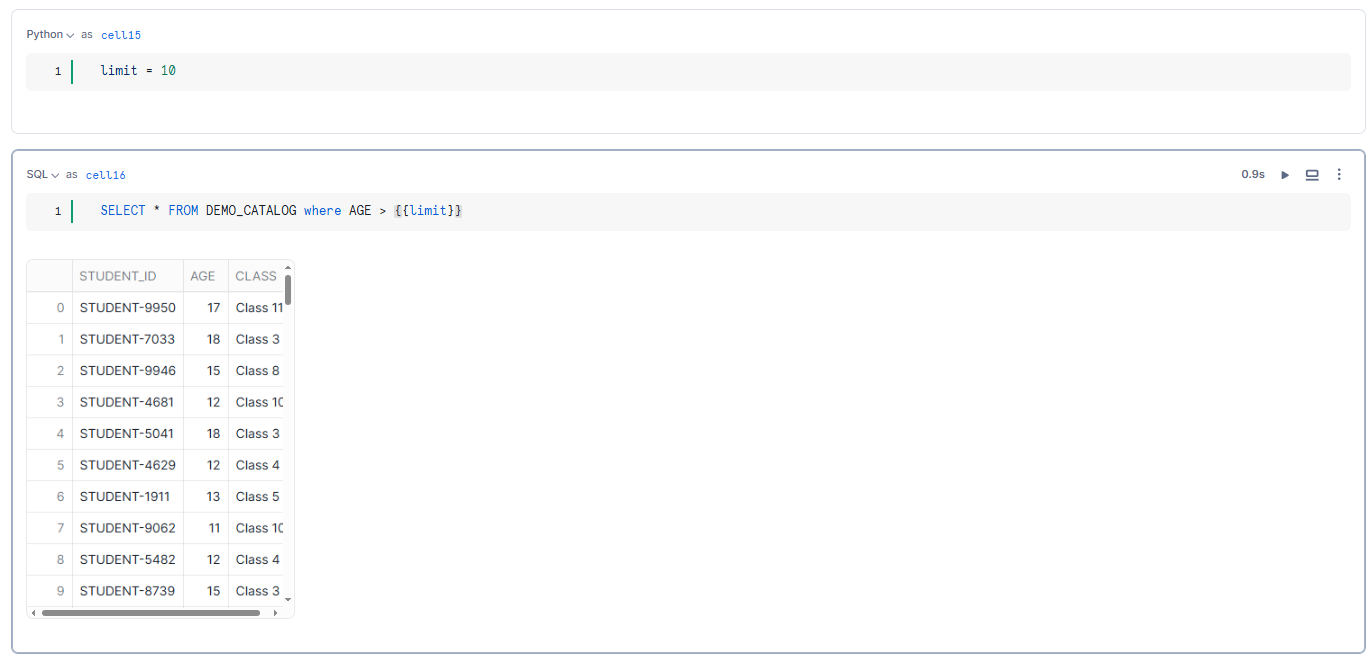
Likewise, you can also reference a Pandas Dataframe within your SQL statements, making it possible to use the Dataframe directly in SQL queries:
SELECT * FROM {{my_df}}As you can see, this ability to reference outputs and variables across different cell types in Snowflake Notebooks significantly enhances data manipulation capabilities and allows for more interactive and dynamic data workflows.
Building an interactive data app with Snowflake Streamlit
Snowflake Notebooks seamlessly integrate with Snowflake Streamlit, enabling the creation of interactive data applications directly within your notebooks. Streamlit is a powerful tool that allows data scientists and analysts to build interactive and user-friendly web apps for data exploration and data visualization. This step-by-step guide will show you how to leverage Streamlit within Snowflake Notebooks to create an interactive data app.
Streamlit is already included in Snowflake Notebooks as part of the pre-installed libraries.
Step 1—Initialize Streamlit and create interactive sliders
First, we’ll create interactive sliders using Snowflake Streamlit to allow users to select the mean and standard deviation for generating data.
import streamlit as st
mean = st.slider('Select mean age:', 6, 18, 12)
stdev = st.slider('Select standard deviation of age:', 0, 10, 2)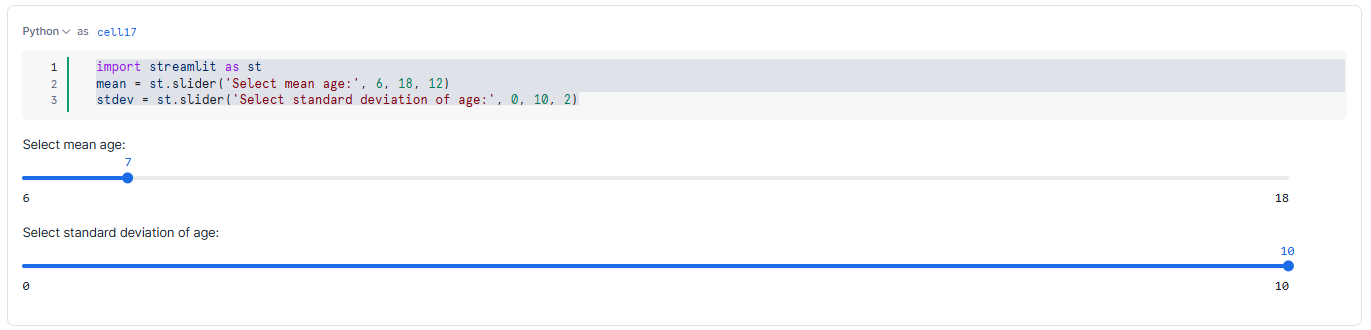
Step 2—Initialize a Snowpark session
Initialize a Snowpark session to interact with Snowflake’s Python API within the notebook.
from snowflake.snowpark.context import get_active_session
session = get_active_session()
Step 3—Capture slider values and generate data
Capture the mean and standard deviation values from the sliders and use them to generate a distribution of values to populate a Snowflake table.
CREATE OR REPLACE TABLE STUDENT_DATA AS
SELECT CONCAT('STUDENT-', UNIFORM(1000, 9999, RANDOM())) AS STUDENT_ID,
				UNIFORM({{mean}}, {{stdev}}, RANDOM()) AS AGE,
				'Class ' || UNIFORM(1, 12, RANDOM()) AS CLASS
FROM
		TABLE(GENERATOR(ROWCOUNT => 200));
Step 4—Plot the data using Altair
Use Altair to plot a histogram of the generated data. This visualization will update automatically as the slider values are adjusted.
from snowflake.snowpark.context import get_active_session
import altair as alt

session = get_active_session()
df = session.table("STUDENT_DATA").to_pandas()

alt.Chart(df).mark_bar().encode(
		 alt.X("AGE", bin=alt.Bin(step=2)),
		 y='count()',
)
As you adjust the slider values, the cells re-execute itself and the histogram updates based on the new data. This dynamic interactivity makes it easy to explore different data distributions and gain insights in real time.

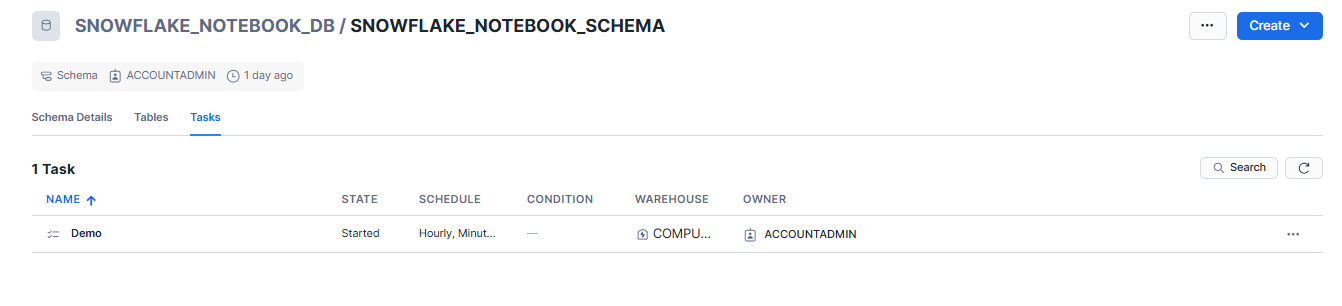
Step 9—Schedule your Snowflake Notebooks
Snowflake Notebooks offer the capability to schedule notebook runs, automating data workflows and guaranteeing timely updates.
Whenever you create a schedule for your notebook, Snowsight creates a task that runs the notebook according to the specified schedule. The notebook runs in a non-interactive mode, executing each cell sequentially from top to bottom. The task is associated with the notebook owner’s role and uses the designated warehouse for execution. If the task fails ten times, it automatically suspends to prevent further resource usage.
Each scheduled run resumes the warehouse and keeps it active until 15 minutes after the task is completed, which might affect billing.
To schedule a notebook, your role must have specific privileges. Make sure the following permissions are granted:
- EXECUTE TASK on the account
- USAGE on the database containing the notebook
- USAGE and CREATE TASK on the schema containing the notebook
First—Create Snowflake Notebook Schedules
Follow these steps to schedule your notebook:
Step 1—Navigate to the Projects pane and select Notebooks.
Step 2—Find the notebook you want to schedule.
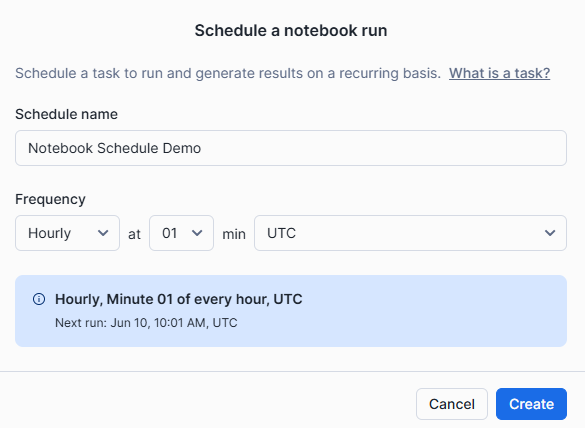
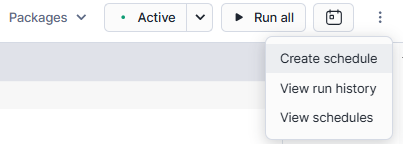
Step 3—In the Snowflake Notebook, select the schedule button and then click on “Create schedule“.
Step 4—The schedule dialog will appear. Provide the following details:
- Schedule Name: Enter a name for the notebook schedule.
- Frequency: Choose the frequency (e.g., Daily, Weekly).
- Scheduled Time: Adjust the time and other options as needed.
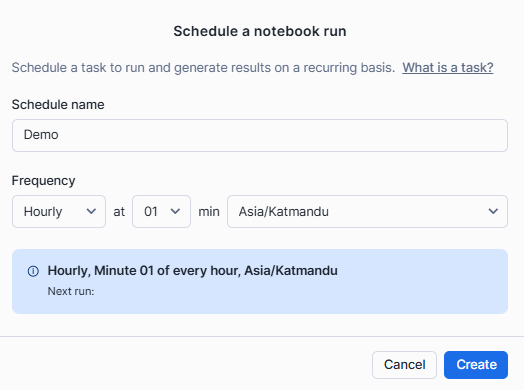
Step 5—Review the schedule details and click “Create” to establish the task.
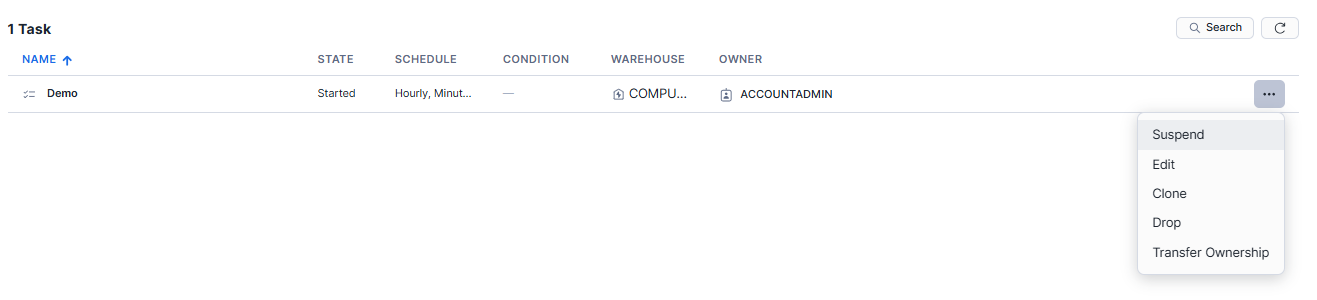
Second—Manage Snowflake Notebook Schedules
After creating a schedule, you can manage it through the task list:
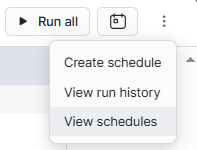
Step 1—Select the schedule button in the notebook and choose “View schedules“. This displays all tasks in the schema.
Step 2—Use the vertical ellipsis (more actions) menu to edit the schedule, such as changing the time or frequency, or suspending/dropping the task.
For more on scheduling Notebook runs, see Schedule your Snowflake Notebook to run.
Snowflake Notebooks in Workspaces: the 2026 experience
Notebooks in Workspaces is generally available as of February 5, 2026. It provides a fully managed, end-to-end environment for data science and ML development on Snowflake data, combining the familiar Jupyter notebook interface with enterprise-grade compute, governance and collaboration capabilities.
The new experience includes a Jupyter environment with direct access to governed Snowflake data, enhanced IDE features including file management and terminal access, powerful AI/ML compute with fully managed access to CPUs and GPUs and governed collaboration with role-based access controls and version history through Git-integrated or Shared Workspaces.
Some key differences from legacy notebooks
Container-based compute: Snowflake Notebooks in Workspaces run on a Container Runtime powered by Snowpark Container Services, with preconfigured containers optimized for AI/ML workloads and access to CPUs and GPUs, parallel data loading and distributed training APIs for popular ML packages.
File-based organization: Notebooks are files in Workspaces, enabling easy file management and organization. Standard Jupyter magic commands provide a familiar development experience. You can install additional packages via pip, PyPI or file upload.
Bidirectional cell referencing: Notebooks in Workspaces supports bidirectional SQL and Python cell referencing for seamless language switching, plus an interactive datagrid and automated chart builder for data visualization, and an enhanced minimap with cell status tracking and table of contents.
Scheduling with NPOs: When you schedule a notebook in Workspaces, it deploys into a production object called a Notebook Project Object (NPO), which encapsulates the workspace contents (for example, .ipynb files, Python scripts and SQL files). NPOs support versioned deployments and are schema-level objects. You can create multiple task objects that execute the same NPO, allowing multiple schedules for the same notebook project object.
ML workflows: Users can access distributed data loading and training across designated CPU or GPU compute pools, simplifying ML infrastructure management by abstracting the need for manual configuration of distributed compute resources.
Migrating from Legacy Notebooks
Starting in March 2026, Snowflake is rolling out the ability to import legacy notebooks into Workspaces. Snowflake will communicate the full deprecation timeline and migration process in advance. Watch for a Behavior Change Request (BCR) before any mandatory migration is enforced.
14 tips for running Snowflake Notebooks effectively
Tip 1—Understand Notebook permissions
Use Snowflake’s role-based access controls (RBAC) to manage who can view, edit and run notebooks. Always confirm your role has USAGE privileges on the database and schema where the notebook lives. For scheduling, your role also needs CREATE TASK and EXECUTE TASK.
In Legacy Notebooks, consider creating a dedicated role for notebook management since sharing across roles isn’t supported.
Tip 2—Managing session context
Managing the session context effectively guarantees that your Snowflake Notebooks execute in the correct environment:
- Set session variables at the beginning of your notebook to define the context
- Use fully qualified names for tables and other database objects to avoid ambiguity and ensure correct data access.
- Use SQL commands like USE DATABASE and USE SCHEMA to explicitly set the context when necessary.
Tip 3—Size your warehouse appropriately
Pick the right warehouse size that fits the workload. An XS warehouse handles most exploratory queries. For large-scale transformations, step up to S or M. Warehouses accrue cost while running, so set a reasonable AUTO_SUSPEND (60 seconds is a good default for notebooks).
Tip 4—Verify Python packages before you start
Legacy Notebooks come pre-installed with common packages, but check the package picker before you begin. Missing packages mid-analysis interrupt your flow. If a package isn’t available in the Snowflake Anaconda channel, Container Runtime gives you access to broader PyPI packages via pip.
Tips 5—Structure your Notebook for clarity
A well-structured notebook is easier to read, understand and maintain:
- Organize your notebook into clear sections with descriptive titles and comments. Use Markdown cells to add explanations and context.
- Maintain consistent formatting for code and text to enhance readability.
- Include comments to document any assumptions or important details about the data and analysis.
Tip 6—Don’t rely on auto-save
Snowflake Notebooks auto-save drafts every few seconds, which helps avoid data loss. That said, commit significant changes to your Git repository regularly. Auto-save is not a substitute for version control.
Tip 7—Use Git integration
Integrating your Snowflake Notebooks with Git provides powerful version control and collaboration capabilities. Sync your notebooks with repositories in GitHub, GitLab, BitBucket, or Azure DevOps.
This integration allows you to track changes, collaborate with team members and maintain a history of notebook versions. Using Git also facilitates continuous integration and deployment (CI/CD) practices, ensuring that your notebooks are always up-to-date and consistent.
Tip 8—Keep cell execution sequential
In Legacy Notebooks using Warehouse Runtime, Python cells don’t support non-linear execution. If you re-run an earlier cell that declares a variable, you’ll need to re-run all subsequent cells that depend on it. Structure your notebook so dependencies flow top to bottom.
Tip 9—Execute Snowflake scripting blocks correctly
Legacy Snowflake Notebooks do not support the BEGIN … END syntax for Snowflake scripting within SQL cells. Instead, use the session.sql().collect() method in a Python cell to execute scripting blocks.
session.sql("""
BEGIN
-- your scripting block here
END;
""").collect()
Tip 10—Use Snowflake’s RBAC to control access
Set up roles carefully, especially when notebooks contain sensitive data queries. RBAC controls apply to the data your notebook accesses, not just to the notebook object itself.
Tip 11—Use keyboard shortcuts
Keyboard shortcuts can significantly enhance your productivity when working with Snowflake Notebooks. Familiarize yourself with the available shortcuts to navigate and edit your notebook more efficiently.
| Command | Shortcut |
| Run this cell and advance | SHIFT + ENTER |
| Run this cell only | CMD/Ctrl + ENTER |
| Run all cells | CMD/Ctrl + SHIFT + ENTER |
| Add cell BELOW | b |
| Add cell ABOVE | a |
| Delete this cell | d + d |
Tip 12—Export, duplicate and download Snowflake Notebooks
Snowflake Notebooks can be exported, duplicated and downloaded for backup and sharing purposes. Exporting a notebook allows you to create a snapshot of your work that can be shared with others or stored for future reference. To do so, click on the action menu located at the top of the Snowflake Notebook and select Export.
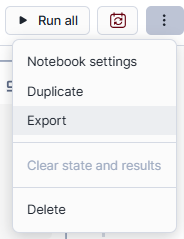
Duplicating a notebook is useful when you want to experiment with changes without affecting the original version. To do so, click on the action menu and select “Duplicate”.
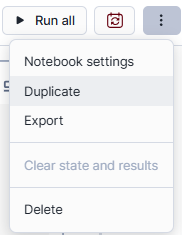
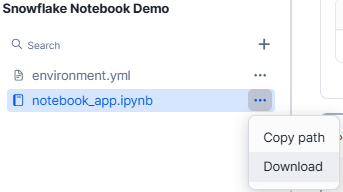
Downloading notebooks as .ipynb files allows you to work with them in other environments, such as Jupyter Notebooks. To do so, navigate to the left side panel, select the notebook you want to download, click on the menu option and hit “Download”.
Tip 13—Import existing .ipynb projects
You can import existing .ipynb projects into Snowflake Notebooks to continue development and analysis within the Snowflake environment.
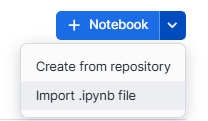
To import a project, navigate to the Notebooks section in Snowsight, select the import .ipynb file option and upload your .ipynb file.
That’s it! This is everything you need to know to get started with using Snowflake Notebooks.
Further reading
Read:
-
- Snowflake Notebook Demos
- Develop and run code in Snowflake Notebooks
- Snowflake Notebooks, Interactive Environment for Data & AI Teams
- Experience Snowflake with notebooks
- Snowflake Notebooks in Workspaces overview
- About Legacy Snowflake Notebooks
- Migrating legacy notebooks to Workspaces
- Run and schedule Notebooks in Workspaces
- Visualize data in Snowflake Notebooks
- Sync notebooks with a Git repository
- Schedule notebook runs (Legacy)
Watch:
Save up to 30% on your Snowflake spend in a few minutes!
Conclusion
And that’s a wrap! Snowflake Notebooks bring together the best of data analysis, machine learning and data engineering—all within the Snowflake ecosystem. Snowflake Notebooks, with their interactive, cell-based interface, seamless connection with Snowflake tools and strong scheduling and automation capabilities, have the potential to transform how data professionals interact with their data.
In this article, we have covered:
- What Is a Notebook in Snowflake?
- Potential of Snowflake Notebooks—Key Features and Capabilities
- Step-by-Step Guide to Setting Up and Using Snowflake Notebooks
- 14 Things to Keep in Mind When Running Snowflake Notebooks Effectively
…and so much more!
FAQs
What is Snowflake Notebooks?
Snowflake Notebooks is an interactive development environment inside Snowsight that supports Python, SQL and Markdown. It lets you perform data analysis, develop ML models and run data engineering workflows without leaving Snowflake.
What’s the difference between Legacy Notebooks and Notebooks in Workspaces?
Legacy Notebooks are the original experience, now deprecated for new accounts as of April 2026. Notebooks in Workspaces is the new GA experience with full Jupyter compatibility, Container Runtime compute (CPU/GPU), pip-based package management and file-based organization inside Workspaces. Snowflake will migrate all users to the new experience over the coming quarters.
Is Snowflake Notebooks a separate product?
No. It’s integrated into the Snowflake platform and works alongside other Snowflake components.
What programming languages are supported?
Python, SQL and Markdown in both Legacy Notebooks and Notebooks in Workspaces.
How do you create a new cell?
Select the cell type button (SQL, Python or Markdown) to add a new cell below the current one. Change the type at any time using the dropdown at the top left of the cell.
How do you move cells?
Drag and drop using the drag handle on hover, or use the vertical ellipsis (more actions) menu.
How do you delete a cell?
Click the vertical ellipsis, select “Delete” and confirm. Or press d twice when the cell is selected.
How do you stop a running cell?
Click the stop button at the top right of the cell. This cancels the current cell and any queued cells.
How do you install additional Python packages?
In Legacy Notebooks, use the Packages dropdown at the top right. In Notebooks in Workspaces, use pip install or uv pip install in a code cell or the terminal.
How do you use the Snowpark API?
Initialize a session with get_active_session() from the snowflake.snowpark.context module, then use the session object to run queries, write DataFrames and perform transformations.
Can I reference SQL output in Python cells?
Yes. Name your SQL cell, then use cell_name.to_df() for a Snowpark DataFrame or cell_name.to_pandas() for a pandas DataFrame.
Can I reference Python variables in SQL cells?
Yes. Use Jinja syntax: {{variable_name}} in your SQL cell references a Python variable defined in an earlier cell.
Can I build interactive apps inside notebooks?
Yes. Streamlit is pre-installed and lets you add sliders, dropdowns and other interactive components that re-trigger cell execution when their values change.
Can I schedule notebook runs?
Yes. Legacy Notebooks use Snowflake Tasks. Notebooks in Workspaces use Notebook Project Objects (NPOs) with more flexible versioned deployments and multi-schedule support.
How does Git integration work?
You can sync notebooks with GitHub, GitLab, Bitbucket or Azure DevOps for version control. Notebooks in Workspaces extends this to Git-integrated workspaces where the entire workspace directory is tracked.
How do I optimize SQL query performance inside notebooks?
Use specific column names instead of SELECT *. Write efficient WHERE and JOIN conditions. For large tables, consider defining clustering keys. Leverage Snowflake’s result caching for repeated queries and use materialized views for expensive aggregations you query frequently.
Can I import an existing Jupyter notebook?
Yes. In Legacy Notebooks, navigate to the Notebooks section, select the import .ipynb option and upload your file. Notebooks in Workspaces supports .ipynb files natively as part of its Jupyter-compatible environment.
What happens if my scheduled task fails repeatedly?
In Legacy Notebooks, Snowflake automatically suspends a task that fails 10 consecutive times. You’ll need to manually resume it after investigating and fixing the underlying issue.
Are Private Notebooks still available?
No. Private Notebooks are deprecated and no longer supported. The new Notebooks in Workspaces provides equivalent private development capabilities with additional features.