
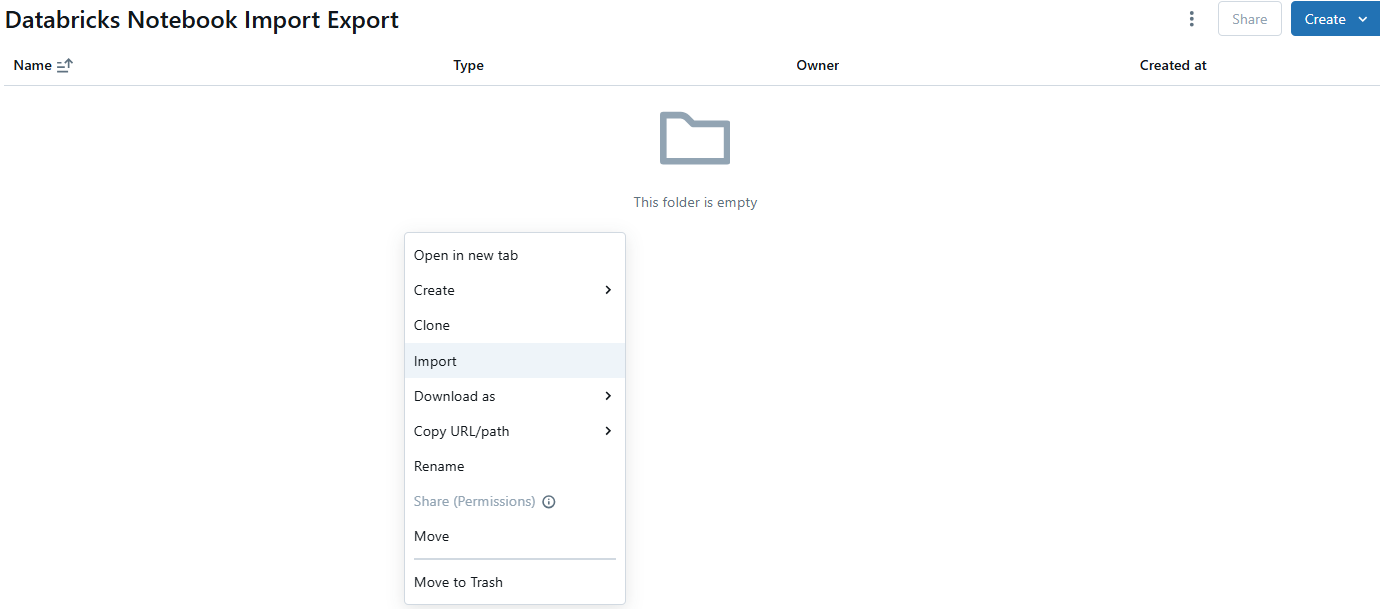
Databricks Notebook is an interactive development environment where you can write and run code collaboratively across languages like Python, R, SQL and Scala. It’s great for exploring, analyzing and visualizing data, as well as machine learning tasks. But managing complex projects in a single notebook can become cluttered and slow. One of the primary advantages of Databricks Notebooks is the ability to split your code into smaller, modular chunks. You can do this by importing and running one Databricks Notebook from another notebook. This approach makes your code more reusable, organized and maintainable. It also reduces redundancy, makes your code more readable and speeds up the debugging process. Breaking down complex workflows into smaller notebooks allows you to more easily maintain, debug and collaborate with others. Plus, this approach also clarifies your code, allowing you to develop and maintain it more quickly.
In this article, we will cover everything you need to know on how to import and execute one Databricks Notebook from another, focusing on two key techniques: the Databricks %run command and the dbutils.notebook.run() method.
What is Databricks Notebook?
Databricks Notebook is a collaborative workspace where you can write and run code, visualize data and work with others in real time. You can use it with multiple programming languages (Python, R, SQL and Scala)—all within the same environment. It allows you to develop data science and machine learning workflows easily. Plus, Databricks Notebooks simplify the process of creating and sharing data-driven projects with features like real-time coauthoring, built-in visualizations and automatic versioning.
Here are some key notable characteristics of Databricks Notebooks:
➥ Multi-language support — Databricks Notebook allows you to write code in multiple languages like Python, Scala, R and SQL within the same notebook.
➥ Cell-based execution — Databricks Notebook organizes code into cells. You can run individual cells independently, which allows you to test and debug smaller code sections before executing the full notebook.
➥ Interactive execution — Databricks Notebook supports interactive execution, letting you run code in real time and view outputs instantly.
➥ Easy collaboration — Databricks Notebook allows real-time collaboration, so you and your team can work on the same notebook simultaneously. Comments and version control simplify teamwork, reducing conflicts and streamlining workflows.
➥ Code modularization — Databricks Notebook supports code modularization by allowing you to import and run other Databricks Notebooks.
➥ Built-in visualizations — Databricks Notebook allows you to generate visualizations directly from your data. You can create charts and graphs without writing extensive code, helping you share data insights faster.
➥ Version control — Databricks Notebook automatically tracks changes. You can revert to previous versions if needed, so that you can have better control over your code history.
➥ Magic Commands — Databricks Notebooks support special commands (magic commands) that simplify certain tasks like running SQL queries directly from Python cells or managing notebook lifecycle.
➥ Dashboard creation — Databricks Notebook enables you to build dashboards to present/display results.
➥ MLflow Integration — For machine learning tasks, Databricks Notebooks integrate with MLflow for tracking experiments, managing models and deploying them to production.
➥ Easy Scheduling — Databricks Notebook can be easily scheduled to run at specific times, useful for automating data refresh, reports, or model retraining.
… and so much more!
Check out this article for a more detailed understanding of Databricks Notebooks.
Databricks Notebooks pack a lot of features. They are great for developing, testing and collaborating on data projects.
Now that you have a solid understanding of Databricks Notebooks and their role in modularizing code, let’s explore some techniques on how to import and run one Databricks Notebook from another notebook.
Step-by-step guide to import & Run one Databricks Notebook from another Notebook
In this section, we’ll go through three different techniques for importing and running one Databricks Notebook from another.
But before we get into the methods, here’s what Databricks actually recommends. The official Databricks documentation now lays out a clear hierarchy for notebook orchestration and code modularization:
| Goal | Recommended method | Fallback |
| Notebook orchestration | Lakeflow Jobs (formerly Databricks Jobs) | dbutils.notebook.run() |
| Code modularization | Workspace Files (Python .py files) | %run |
So, if you’re building production pipelines, reach for Lakeflow Jobs first. And if you’re splitting reusable utility functions into separate files, Workspace Files with proper Python imports are cleaner and more maintainable than %run.
That said, both %run and dbutils.notebook.run() are widely used and still fully supported. They are perfect in situations like when you need to loop over a dynamic list of parameters or when you’re prototyping and don’t want the overhead of setting up jobs.
We’ll start with the simplest and most straightforward method, which is by using the Databricks %run command. If you’re looking for quick code inclusion without any complexities, this is the technique for you. So, let’s dive right in!
Prerequisites
First things first, make sure that the following prerequisites are met:
- You have to have access to a Databricks workspace.
- Store both notebooks in the same directory or make sure you know their relative paths.
- The notebook you intend to import (child notebook) has the necessary permissions for reading and execution.
- Your Databricks Notebooks are attached to an active Databricks cluster. Code execution requires a running cluster.
- You have the required permissions to read and execute the target notebook.
- Verify that your environment’s Databricks runtime version supports the
%runcommand anddbutils.notebook.run()method. - If the called notebook uses Databricks Widgets for parameter input, ensure they’re properly configured to accept parameters when invoked.
Note: Although Databricks provides tools like Jobs for orchestration and workspace files for code modularization, the methods below are great for situations where these options aren’t suitable, such as when dealing with dynamic parameters or lacking workspace file access.
Technique 1—Run Databricks Notebook from another Notebook using Databricks %run command
Databricks %run command executes another Notebook inline, within the same execution context as your current Notebook. Functions, variables and imports defined in the child Notebook become immediately available in the parent.
When to use it: Quick code inclusion, shared utility functions, common configuration logic, prototyping.
When not to use it: Complex pipelines with dynamic parameters, production orchestration or anything that benefits from isolation between runs.
Step 1—Log in to Databricks
First things first—head over to your Databricks account and log in with your credentials to access your workspace.
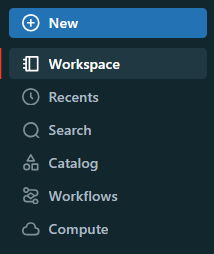
Step 2—Navigate to the Workspace
Once logged in, find the Databricks Workspace section in the left sidebar where your notebooks are stored.

Step 3—Create or locate the child Notebook
It’s time to create the notebook you want to include. Let’s call this the child notebook. If you have already created it, navigate through your workspace folders, find it and confirm its location. If you don’t have a child notebook yet, no problem—you can quickly create one for this demo.
Here’s how you can create a new child notebook:
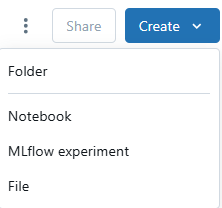
Head over to the Databricks Workspace section, click on the dropdown arrow next to your desired folder or directory, then select Create > Notebook.
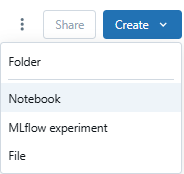
Name it, for example, child_notebook_demo and select a programming language like Python.
Next, add the following sample code to your child notebook:
# Child Notebook: child_notebook

def greet(name):
		 return f"Hello there, {name}!"

def add(a, b):
		 return a + b

print("  Child notebook has run successfully  ")
Save the notebook once you’ve added the code.
Now you have a fully functional child notebook to include in your parent notebook. In the next step, we’ll identify the path of this notebook and use it to execute it seamlessly.
Step 4—Get the child Notebook path
Right-click on your child Notebook in the workspace. Choose Copy Path or Copy URL/File Path to get the notebook’s path. This path is essential for the Databricks %run command to locate and execute the notebook.
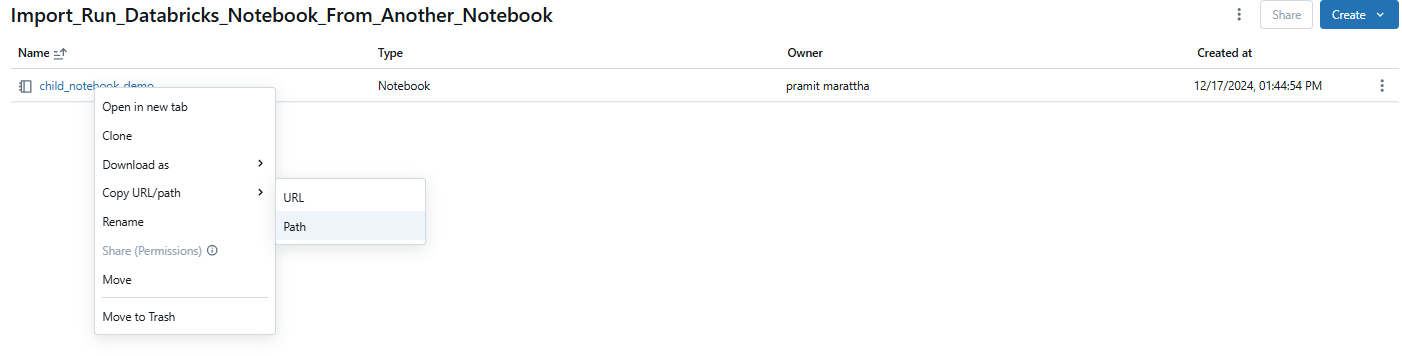
For example, the path might look like this:
/Users/<user-name>@gmail.com/Import_Run_Databricks_Notebook_From_Another_Notebook/child_notebook_demoStep 5—Set up your Databricks compute
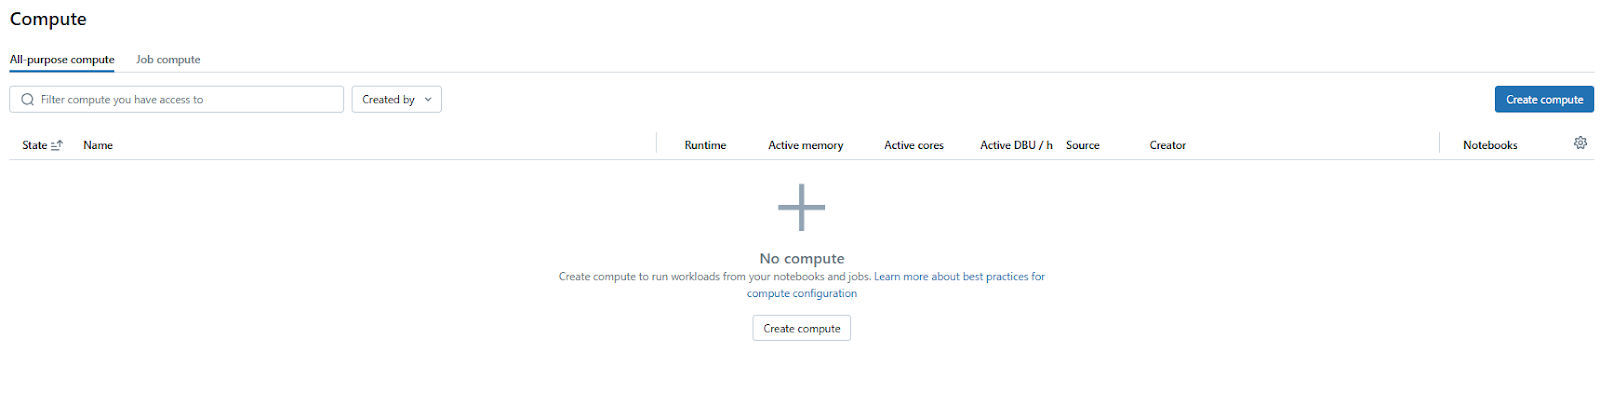
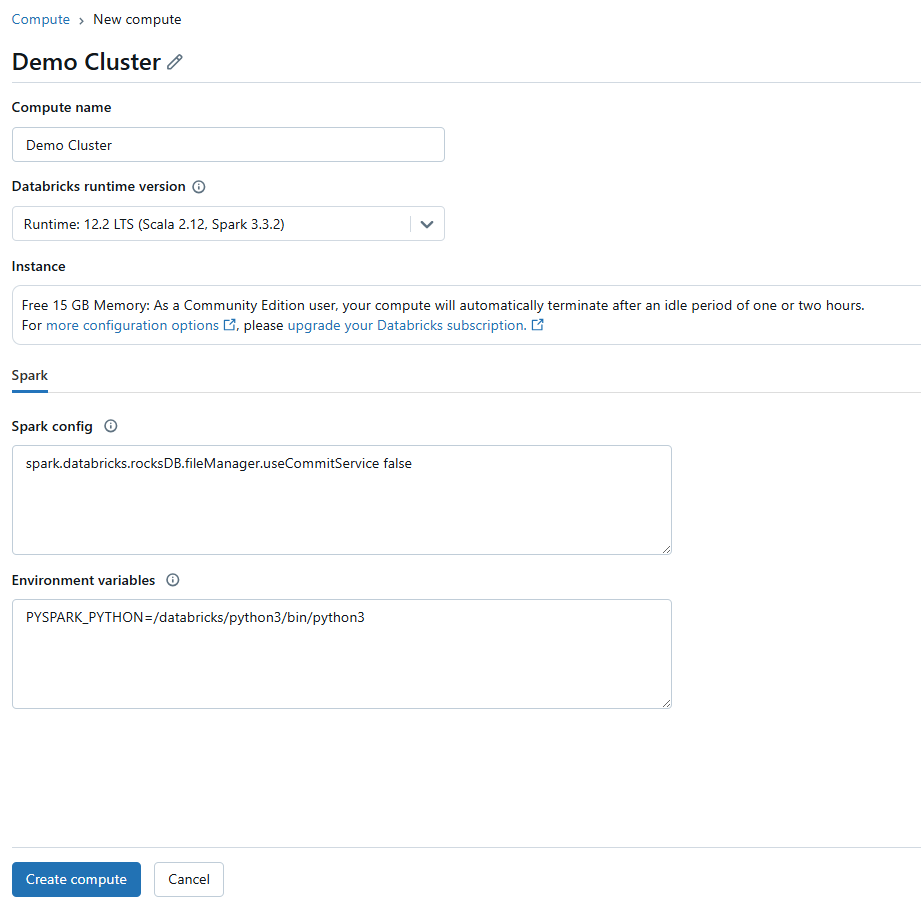
Before running notebooks, make sure you have a compute resource (cluster or SQL warehouse) set up or selected. If you don’t have a cluster, go to Compute in the left sidebar, click Create Compute and set up one with suitable configurations for your job.
Attach your Databricks Notebook to this cluster or an existing one that’s running.
Step 6—Open or create the parent Notebook
Navigate to or create the notebook from which you want to run the child notebook, let’s call this parent_notebook_demo.

Step 7—Use %run to execute the child Notebook
Add a new cell with this command:
%run /Users/<user-name>@gmail.com/Import_Run_Databricks_Notebook_From_Another_Notebook/child_notebook_demoImportant: %run must be the only content in its cell. You can’t combine it with other code in the same cell—it’ll throw a syntax error.
Running this cell executes every cell in the child notebook and makes its functions and variables available in the parent notebook’s scope.
Step 8—Call the imported functions
Test the execution by calling a function or printing a variable from the child notebook. Here is one very simple example:
a = 10
b = 20
sum_result = add(a, b)
print(f"The sum of {a} and {b} is {sum_result}.")

name = "Elon Musk"
greeting_message = greet(name)
print(greeting_message)
Step 9—Run the Databricks Notebook cell
Execute the cell containing the Databricks %run command along with the subsequent code testing the imported functions.
a = 10
b = 20
sum_result = add(a, b)
print(f"The sum of {a} and {b} is {sum_result}.")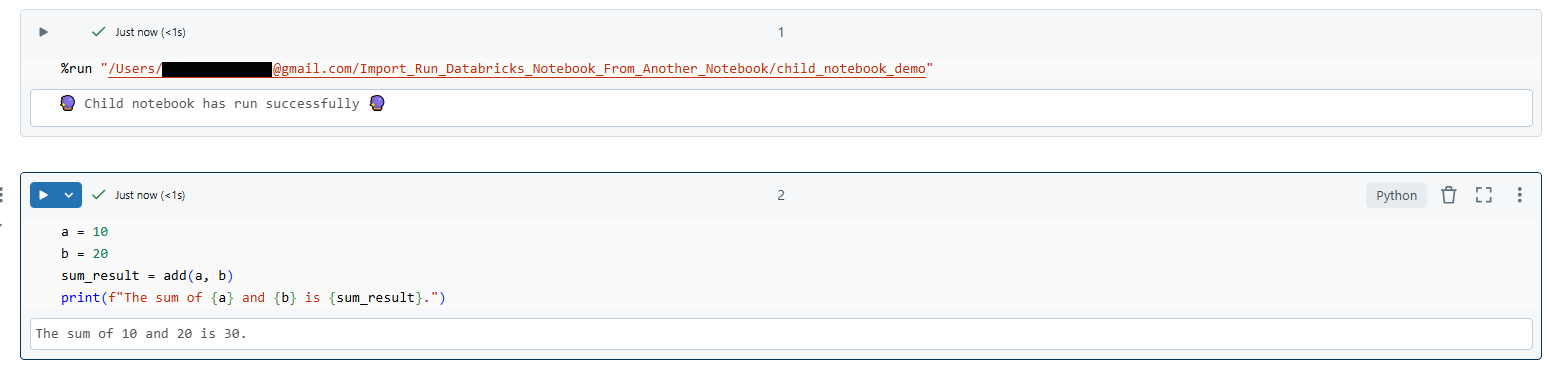
name = "Elon Musk"
greeting_message = greet(name)
print(greeting_message)
Can you pass parameters with %run?
Yes, you can pass values to widgets defined in the child notebook using this syntax, but only when the notebook is attached to a cluster (not a SQL warehouse):
%run ./child_notebook_demo $param_name="some_value" $other_param="another_value"
What you can’t do is pass Python variables directly. The $variable=value syntax only sets widget values and those values must be string literals. If you need to pass a Python variable, you’ll need dbutils.notebook.run() instead.
Key constraints to keep in mind with %run:
- The child notebook runs in the same context, so its variables and functions land directly in the parent’s scope
- That shared scope means naming conflicts are possible. Be careful with variable names across notebooks
- You cannot use %run to run a .py Python file and import from it; that’s what Workspace Files are for
- Everything is synchronous; the parent waits for the child to finish before continuing
Now that you’ve mastered the Databricks %run command, let’s take things up a notch. What if you need to pass parameters or retrieve values from the child notebook? That’s where dbutils.notebook.run() comes into play. Let’s explore this next!
Technique 2—Run a Databricks Notebook from another Notebook using Databricks dbutils.notebook.run() method
The dbutils.notebook.run() method in Databricks allows you to run another notebook as a separate job, passing parameters to it and capturing its return value. This technique is especially useful for creating dynamic workflows or when you need to manage data flow between notebooks with specific input and output requirements.
This method is available in Python and Scala only. You can use it to invoke R Notebooks, but you cannot call it from within an R Notebook.
When to use it: Dynamic workflows, looping over parameter sets, situations where you need return values and cases where scope isolation matters.
When not to use it: When Lakeflow Jobs can do the job, they’re more robust for production orchestration.
Step 1—Log in to Databricks
Log in to your Databricks workspace using your credentials.
Step 2—Navigate to the Databricks workspace
Use the sidebar to navigate to the “Workspace” section where all your notebooks are stored.
Step 3—Create the child Notebook
Similar to before, find or create the notebook you want to execute from another notebook, which we’ll refer to as the “child notebook“.
a) Create a New Notebook
- Click on the dropdown next to your chosen folder, select Create > Notebook.
- Name your notebook, for example, child_notebook_param and choose Python.

b) Set Up Databricks Widgets to Accept Parameters
Use dbutils.widgets to define parameters for your notebook. Databricks widgets allow the parent notebook to pass inputs dynamically. Here’s an example:
# Import necessary modules for widgets
import json

# Set up widgets to accept parameters
dbutils.widgets.text("name", "Default Name", "Enter name")
dbutils.widgets.text("age", "30", "Enter age")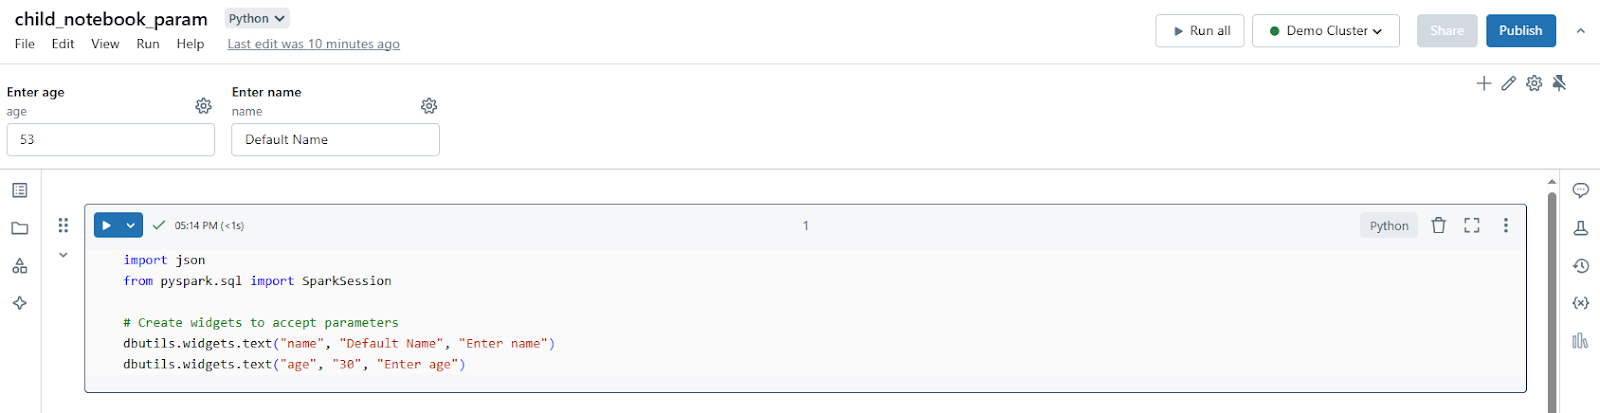
# Retrieve widget values
name = dbutils.widgets.get("name")
age = dbutils.widgets.get("age")

# Example processing with parameters
result = f"{name} is {age} years old."# Return the result as a string using dbutils.notebook.exit
dbutils.notebook.exit(result)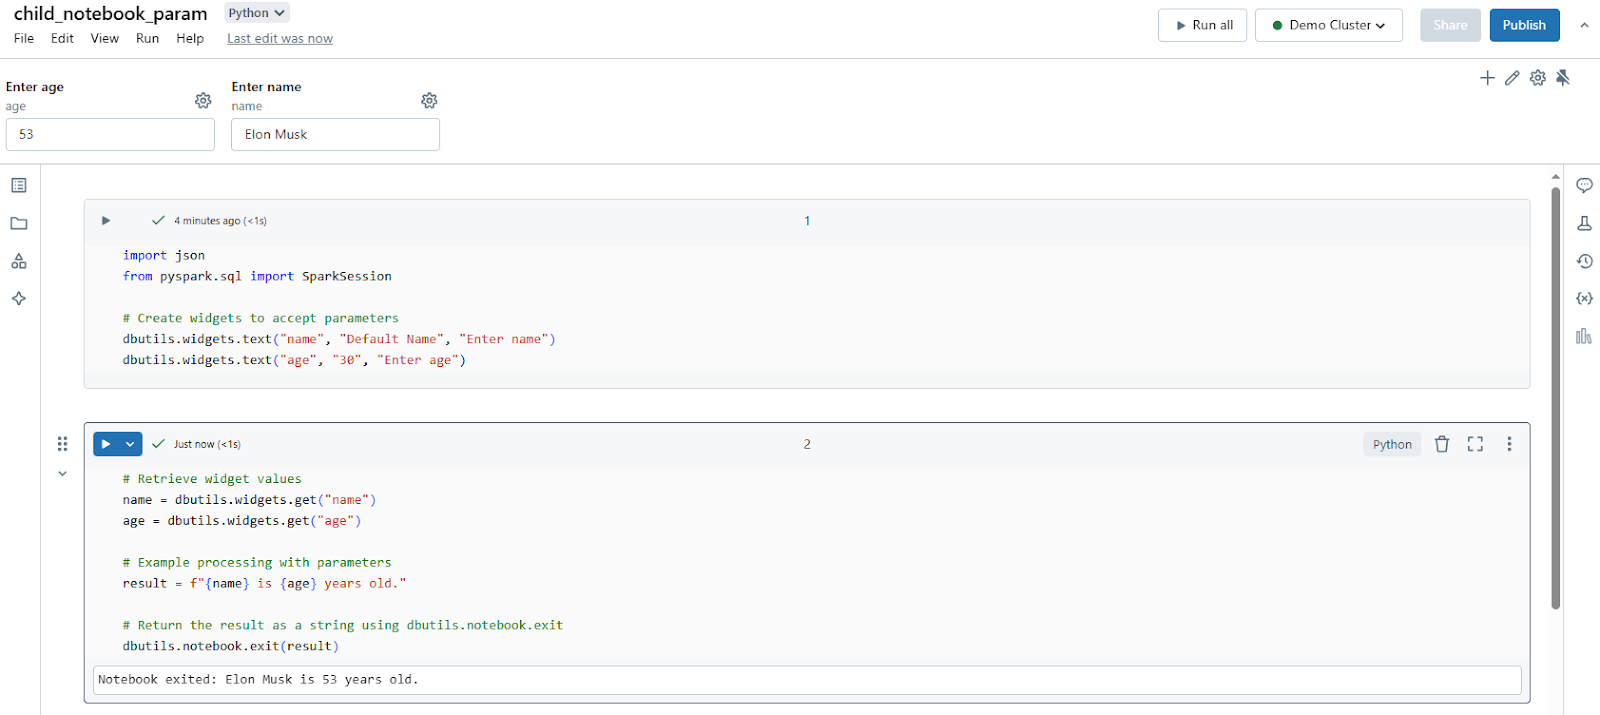
Step 4—Get the child Notebook path
To run the child notebook from your parent notebook, you need its path. For that, right-click on your child notebook in the workspace. Select Copy Path to get the notebook’s path, which will look something like:
/Users/<user-name>@gmail.com/notebooks/child_notebook_param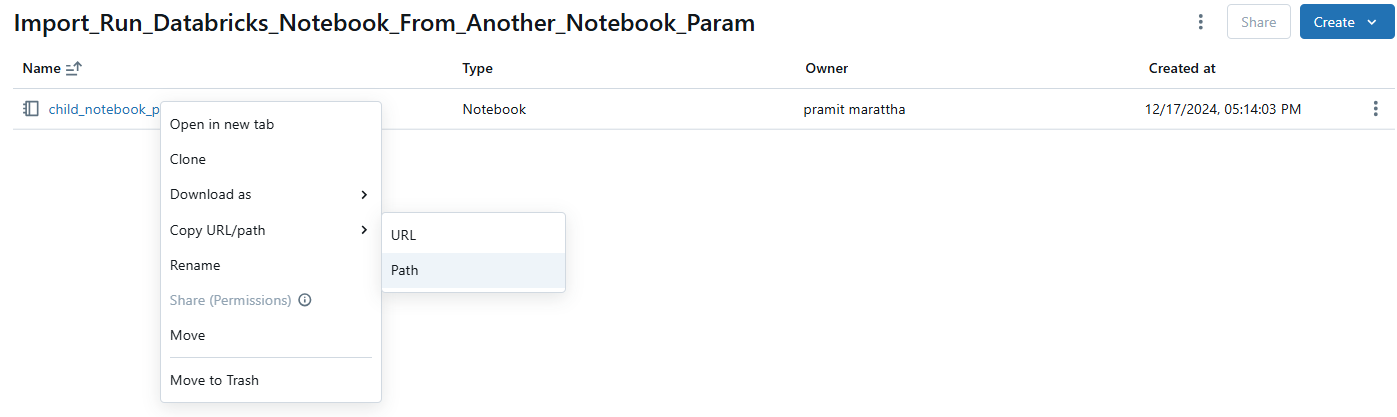
Optional—Configure parameters for the Databricks Notebook
Prepare any parameters you want to pass to the child notebook as a dictionary in your parent notebook:
# In parent notebook
parameters = {
		 "name": "Jeff Bezos",
		"age": "58"
}
Step 5—Configure Databricks Compute
Now make sure you have a compute resource set up. To do so, head over to “Compute” on the sidebar and if needed, click “Create Compute” to set up a new one or select an existing one. Make sure your cluster is running or set it to start automatically if it’s idle.


Step 5—Call the child Notebook using dbutils.notebook.run()
The syntax for dbutils.notebook.run() is as follows:
dbutils.notebook.run(notebook_path, timeout_seconds, arguments)Here:
- notebook_path is the path to the notebook you want to run.
- timeout_seconds is the maximum time to wait for the notebook to run, in seconds. A value of 0 means no timeout.
- arguments is a dictionary of key-value pairs representing the parameters to pass to the target notebook’s widgets. Both keys and values must be strings.
Now, in your parent notebook, call the child notebook using dbutils.notebook.run() like this:
# Parent Notebook

# Define parameters to pass
parameters = {
		"name": "Jeff Bezos",
		 "age": "58"
}

# Run the child notebook and capture its return value
result = dbutils.notebook.run("/Users/<user-name>@gmail.com/notebooks/child_notebook_param", timeout_seconds=60, arguments=parameters)

# Print the result to confirm execution
print(f"Child notebook returned: {result}")
Here, 60 is the timeout in seconds for the child notebook execution. If the child notebook doesn’t finish within this time, an exception will be thrown.
Step 6—Parse the return value
dbutils.notebook.run() always returns a string. If the child notebook exits with JSON, parse it in the parent:
# in the parent notebook

# Assuming the child notebook returned a JSON formatted string
try:
		parsed_result = json.loads(result)
		print(f"Parsed result: {parsed_result}")
except json.JSONDecodeError:
		print("The returned value is not JSON formatted.")

# Or if it's just a simple string:
print(f"The result from the child notebook: {result}")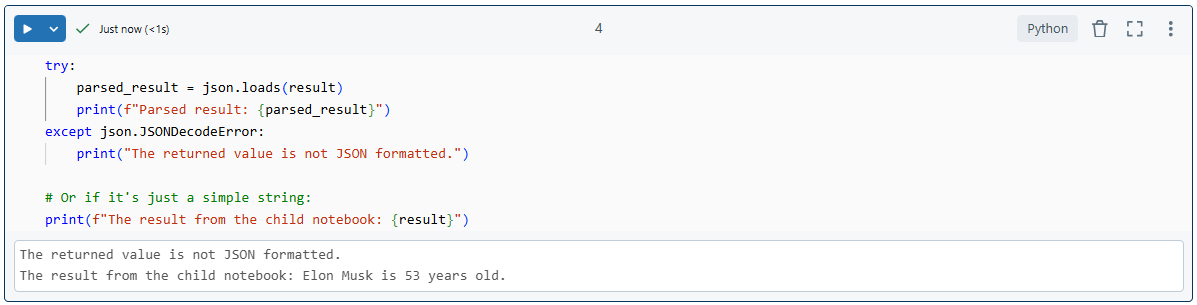
For larger datasets, don’t try to squeeze everything through dbutils.notebook.exit(). Instead, write the data to a Delta table, DBFS path or global temp view in the child notebook, then return just the reference:
# In the child notebook—write data and return the path

spark.range(5).toDF("value").write.format("parquet").save("dbfs:/tmp/results/my_data")

dbutils.notebook.exit("dbfs:/tmp/results/my_data")

# In the parent notebook—read the data using the returned path

returned_path = dbutils.notebook.run("CHILD_NOTEBOOK_PATH", 60)

df = spark.read.format("parquet").load(returned_path)

display(df)
Step 7—Handle errors
If the child notebook fails or times out, dbutils.notebook.run() throws an exception. Wrap it:
def run_with_retry(notebook_path, timeout, args={}, max_retries=3):

    retries = 0

    while True:

        try:

            return dbutils.notebook.run(notebook_path, timeout, args)

        except Exception as e:

            if retries >= max_retries:

                raise e

            print(f"Retrying after error: {e}")

            retries += 1

result = run_with_retry(

    "/Users/your-email@example.com/project-folder/child_notebook_param",

    60,

    {"name": "Ada Lovelace", "age": "36"}

)
Note: Jobs created via dbutils.notebook.run() must complete within 30 days. If you’re building long-running pipelines, Lakeflow Jobs is the better fit.
Key limitations with dbutils.notebook.run():
- The child notebook runs in isolation. Its variables and functions are not accessible in the parent
- The child must use widgets to accept parameters; parameters passed without a matching widget are silently ignored
- The return value is always a string; complex data types need serialization
- Arguments accept only ASCII (Latin) characters
- The method is available in Python and Scala only
Databricks %run vs. dbutils.notebook.run()—which one should you use?
Use Databricks %run command:
➥ Databricks %run command copies and executes the contents of another notebook directly within the context of the current notebook. All functions, variables and imports from the child notebook become part of the parent notebook’s execution environment.
➥ Databricks %run command is great for modularizing code. You can keep helper functions, data preprocessing steps, or common configurations in separate notebooks and %run them where needed. This promotes code reuse and maintainability.
➥ The execution of Databricks %run command is synchronous; the parent notebook waits for the child to finish before continuing.
➥ Since the code from the child notebook runs in the same context, there’s a potential for naming conflicts if not managed properly.
Use dbutils.notebook.run() method:
➥ Databricks dbutils.notebook.run() method runs the child notebook as a separate job. Each notebook maintains its own Spark session, which means variables and functions are not directly accessible in the parent notebook.
➥ Databricks dbutils.notebook.run() method allows you to pass parameters to the child notebook using widgets. This is crucial for dynamic workflows where different parameters might be needed each run.
➥ Databricks dbutils.notebook.run() method can return a single string from the child notebook back to the parent, which can then be parsed or used as needed. This supports more complex workflow management where you might need to act on the result of a notebook’s execution.
➥ You can specify a timeout, giving you control over how long you’re willing to wait for the child notebook to execute.
➥ Databricks dbutils.notebook.run() method is typically synchronous, with additional orchestration (like using jobs), you could achieve asynchronous behavior or manage dependencies between notebooks.
➥ Each notebook run in isolation reduces the risk of scope pollution but requires explicit data passing.
So, which one is better?
- Databricks %run is simpler for including another notebook’s code directly in your current context, but it lacks parameter passing and return values. Databricks dbutils.notebook.run() adds complexity with parameter passing and return values but offers more control over execution, especially in orchestrated workflows.
- If you need isolation or are concerned about scope, Databricks dbutils.notebook.run() method is preferable. If direct code reuse and sharing context are more important, Databricks’ %run command is the way to go.
- Databricks %run might be faster since there’s no job overhead, but for larger notebooks or those with extensive Spark operations, Databricks dbutils.notebook.run() might optimize resource usage by running each as a separate job.
TL;DR: Neither is strictly “better” as both serve different purposes. Your choice should be based on your specific needs for modularity, parameter handling, workflow complexity and data isolation within your Databricks environment. For simple, straightforward inclusion of code, Databricks
%runis better. For building complex data pipelines or workflows with dynamic parameters, Databricksdbutils.notebook.run()provides more flexibility.
Technique 3—Import Databricks Notebook using Databricks UI
Finally, let’s dive into the UI method. Here, in this method, we will export and import an entire Databricks Notebook file into your Databricks workspace, not executing one notebook from another. This particular technique is crucial for moving notebooks between different workspaces, backing up notebooks, or even sharing them in a format that can be easily imported by others.
Note that this technique does not actually “import” in the sense of code execution but rather imports the entire notebook into the workspace.
Step 1—Log into Databricks
First, start by logging into your Databricks workspace with your credentials.
Step 2—Navigate to the Databricks workspace
From the left sidebar, select Databricks Workspace to access all of your Databricks Notebooks.
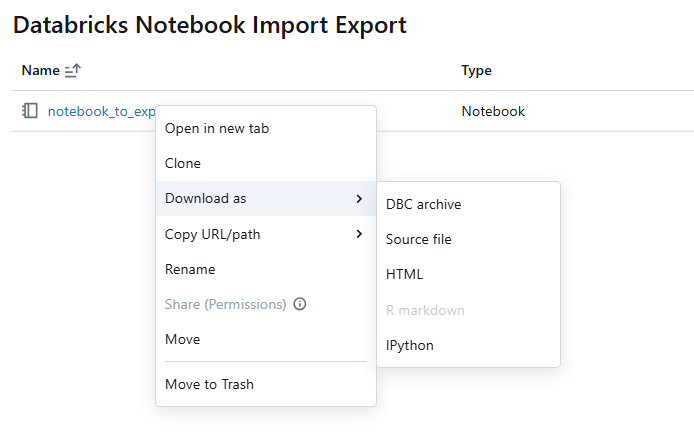
Step 3—Locate the Notebook and export it
Find the Databricks Notebook you wish to export in your workspace. To do that, right-click on the notebook name. From the dropdown menu, select “Download as”. Then, choose the “DBC archive” (Databricks Archive) format. This format includes the notebook’s source code and cell outputs if not cleared.
Here’s how the process looks:
Right-click on notebook_to_export and then click Download > DBC Archive.
Save the file to your local machine or a shared location.
Step 4—Open the workspace
Navigate back to your Databricks workspace or to the folder where you want to import the notebook. Then, right-click on the workspace or a folder where you want to place the exported notebook.
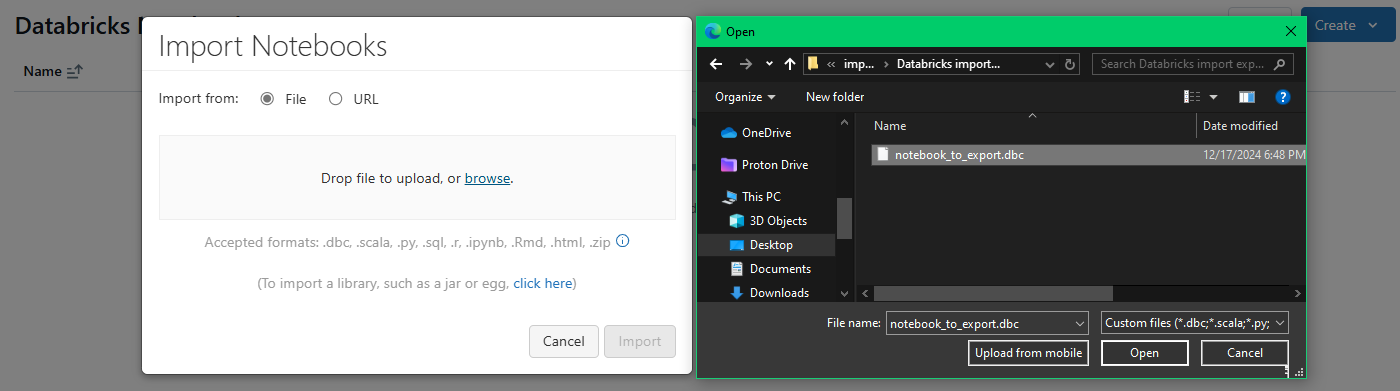
Step 5—Import the child notebook
Select Import from the context menu. This will open a file dialog where you can navigate to where you saved the .dbc file. Select the .dbc file you just exported (e.g., notebook_to_export.dbc) and click Open.
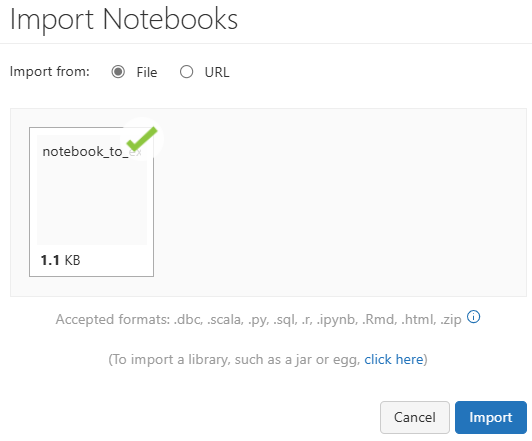
Databricks Notebook will now be imported into your workspace. The structure of the .dbc file will be recreated in your selected directory, meaning if the .dbc contained a folder structure, it will be mirrored in your workspace.
Step 6—Configure Databricks compute
Now make sure you have a compute resource set up. To do so, head over to “Compute” on the sidebar and if needed, click “Create Compute” to set up a new one or select an existing one. Make sure your cluster is running or set it to start automatically if it’s idle.


Step 7—Run the Databricks Notebook
Once you have set up the Databricks compute clusters and your Databricks Notebook has been imported. Find the newly imported Databricks Notebook in your workspace. Open it by clicking on its name.

Attach the Databricks Compute that you have just created. And finally, execute it.
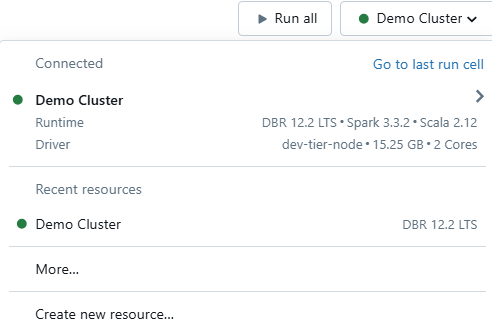
To execute it, you can use the “Run All” button at the top of the notebook interface for running all cells. Or, run individual cells by clicking the run button for each cell or pressing Shift + Enter.
Save up to 50% on your Databricks spend in a few minutes!
Conclusion
And that’s a wrap! Importing and running one Databricks Notebooks from another not only streamlines your workflow but also speeds up code modularity, code reuse and collaborative efficiency. Opt for the Databricks %run command when you need simple code inclusion, leverage dbutils.notebook.run() for more complex, parameter-driven workflows and use the UI import method for sharing or moving notebooks between different environments.
FAQs
What’s the difference between %run and dbutils.notebook.run()?
%run executes the child notebook inline in the same context. dbutils.notebook.run() starts a separate ephemeral job. The first shares scope; the second provides isolation and supports parameter passing.
Can %run pass parameters?
Partially. You can pass string values to widgets using %run ./notebook $widget_name=”value”, but only on clusters (not SQL warehouses). You cannot pass Python variables directly.
Can I return values from a notebook called with %run?
No. %run shares state through the shared execution context. There’s no explicit return mechanism.
Can I run a notebook on a different cluster using dbutils.notebook.run()?
dbutils.notebook.run() starts an ephemeral job. By default it uses the same cluster, but you can configure job settings for different compute. %run, on the other hand, always uses the current cluster.
What happens if the child notebook fails during dbutils.notebook.run()?
An exception is thrown in the parent notebook. Wrap your call in a try-except block to handle it gracefully.
Can I pass a DataFrame between notebooks?
Not directly. Serialize data to a Delta table, DBFS path or global temp view in the child notebook, then return the reference string to the parent.
Are there character restrictions on dbutils.notebook.run() arguments?
Yes. The arguments dictionary only accepts Latin characters (ASCII). Non-ASCII characters will cause an error.
Is %run available in all languages?
%run works from any notebook cell regardless of language. dbutils.notebook.run() is only callable from Python or Scala cells.
What’s the recommended approach for production pipelines?
Databricks recommends Lakeflow Jobs for orchestration and Workspace Files for code modularization. %run and dbutils.notebook.run() are solid fallbacks for cases where those don’t fit.