
Apache Spark has revolutionized big data processing, providing fast, near real-time, horizontally scalable and distributed computing capabilities. It’s no wonder that Spark has become the preferred choice for enterprises seeking high-speed, efficient solutions for processing big datasets in parallel. What genuinely distinguishes Spark is its tight connection with Scala, the language it was originally built in. That relationship isn’t accidental. Scala’s seamless compatibility with Spark provides considerable benefits, including efficient code execution, extensive functional programming support and strong type safety—all of which improve performance and reliability.
In this article, we’ll cover everything you need to know about Apache Spark with Scala, why the two are a powerful combination for data processing and walk through a step-by-step hands-on tutorial to get you started with Scala APIs and Spark for data analysis.
What is Apache Spark?
Apache Spark is an open source, distributed computing system designed for fast and general-purpose data processing at scale. Spark started as a research project at UC Berkeley’s AMPLab in 2009, was open sourced in early 2010 under a BSD license and was donated to the Apache Software Foundation project in 2013. It became an Apache top-level project in February 2014.
Spark was created to address the limitations of Hadoop MapReduce, particularly its poor performance with iterative algorithms and interactive data analysis.

Here are some key features of Apache Spark:
- In-memory computing — Apache Spark can cache data in memory across operations, significantly speeding up iterative algorithms and interactive queries compared to disk-based systems.
- Distributed processing — Apache Spark can distribute data and computations across clusters of computers, allowing it to process massive datasets efficiently.
- Fault tolerance — Apache Spark’s core abstraction, Resilient Distributed Datasets (RDDs), lets it automatically recover from node failures by maintaining lineage information.
- Lazy evaluation — Apache Spark uses lazy evaluation in its functional programming model, which allows for optimized execution plans
- Unified engine — Apache Spark provides a consistent platform for various data processing tasks, including batch processing, interactive queries, streaming, machine learning and graph processing.
- Rich ecosystem — Apache Spark ships with higher-level libraries for SQL (Spark SQL), machine learning (MLlib), graph processing (GraphX) and stream processing (Structured Streaming).
- Polyglot nature — Apache Spark is primarily written in Scala but it also offers APIs in Java, Python and R, making it accessible to a wide range of developers and engineers.
Why Spark?
Now that we understand what Spark is, let’s explore why it has become such a crucial tool in the big data landscape.
One reason Spark is widely used is that it’s fast, scalable and easy to use. It’s different from Hadoop MapReduce because it processes data in-memory, which reduces processing time. That makes it versatile enough to handle varied workloads on the same engine: machine learning, graph processing, batch jobs and real-time analytics. Whether you’re working with a huge amount of data for real-time analytics or running big batch jobs, Spark can handle it efficiently.
Apache Spark has a wide range of use cases across various industries and applications.
- E-commerce: Real-time product recommendations, customer segmentation and inventory optimization
- Finance: Fraud detection, risk assessment and algorithmic trading
- Healthcare: Patient data analysis, disease prediction and drug discovery
- IoT and telematics: Real-time sensor data analysis and predictive maintenance
- Social media: Network analysis, sentiment analysis and trend prediction
- Log analysis: Real-time monitoring and anomaly detection in system logs
Apache Spark’s power and adaptability make it a top tool for organizations facing big data challenges. It’s great for handling batch jobs, interactive queries and building ML models. Plus, it can process real-time data streams. What’s more, Spark offers one platform to take care of all these tasks.
Spark and Scala: A symbiotic relationship
Scala‘s a natural fit with Spark since it was built using the same language. Scala, which stands for “Scalable Language“, is a statically typed programming language that combines object-oriented and functional programming paradigms. The close integration between Scala and Spark has led to a symbiotic relationship, with Scala being the primary language for developing Spark applications.
Features and benefits of using Spark with Scala
Let’s dive into why Scala is Spark’s native language and the benefits this brings:
1. Performance — Scala compiles to Java bytecode and runs on the Java Virtual Machine (JVM), which provides strong performance and optimization capabilities. Its type system catches many errors at compile time rather than runtime, which matters in distributed systems where runtime errors are costly to debug.
2. Expressiveness — Scala’s syntax is concise yet powerful, letting developers express complex operations in a readable way. This is especially useful for defining data transformations and analyses in Spark.
3. Functional programming — Scala’s strong support for functional programming aligns well with Spark’s design, which heavily uses immutable data structures and higher-order functions.
4. Type safety — Scala’s strong static typing helps catch errors at compile-time, reducing runtime errors in distributed environments.
val data: RDD[Int] = sc.parallelize(1 to 10)
val result: RDD[String] = data.map(_.toString)
5. Performance optimizations — Scala’s compiler can perform various optimizations and its close alignment with Spark’s internals allows for efficient code execution. For example, Scala’s case classes work seamlessly with Spark’s serialization system.
6. Access to latest Spark features — Since Apache Spark is primarily developed in Scala, new features typically appear in the Scala API first before being ported to other language APIs.
7. Seamless Java interoperability — Scala’s interoperability with Java means you can easily use Java libraries in your Spark applications when needed.
Scala APIs vs PySpark, SparkR and Java APIs
PySpark is popular because of Python‘s ease of use and its rich machine-learning ecosystem, but Scala offers better performance and type safety. SparkR is useful for data scientists familiar with R, but it lacks the functional programming power and deep integration Scala provides. Java APIs are available but more verbose compared to Scala’s concise syntax.
TL;DR:
PySpark (Python API):
➤ Pros: Easier for Python developers, great for data science workflows, integrates well with NumPy, Pandas and similar libraries
➤ Cons: Generally slower than Scala due to serialization overhead, may lag behind in features
SparkR (R API):
➤ Pros: Familiar for R users, good for statistical computing and plotting
➤ Cons: Limited functionality compared to Scala API, performance overhead
Java API:
➤ Pros: Familiar for Java developers, good performance
➤ Cons: More verbose than Scala, lacks some of Scala’s functional programming features
Here’s a quick comparison of how a word count program might look in Spark Scala APIs and PySpark (Spark Python) APIs:
1) Scala:
val input = List("Apache Spark is great", "Scala is powerful", "Apache Spark With Scala", "Spark and Scala", "Spark Scala Tutorial", "Scala with Spark Tutorial", "Spark on Scala", "Apache Spark Architecture","Spark Scala Architecture", "Installing Apache Spark", "Scala Build Tool", "SBT" )

val wordCounts = sc.parallelize(input).flatMap(_.split(" ")).map(word => (word, 1)).reduceByKey(_ + _)

wordCounts.collect().foreach(println)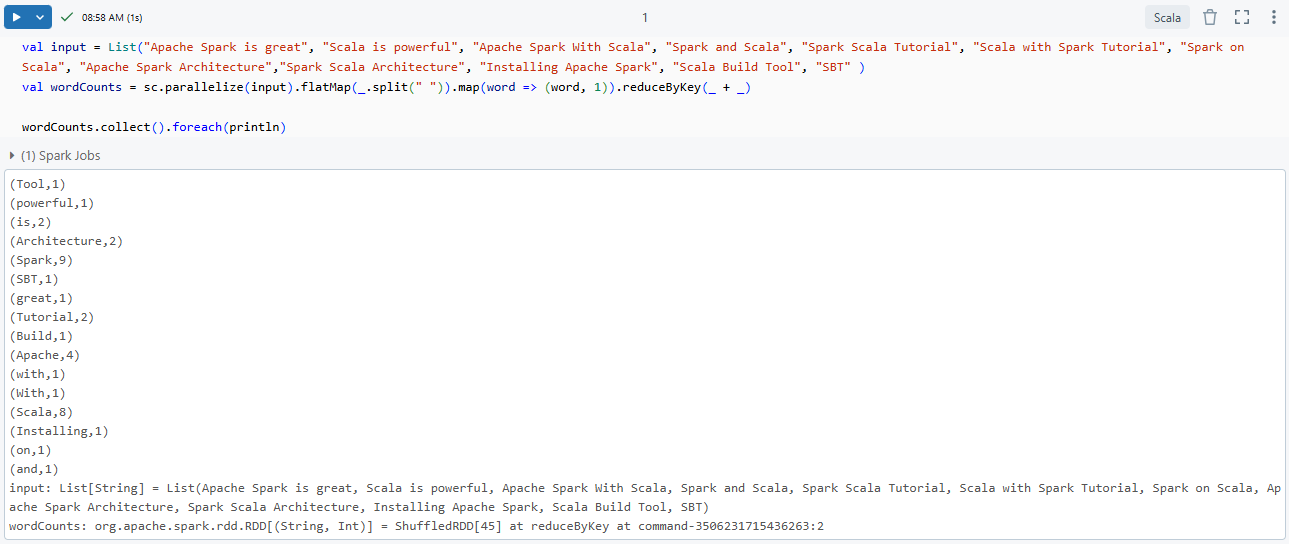
2) PySpark:
input = ["Apache Spark is great", "Scala is powerful", "Apache Spark With Scala", "Spark and Scala", "Spark Scala Tutorial", "Scala with Spark Tutorial", "Spark on Scala", "Apache Spark Architecture","Spark Scala Architecture", "Installing Apache Spark", "Scala Build Tool", "SBT"]

word_counts = sc.parallelize(input).flatMap(lambda line: line.split(" ")).map(lambda word: (word, 1)).reduceByKey(lambda a, b: a + b)

print(word_counts.collect())
As you can see, the Scala version is concise and expressive, leveraging Scala’s functional programming features to produce readable and efficient code.
Apache Spark with Scala: Architecture overview
To use Apache Spark with Scala effectively, you need to understand Spark’s architecture and how Scala interacts with its components. Spark’s architecture is designed for distributed computing, allowing it to process large amounts of data across a cluster of machines.
Apache Spark operates on a leader-worker architecture, with a driver program that manages task execution across a cluster of worker nodes.
Apache Spark architecture relies on two main abstractions:
The driver program is the entry point of a Spark application. It’s responsible for:
- Creating a SparkContext (or SparkSession in modern Spark)
- Defining the operations to be performed on data
- Submitting jobs to the cluster manager
- Coordinating the execution of tasks on executors
The cluster manager handles resource allocation across the cluster. Spark supports several cluster managers:
- Standalone: Spark’s built-in cluster manager
- Hadoop YARN: The resource manager in Hadoop 3
- Kubernetes: The current industry-standard for containerized workloads
Note: Apache Mesos was deprecated as a cluster manager in Spark 3.2.0 and was officially retired in late 2025. YARN and Kubernetes are the practical choices today.
3) Executors
Executors are worker nodes in the Spark cluster. They:
- Run tasks assigned by the driver program
- Store data in memory or on disk
- Return results to the driver
Execution flow of a Spark application
➥ App submission
When a Spark application is submitted, the driver program is launched, which communicates with the cluster manager to request resources.
➥ Job creation and DAG formation
The driver translates user code into jobs, breaking them into stages, each further divided into tasks. A Directed Acyclic Graph (DAG) is created to represent the task and stage dependencies.
➥ Stage division and task scheduling
The DAG scheduler breaks down the DAG into stages, and the task scheduler assigns tasks to executors based on resource availability and data locality.
➥ Task execution on worker nodes
Executors process tasks on worker nodes, execute the computation and return results to the driver, which aggregates and presents the final output.
How does Scala interact with Spark?
Scala’s interaction with Apache Spark is efficient because both run on the JVM. Scala code doesn’t require additional conversions or inter-process communication, which is exactly the overhead that PySpark incurs through its Python-to-JVM bridge (Py4J).
Direct compatibility with JVM
Scala runs on the Java Virtual Machine (JVM), just like Spark, which means Scala code does not require additional conversions or inter-process communication. This direct compatibility ensures that Spark applications written in Scala are executed with minimal overhead, leveraging Spark’s native capabilities for performance optimization. Because both Spark and Scala are JVM-based, the processing is generally faster and more efficient than with non-JVM languages like Python or R, which require additional steps for execution (such as serialization/deserialization through PySpark).
Direct API access
Spark’s core APIs are designed with Scala in mind:
- Native access: Scala developers interact directly with Spark’s internals without additional abstraction layers
- Type safety: Scala’s type system catches errors at compile time, reducing runtime failures
- Functional programming support: Spark’s API aligns naturally with Scala’s functional paradigm
Type-Safe data manipulation
Scala interacts with Spark’s structured data APIs through Datasets and DataFrames:
- Datasets: Strongly typed, compile-time safe data manipulation. Scala’s Datasets offer type inference and static analysis, catching potential errors before runtime. They’re useful when working with domain-specific objects.
- DataFrames: Technically, a DataFrame in Spark is an alias for Dataset[Row], where Row is a generic, untyped JVM object. This unification simplifies the API while retaining performance benefits.
Functional programming paradigm
Scala’s functional programming features align well with Spark’s distributed computing model:
- Higher-order functions like
map,filterandreduceare efficiently parallelized across Spark’s distributed environment.
val numbers = spark.sparkContext.parallelize(1 to 1000000)
val sumOfSquares = numbers.map(x => x * x).reduce(_ + _)- Immutability: Scala’s emphasis on immutable data structures complements Spark’s fault-tolerant, distributed processing paradigm.
- Pattern matching: Enables concise and expressive data transformations on complex nested structures.
def processData(data: Any): String = data match {
	 case s: String => s"String: $s"	 case i: Int if i > 0 => s"Positive Int: $i"	case _ => "Unknown type"}
Advanced performance optimizations
Since Spark is designed with Scala in mind, using Scala lets you tap into Spark’s internal optimizations: Catalyst (query optimization) and Tungsten (memory and CPU efficiency).
Custom serialization
Scala objects can be efficiently serialized for distribution across Spark clusters using Kryo serialization, which is faster and more compact than Java’s default serialization. To enable Kryo serialization:
val conf = new SparkConf().setAppName("MyApp")
	.set("spark.serializer", "org.apache.spark.serializer.KryoSerializer")
spark = SparkSession.builder().config(conf).getOrCreate()
REPL integration
Scala’s Read-Eval-Print Loop (REPL) integrates seamlessly with Spark through the Spark Scala Shell, allowing for interactive data exploration and rapid prototyping of Spark jobs.
Here’s a very simple example of how you can use Scala to interact with Spark:
1) Creating a SparkSession
import org.apache.spark.sql.SparkSession

val spark = SparkSession.builder.appName("Spark with Scala App").getOrCreate()2) Creating an RDD
val rdd = spark.sparkContext.parallelize(List(1, 2, 3, 4, 5))3) Using map and reduce to process the RDD
val result = rdd.map(x => x * 2).reduce((x, y) => x + y)4) Printing the result
println(result)5) Creating a DataFrame
val df = spark.createDataFrame(Seq(
	(1, "Elon", 45),
	(2, "Jeff", 32),
	(3, "Larry", 20),
	 (4, "Mark", 30)
)).toDF("id", "name", "age")6) Using filter and map to process the DataFrame
val resultDF = df.filter($"age" >= 30).map(row => row.getAs[String]("name"))7) Printing the final result
resultDF.show()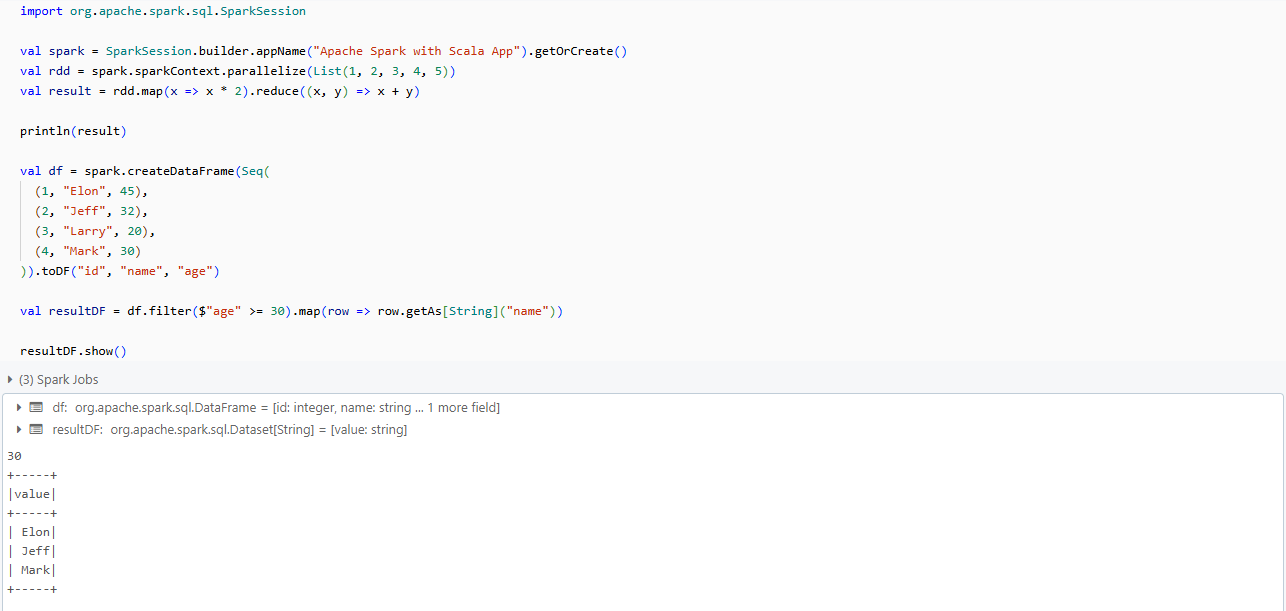
This seamless interaction allows Scala developers to leverage Spark’s full potential, making it the most efficient language for Spark-based applications.
Step-by-step guide to installing Apache Spark with Scala (Windows, Mac, Linux)
Now that we understand Spark’s architecture and its relationship with Scala, let’s set up a Spark environment with Scala.
Version compatibility (2026)
Before we start, here’s what you need to know about version compatibility:
| Spark version | Java | Scala | Status |
| Spark 4.x | 17 or 21 | 2.13 only | Latest stable (4.1.x as of 2026) |
| Spark 3.5.x | 8, 11 or 17 | 2.12 or 2.13 | LTS (maintained through Nov 2027) |
For this guide, we’ll use Spark 3.5.x with Scala 2.12 since it’s the LTS (long-term support) branch and the most widely deployed in production. We’ll note where Spark 4.x differs.
Heads up on Java 8: Java 8 prior to version 8u371 is deprecated as of Spark 3.5.0. If you’re using Java 8, make sure you’re on a recent update. For new projects, Java 17 is the recommended choice for Spark 3.5.x.
Prerequisites
Before we start, make sure you have the following installed:
- Java Development Kit (JDK) 8 or 11 (Spark 3.x is compatible with both).
- A text editor or IDE (VScode or IntelliJ IDEA with the Scala plugin is the most popular choice for Spark/Scala development)
1) Installing Apache Spark with Scala on Windows
Step 1—Install Java Development Kit (JDK)
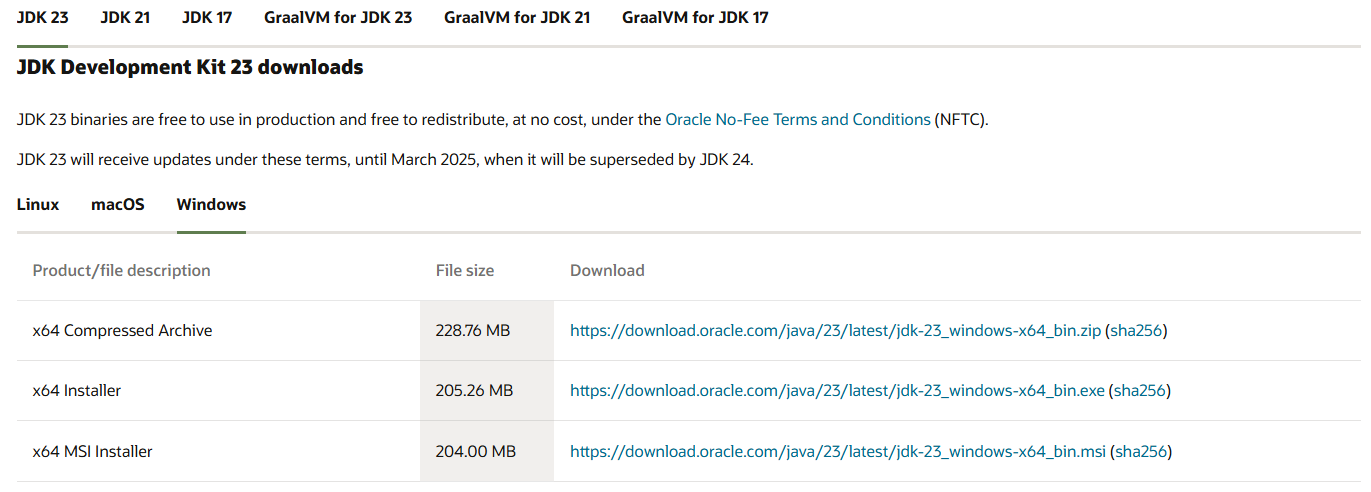
First, download the JDK from the Oracle website or use OpenJDK.
Run the installer and follow the prompts to complete the installation.
Now, set the JAVA_HOME environment variable:
- Right-click on “My Computer “This PC” > Properties > Advanced system settings > Environment Variables
- Add a new system variable JAVA_HOME and set it to your JDK installation path (e.g., C:Program FilesJavajdk….)
To verify the installation, open Command Prompt and type:
java --versionStep 2—Install Scala
Next, download Scala from the official Scala website, or use scoop or choco (Windows package managers) to install it.
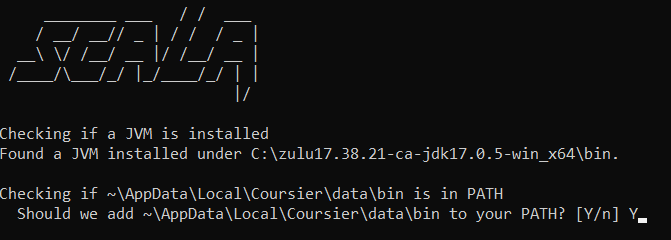
Run the installer and type “Y” to add it to the PATH. And, to verify the installation, open the command prompt and type:
scala -version
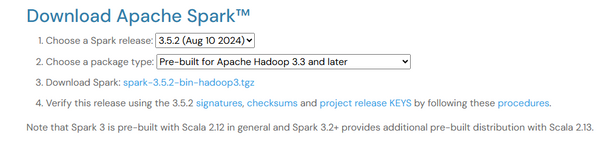
Step 3—Install Apache Spark
Go to the Apache Spark download page and select a pre-built version for Hadoop. Download the .tgz file.
Create a directory for Spark, e.g., C:\spark and extract the downloaded Spark file into this directory. Verify the extraction and check that the bin folder contains the Spark binaries.
Step 4—Install winutils
Download winutils.exe from the steveloughran/winutils repository, matching your Hadoop version (Hadoop 3 for Spark 3.5.x). Create a folder C:\winutils\bin and place winutils.exe inside it.
Set environment variables:
- SPARK_HOME: Set it to the path of your extracted Spark folder, e.g., C:\spark\spark-3.5.4-bin-hadoop3
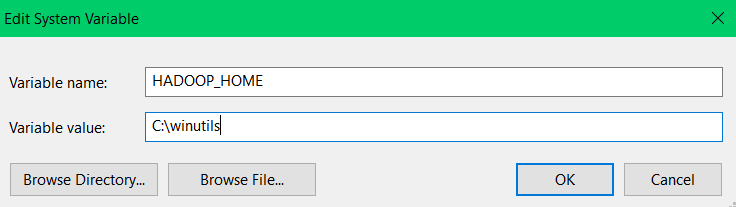
- HADOOP_HOME: Set it to C:\winutils
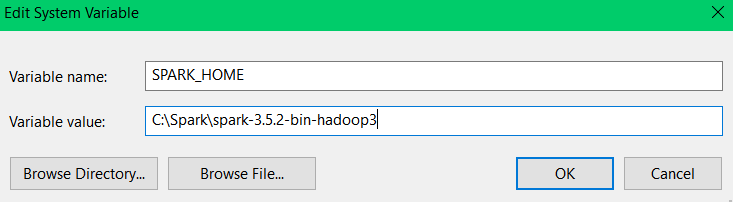
Next, add HADOOP_HOME by creating another variable named HADOOP_HOME and set its value to C:winutils.
Once these variables are set, update the system’s Path variable by editing it and adding the following entries:
%SPARK_HOME%bin
%HADOOP_HOME%bin
Step 5—Verify Spark with Scala installation
To verify Spark with Scala installation, head over to your Command Prompt and type:
spark-shellThis command will start the Scala REPL with Spark. You should see the Spark logo and a Scala prompt.
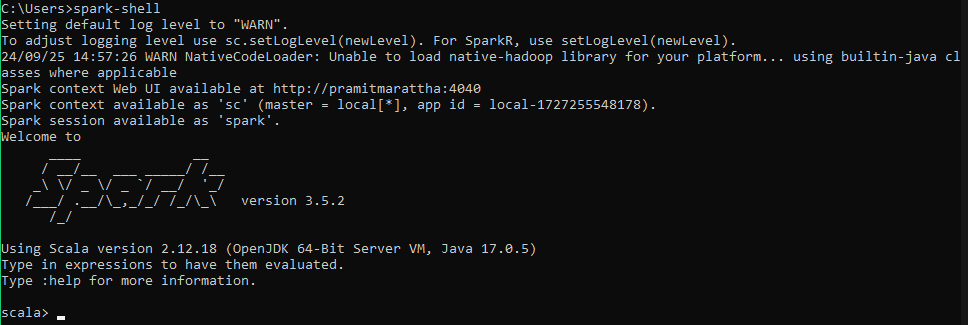
Test a basic Spark operation:
val data = spark.range(1, 100)
data.filter(_ % 2 == 0).count()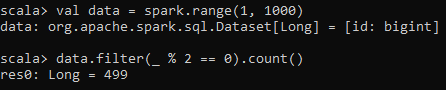
2. Installing Apache Spark with Scala on Mac

Step 1—Install Homebrew (if not already installed)
Open your terminal and run the following command to install Homebrew:
/bin/bash -c "$(curl -fsSL https://raw.githubusercontent.com/Homebrew/install/HEAD/install.sh)"Step 2—Install Java Development Kit (JDK)
Install OpenJDK using Homebrew:
brew install openjdkFollow the instructions in the terminal to add Java to your PATH.
After installation, verify that Java is installed correctly by checking the version:
java -versionStep 3—Install Scala
Install Scala using Homebrew:
brew install scalaVerify the installation:
scala -version
Step 4—Install Apache Spark
Install Spark using Homebrew:
brew install apache-sparkStep 5—Set environment variables
Open your shell configuration file (e.g., ~/.zshrc or ~/.bash_profile):
open -e ~/.bash_profileAdd the following configuration to the file. Note that Homebrew uses different paths on Apple Silicon (M1/M2/M3) Macs vs Intel Macs.
export SPARK_HOME=/usr/local/Cellar/apache-spark/3.x.x/libexec
export PATH=$PATH:$SPARK_HOME/bin
Replace 3.x.x with your installed Spark version.
Save the file and reload the environment:
source ~/.bash_profileStep 6—Verify Apache Spark with Scala installation
Open a new terminal window and run:
spark-shell This will start the Scala REPL with Spark.
Installing Apache Spark with Scala on Linux (Ubuntu, Debian, CentOS)

Step 1—Install Java (OpenJDK via the package manager)
Open a terminal and update the package manager and install Java runtime environment:
sudo apt update
sudo apt install default-jre
Verify Java installation:
java -versionStep 2—Install Scala
Install Scala using the package manager:
sudo apt install scalaVerify the installation:
scala -versionNote: The apt package for Scala may be outdated on some Linux distributions. If you need a specific Scala version (e.g., 2.12.18 for Spark 3.5.x compatibility), use SDKMAN! instead:
curl -s "https://get.sdkman.io" | bash

source "$HOME/.sdkman/bin/sdkman-init.sh"

sdk install scala 2.12.18
Step 3—Install Apache Spark
Download Spark:
wget https://downloads.apache.org/spark/spark-3.x.x/spark-3.x.x-bin-hadoop3.tgzReplace 3.x.x with the latest version number.
Extract the Spark archive:
tar xvf spark-3.x.x-bin-hadoop3.tgz
sudo mv spark-3.x.x-bin-hadoop3 /opt/spark
Step 5—Set environment variables
Open your shell configuration file (e.g., ~/.bashrc). Add the following lines:
export SPARK_HOME=/opt/spark
export PATH=$PATH:$SPARK_HOME/bin
Save the file and reload it:
source ~/.bashrcStep 6—Verify Apache Spark with Scala installation
To verify Spark with Scala installation, open a new Terminal window and run the following command:
spark-shell This will start the Scala REPL with Spark.
Getting started with Apache Spark with Scala
Now that we have Spark and Scala installed, let’s dive into some basic operations to get you started with Spark programming in Scala.
Step 1—Create a SparkSession
SparkSession is the entry point for programming Spark with the Dataset and DataFrame API. Here’s how to create one:
import org.apache.spark.sql.SparkSession

val spark = SparkSession.builder()
	 .appName("Getting Started")
	.master("local[*]")
	 .getOrCreate()
Step 2—Basic RDD operations
RDDs (Resilient Distributed Datasets) are the fundamental data structure of Spark. Let’s perform some basic operations:
1) Creating an RDD
val data = sc.parallelize(1 to 1000)2) Transformation — Filtering all even numbers
val evenNumbers = data.filter(_ % 2 == 0)3) Action — Counting elements
println(s"Number of even numbers: ${evenNumbers.count()}")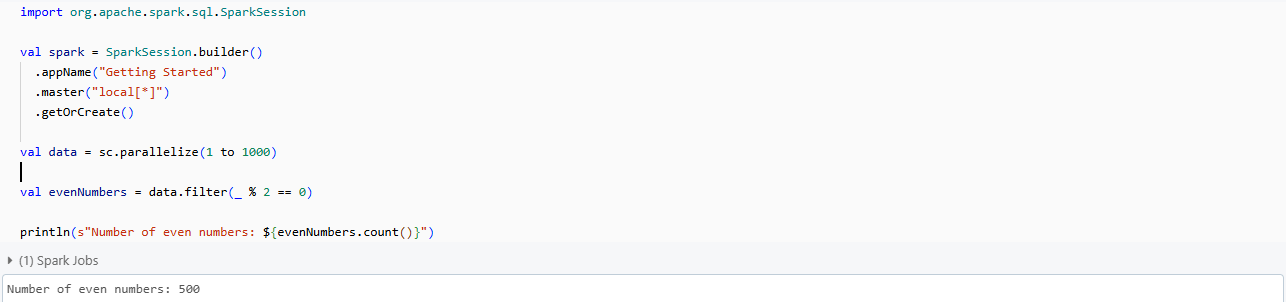
4. Transformation — Squaring each number
val squared = evenNumbers.map(x => x * x)5. Action — Collecting the results
val result = squared.take(10)
println(s"First 10 squared even numbers: ${result.mkString(", ")}")
Step 3—Introduction to DataFrames and Datasets
DataFrames and Datasets are distributed collections of data organized into named columns. They provide a domain-specific language for structured data manipulation:
First, let’s create a DataFrame from a range.
val df = spark.range(1, 1000).toDF("number")Then, let’s perform operations using DataFrame API.
val evenDF = df.filter($"number" % 2 === 0)
evenDF.show(5)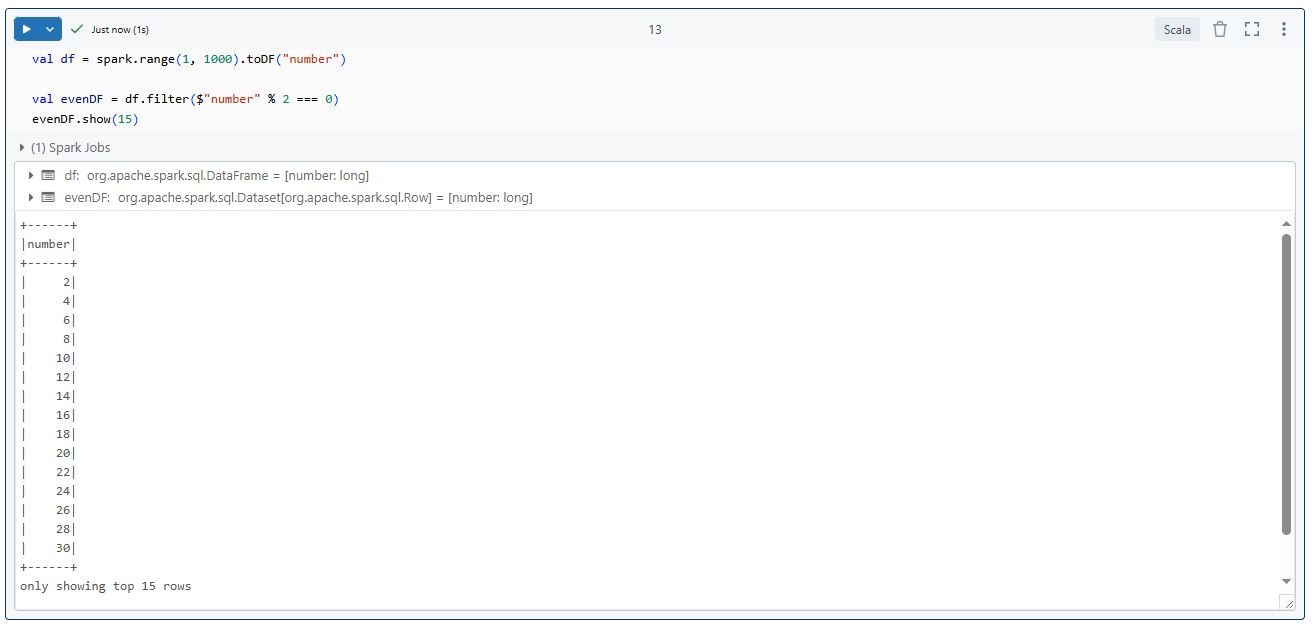
Now, here is how you could create a Dataset on Spark with Scala.
case class Person(name: String, age: Int)
val peopleDS = Seq(Person("Elon", 25), Person("Mark", 30), Person("Jeff", 20), Person("Larry", 40), Person("David", 50), Person("George", 30)).toDS()
peopleDS.show()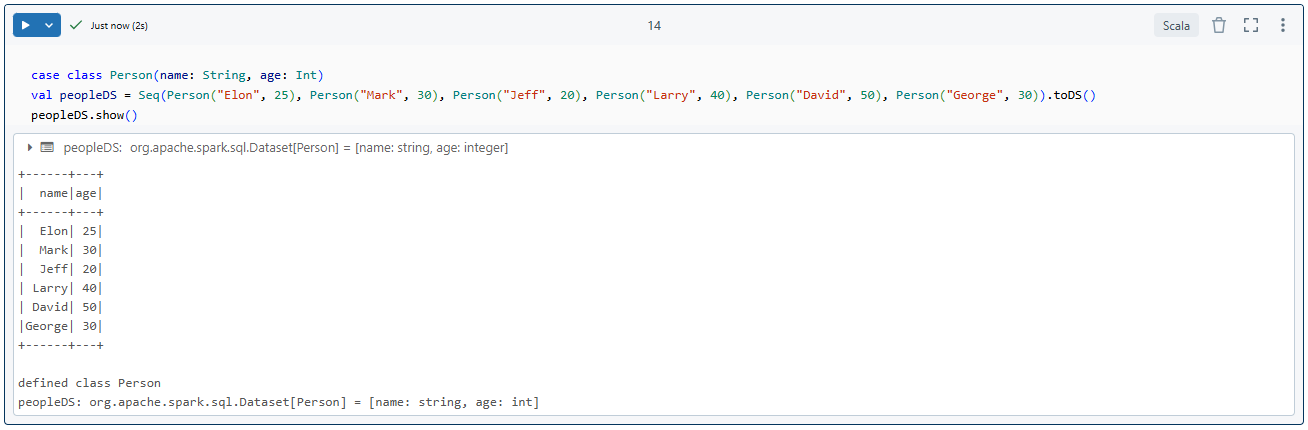
Step 4—Spark SQL basics
Spark SQL lets you write SQL queries against your DataFrames:
1) Registering the DataFrame as a SQL temporary view
df.createOrReplaceTempView("numbers")2) Run a SQL query
val sqlDF = spark.sql("SELECT * FROM numbers WHERE number % 2 = 0 LIMIT 5")
sqlDF.show()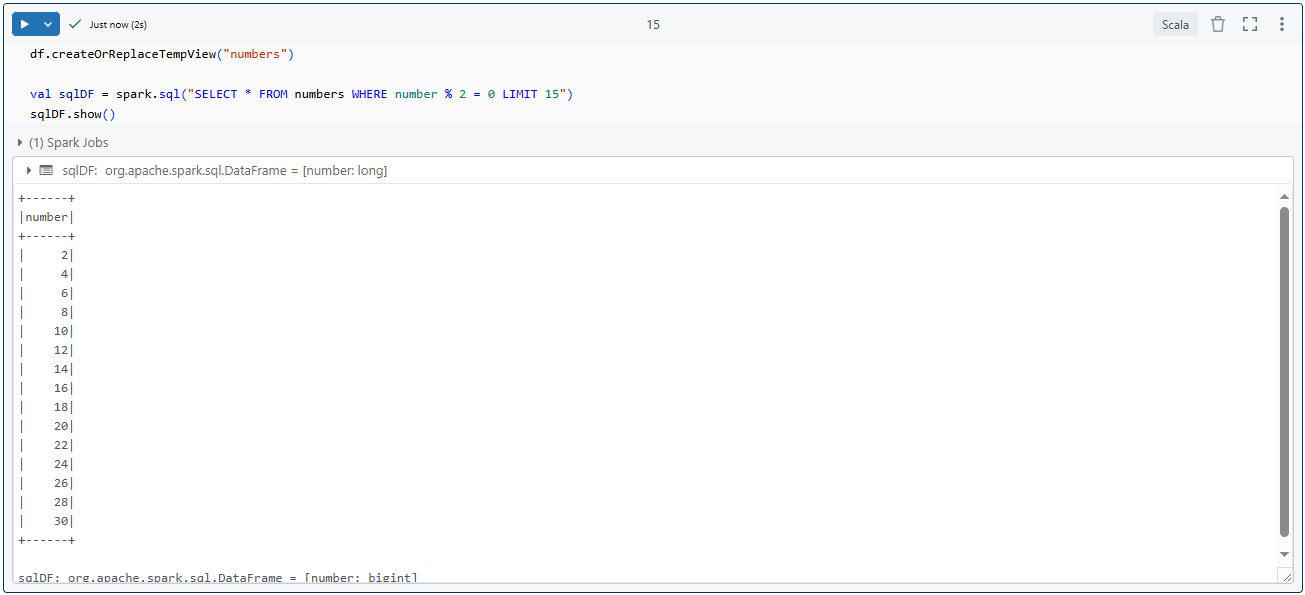
Step 5—Reading and writing data (various formats: CSV, JSON, Parquet)
Spark can read and write data in various formats. Let’s look at CSV, JSON and Parquet:
// Read CSV
val csvDF = spark.read
	 .option("header", "true")
	.csv("path/to/your/file.csv")

// Read JSON
val jsonDF = spark.read.json("path/to/your/file.json")

// Read Parquet
val parquetDF = spark.read.parquet("path/to/your/file.parquet")

// Write DataFrame to Parquet
evenDF.write.parquet("path/to/output/directory")
This concludes our initial exploration of Spark with Scala. Now, in the next section, we’ll dive into more detailed and more hands-on examples of data analysis using these concepts.
Hands-on example: Step-by-step data analysis using Spark with Scala
Now that we’ve covered the basics, let’s work through a practical example of data analysis using Spark with Scala. We’ll analyze a dataset of sales transactions to derive some insights.
Step 1—Set up your environment
First, make sure you have Spark with Scala installed as per the instructions in the previous section. Open your terminal and launch the spark-shell:
spark-shellThis command starts an interactive Scala shell with sc (SparkContext) and spark (SparkSession) pre-configured for immediate use.
Step 2—Create a new Scala project
In spark-shell, you already have a SparkSession instance (spark) automatically created for you. If you’re working in a different environment, you can initiate a Spark session using the following code:
val spark = SparkSession.builder
	.appName("Spark with Scala Example")
	.master("local[*]")
	 .getOrCreate()
The master(“local[*]”) setting tells Spark to run locally using all available CPU cores.
To load the Scala file or want to execute the block of code in the Spark shell, you can load the entire file and execute it to do so, you can type in the following command:
:load <your-file-name>.scalaStep 3—Load data into Spark
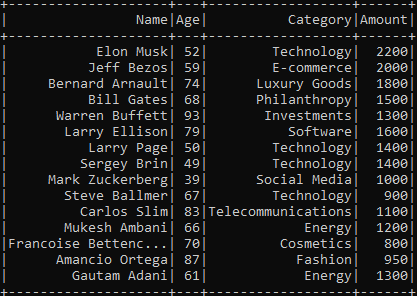
Let’s load some sample data representing sales information for a retail store:
import spark.implicits._
import org.apache.spark.sql.functions._

val data = Seq(

  ("Elon Musk",                    52, "Technology",         2200),

  ("Jeff Bezos",                   59, "E-commerce",         2000),

  ("Bernard Arnault",              74, "Luxury Goods",       1800),

  ("Bill Gates",                   68, "Philanthropy",       1500),

  ("Warren Buffett",               93, "Investments",        1300),

  ("Larry Ellison",                79, "Software",           1600),

  ("Larry Page",                   50, "Technology",         1400),

  ("Sergey Brin",                  49, "Technology",         1400),

  ("Mark Zuckerberg",              39, "Social Media",       1000),

  ("Steve Ballmer",                67, "Technology",          900),

  ("Carlos Slim",                  83, "Telecommunications", 1100),

  ("Mukesh Ambani",                66, "Energy",             1200),

  ("Francoise Bettencourt Meyers", 70, "Cosmetics",           800),

  ("Amancio Ortega",               87, "Fashion",             950),

  ("Gautam Adani",                 61, "Energy",             1300)

)


val columns = Seq("Name", "Age", "Category", "Amount")
val df = data.toDF(columns: _*)
df.show()
Here, each tuple represents a customer’s name, age, category (the department they bought from) and total amount spent. The toDF method converts this into a DataFrame with defined column names.
Note: The import spark.implicits._ is required for the $”column” column notation and .toDF() conversions. The import org.apache.spark.sql.functions._ brings in Spark SQL functions like when, avg and sum. Always include these imports at the top of your script.
When you run df.show(), Spark prints the following output:

Step 4—Data exploration and cleaning
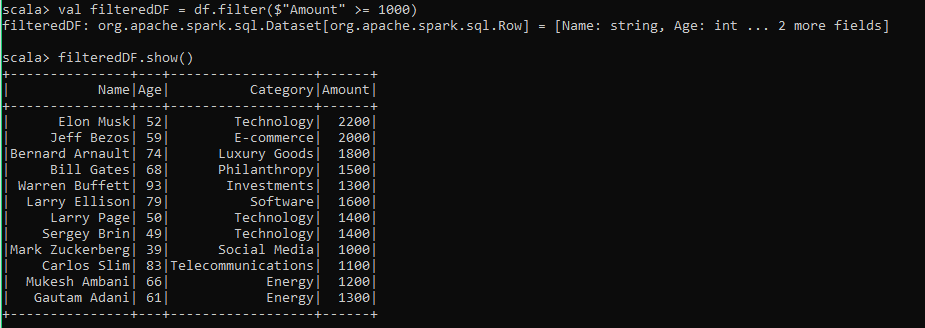
Before any analysis, filter out rows where the Amountis below a threshold. Here we’ll keep only customers who spent 1000 or more
val filteredDF = df.filter($"Amount" >= 1000)
filteredDF.show()
As you can see this code filters out customers who spent less than 1000.
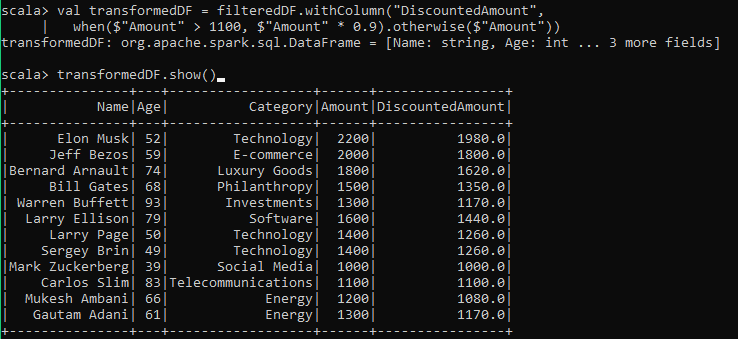
Step 5—Prepare and transform data
Next, let’s transform the dataset. We’ll add a new column called DiscountedAmount, which applies a 10% discount for amounts greater than 1100.
val transformedDF = filteredDF.withColumn("DiscountedAmount",
	when($"Amount" > 1100, $"Amount" * 0.9).otherwise($"Amount"))
transformedDF.show()
As you can see, this creates a new column with discounted values where applicable:
Step 6—Perform grouped analysis
Let’s group the data by Category and calculate the average amount spent per category:
val avgAmountDF = transformedDF.groupBy("Category").agg(avg("Amount").as("AvgAmount"))
avgAmountDF.show()
The output would look like this:
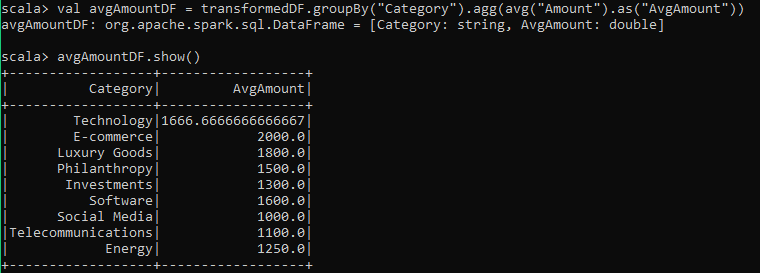
This provides insight into the spending behavior across different categories.
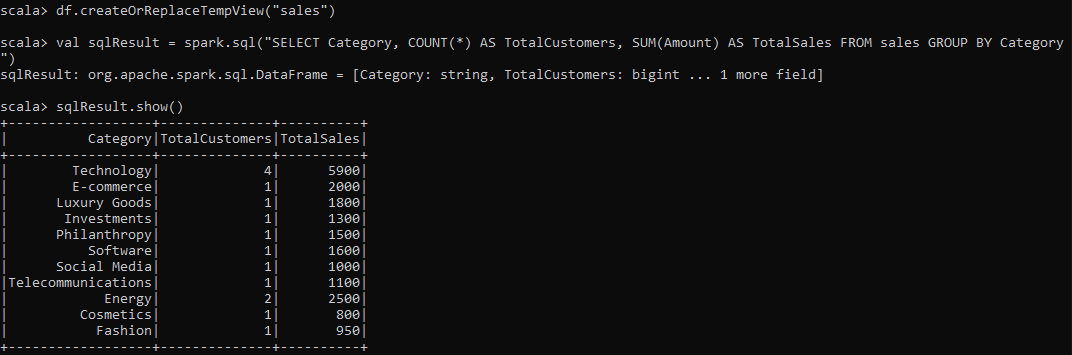
Step 7—Perform analysis with Spark SQL
You can also register the DataFrame as a temporary view and use SQL to query the data. This is especially useful for more complex queries.
df.createOrReplaceTempView("sales")
val sqlResult = spark.sql("SELECT Category, COUNT(*) AS TotalCustomers, SUM(Amount) AS TotalSales FROM sales GROUP BY Category")
sqlResult.show()
This SQL query counts the total number of customers and sums the total sales per category:
Step 8—Save processed data (Parquet, CSV, JSON)
Finally, you can save the processed DataFrame in multiple formats. For example, let’s save the final DataFrame in Parquet format:
transformedDF.write.parquet("path/to/output/output_parquet")Bonus: Configuring a Spark Project with sbt (Scala Build Tool)
Scala Build Tool (sbt) is the de facto build tool for Scala projects. It’s particularly useful for managing dependencies and building Spark applications. Let’s walk through the process of setting up a Spark project with sbt.
What is sbt (Scala Build Tool)?
sbt (Scala Build Tool) is a powerful and fully open source build tool for Scala and Java projects. It lets developers manage dependencies, compile code, run tests and package applications efficiently through a simple configuration file (build.sbt).
sbt is similar in concept to tools like Maven and Gradle. However, sbt is specifically optimized for Scala’s requirements, making it the default tool for Scala developers. Its key features include:
- sbt (Scala Build Tool) simplifies managing dependencies, including external libraries like Spark, Hadoop and more.
- sbt (Scala Build Tool) continuously compiles and tests your code as you make changes, making development more efficient.
- sbt (Scala Build Tool) allows easy packaging of your application into JAR files, which you can deploy in different environments (e.g., local, cluster).
- sbt (Scala Build Tool) integrates smoothly with most major IDEs, like VScode, IntelliJ IDEA and more, enhancing the development experience.
Prerequisites
Make sure you have the following installed:
- Java 17 JDK or later (Spark relies on the JVM)
- Scala 2.12.x (for Spark 3.5.x compatibility; use 2.13.x for Spark 4.x)
- sbt (latest stable version)
- Apache Spark 3.5.x (compatible with Scala 2.12.x)
- IntelliJ IDEA with the Scala plugin (recommended)
Optionally, you can use Docker for a consistent development environment, especially if you need to switch between different versions of Spark, Scala, or Java.
Step 1—Install sbt
First, start by installing sbt. Use the following commands based on your operating system:
For macOS (using SDKMAN! is recommended):
curl -s "https://get.sdkman.io" | bash

source "$HOME/.sdkman/bin/sdkman-init.sh"

sdk install sbt
brew install sbt
For Windows:
Download the installer files:
> choco install sbt> scoop install sbtFor Linux:
Linux (deb):
echo "deb https://repo.scala-sbt.org/scalasbt/debian all main" | sudo tee /etc/apt/sources.list.d/sbt.list
curl -sL "https://keyserver.ubuntu.com/pks/lookup?op=get&search=0x2EE0EA64E40A89B84B2DF73499E82A75642AC823" | sudo apt-key add
sudo apt-get update
sudo apt-get install sbt
Linux (rpm):
curl -sL https://www.scala-sbt.org/sbt-rpm.repo | sudo tee /etc/yum.repos.d/sbt-rpm.repo

sudo yum install sbt
Verify the installations by running the following commands in your terminal:
java -version
scala -version
sbt -version
Step 2—Setting up the project structure
Now, let’s start by creating the basic structure for the Spark project. Open a terminal and create a new directory for the project:
mkdir SparkWithScalaProject
cd SparkWithScalaProject
Inside this directory, you will need to create a typical sbt project structure:
mkdir -p src/main/scala
mkdir -p src/test/scala
mkdir -p src/main/resources
This creates a standard Scala project structure with separate directories for main and test code.
Step 3—Create the build.sbt file
In the root of the ‘SparkWithScalaProject’ directory, create a file named build.sbt and add the following content:
name := "SparkWithScalaProject"

organization := "com.example"

version := "0.1"

scalaVersion := "2.12.18"

val sparkVersion = "3.5.4"

libraryDependencies ++= Seq(

  "org.apache.spark" %% "spark-core" % sparkVersion % "provided",

  "org.apache.spark" %% "spark-sql"  % sparkVersion % "provided"

)

// Fork a new JVM when running Spark jobs to avoid classpath conflicts

fork := true

// JVM options for running Spark locally

javaOptions ++= Seq(

  "-Xms512m",

  "-Xmx2048m",

  "-XX:+UseG1GC"

)
A few things to note here. The % “provided” scope marks Spark dependencies as “provided” because Spark is already on the classpath at runtime in a cluster environment. This keeps your fat JAR lean. When testing locally with sbt run, you’ll need to remove % “provided” or configure sbt to include provided dependencies on the run classpath. We’ll address that in the assembly step.
Step 4—Create build.properties file
Create a project/build.properties file to specify the sbt version:
mkdir project
echo 'sbt.version=1.10.2' > project/build.properties
Step 5—Write your first Scala code
Create a simple Scala file named SparkWithScalaMain.scala in src/main/scala/com/example with the following content:
object SparkWithScalaMain extends App {
	 println("Spark with Scala!")
}
Step 6—Compile and run the project locally
Start the sbt console:
sbtIn the sbt console, compile your project:
compileRun your main object:
run
Exit the sbt console with:
exitStep 7—Add data for processing
Now, we will create sales data to analyze sales data for a store. Create a CSV file named sales_data.csv inside a new folder called data in your project directory:
mkdir dataAdd the following content to sales_data.csv:
TransactionID,Product,Quantity,Price,Date
1,Smartphone,2,699.99,2024-01-01
2,Washing Machine,1,499.99,2024-01-02
3,Laptop,1,999.99,2024-01-03
4,Tablet,3,299.99,2024-01-04
5,Headphones,5,99.99,2024-01-05
6,Smartwatch,2,249.99,2024-01-06
7,Refrigerator,1,899.99,2024-01-07
8,Television,2,1099.99,2024-01-08
9,Vacuum Cleaner,3,149.99,2024-01-09
10,Microwave,2,199.99,2024-01-10
11,Blender,4,59.99,2024-01-11
12,Air Conditioner,1,799.99,2024-01-12
13,Camera,1,549.99,2024-01-13
14,Speaker,3,199.99,2024-01-14
15,Smartphone,1,699.99,2024-01-15
16,Washing Machine,1,499.99,2024-01-16
17,Television,1,1099.99,2024-01-17
18,Laptop,1,1999.99,2024-01-18
19,Microwave,2,199.99,2024-01-19
20,Blender,3,59.99,2024-01-20
21,Camera,2,549.99,2024-01-21
22,Smartwatch,1,249.99,2024-01-22
23,Headphones,4,99.99,2024-01-23
24,Air Conditioner,1,799.99,2024-01-24
25,Vacuum Cleaner,2,149.99,2024-01-25
26,Smartphone,1,699.99,2024-01-26
27,Laptop,1,999.99,2024-01-27
Step 8—Update build.sbt for Spark dependencies
Make sure your build.sbt includes Spark dependencies if not already done:
libraryDependencies += "org.apache.spark" %% "spark-core" % "3.5.0"libraryDependencies += "org.apache.spark" %% "spark-sql" % "3.5.0"Step 9—Implement your Spark job logic
Create a package object by adding a file named package.scala in src/main/scala/com/example/sparktutorial with functions to create a Spark session and parse command-line arguments.
package com.example

import org.apache.spark.sql.SparkSession

package object sparktutorial {
	 def createSparkSession(appName: String): SparkSession = {
		 SparkSession.builder()
			 .appName(appName)
			.master("local[*]")
			 .config("spark.sql.caseSensitive", value = true)
			 .config("spark.sql.session.timeZone", value = "UTC")
			 .getOrCreate()
	 }

	def parseArgs(args: Array[String]): (String) = {
		 require(args.length == 1,"Expecting input path as argument")
		val inputPath = args(0)
		println(s"Input path: $inputPath")
		 inputPath
	 }
}
Then create an analysis file named SalesAnalysis.scala in the same package with the following code to analyze the sales data:
package com.example.sparktutorial

import org.apache.spark.sql.{DataFrame,SparkSession}
import org.apache.spark.sql.functions._

object Analysis {
	 def analyzeSalesData(spark: SparkSession,inputPath: String): DataFrame = {
		// Read sales data from CSV file into DataFrame
		val salesDF = spark.read.option("header","true").csv(inputPath)

		// Calculate total sales per product and add it as a new column 'TotalSales'
		 val resultDF = salesDF.withColumn("TotalSales",col("Quantity").cast("int") * col("Price").cast("double"))
			 .groupBy("Product")
			 .agg(sum("TotalSales").alias("TotalSales"))
			 .orderBy(desc("TotalSales"))

		resultDF.show() // Display result in console

		 // Return result DataFrame for further processing if needed
		 resultDF
	}
}
Step 10—Update the main object to call the analysis logic
Update your SparkWithScalaMain.scala to include logic to call the analysis function:
package com.example.sparktutorial

import org.apache.spark.sql.SparkSession

object SparkWithScalaMain extends App {
	 // Create Spark session
	 val spark = createSparkSession("Spark Sales Analysis")

	// Specify input path for sales data CSV file
	val inputPath = args(0) // Pass input path as command line argument

	// Call analysis function
	Analysis.analyzeSalesData(spark,inputPath)

	 // Stop the Spark session
	 spark.stop()
}
Step 11—Compile and run Your Spark job locally
Compile and run the project using sbt, passing the input path of the CSV file:
sbt "run data/sales_data.csv"This command will read from sales_data.csv, perform the analysis defined in SalesAnalysis.scala and display results in the console.
Step 12—Configure logging
Create a log4j2.properties file in src/main/resources to manage logging output:
status = error

name = PropertiesConfig

appender.console.type = Console

appender.console.name = ConsoleAppender

appender.console.layout.type = PatternLayout

appender.console.layout.pattern = %d{HH:mm:ss.SSS} [%t] %-5level %msg%n

rootLogger.level = INFO

rootLogger.appenderRefs = console

rootLogger.appenderRef.console.ref = ConsoleAppender
Step 13—Package your application as a JAR
Use the following SBT command to package your project into a JAR file:
sbt packageThis will generate a JAR file in the target/scala-2.13/ directory (depending on your Scala version). However, this JAR will not include any dependencies.
Step 14—Packaging using sbt-assembly to create a fat JAR
To package your project along with its dependencies into a single standalone JAR (often referred to as a fat JAR), you’ll need the sbt-assembly plugin.
Add the sbt-assembly plugin to your project by creating a project/plugins.sbt file with the following content:
addSbtPlugin("com.eed3si9n" % "sbt-assembly" % "1.1.0")Next, configure sbt-assembly in your build.sbt file:
assemblyOption in assembly := (assemblyOption in assembly).value.copy(includeScala = false)

mainClass in assembly := Some("com.example.sparktutorial.SparkWithScalaMain")
Finally, run the following command to generate a fat JAR:
sbt assembly
This will produce a JAR file with all dependencies bundled, which you can run or distribute as needed.
Step 15—Submit your JAR to Spark cluster
Use the following command to submit your JAR file to your Spark cluster (replace <master-url> with your actual master URL):
spark-submit
--class com.example.sparktutorial.SparkWithScalaMain
--master <master-url>
target/scala-2.12/sparkexample-assembly-0.1.jar
data/sales_data.csv
Replace <master-url> with your Spark cluster’s master URL (e.g., yarn for YARN cluster, spark://host:port for standalone cluster). And, make sure sparkexample-assembly-0.1.jar matches the exact artifact name generated by sbt-assembly.
Follow these steps and you’ll be all set to create, develop and run Spark projects in Scala using sbt.
Further reading
To continue your journey with Apache Spark and Scala, here are some valuable resources:
Official documentation:
Books:
- “Learning Spark: Lightning-Fast Data Analytics” by Jules S. Damji et al.
- “Spark: The Definitive Guide” by Bill Chambers and Matei Zaharia
- “Programming in Scala” by Martin Odersky, Lex Spoon and Bill Venners
Online courses:
- Coursera: “Big Data Analysis with Scala and Spark”
- edX: “Introduction to Apache Spark” by UC Berkeley
Community resources:
Articles and tutorials:
Comparison articles:
Save up to 50% on your Databricks spend in a few minutes!
Conclusion
Apache Spark with Scala offers a powerful toolset for big data processing and analysis. Throughout this guide, we’ve explored the symbiotic relationship between Spark and Scala, delved into Spark’s architecture and walked through the process of setting up a Spark environment and building Spark applications using Scala.
In this article, we’ve covered:
- Fundamentals of Apache Spark and its ecosystem
- Why Spark has become a go-to solution for big data processing
- The benefits of using Scala with Spark
- Setting up a Spark environment on Windows, Mac and Linux
- Basic and advanced Spark operations using Scala
- A hands-on data analysis example using Spark with Scala
- Configuring and managing Spark projects using sbt
… and so much more!
Want to learn more? Reach out for a chat
FAQs
What is Apache Spark?
Apache Spark is an open-source, distributed computing system designed for fast and general-purpose data processing at scale. It was developed to overcome the limitations of Hadoop MapReduce, with a focus on in-memory processing for iterative algorithms and interactive queries.
How does Apache Spark achieve fault tolerance?
Spark uses Resilient Distributed Datasets (RDDs), which maintain lineage information that allows the system to automatically reconstruct lost data partitions after node failures.
What is lazy evaluation in Spark?
Lazy evaluation means Spark doesn’t execute operations until an action is called. This lets Spark build an optimized execution plan before running any computation, reducing unnecessary work.
What role does the driver program play in a Spark application?
The driver program creates a SparkContext, defines operations on data, submits jobs to the cluster manager and coordinates task execution on executors.
How do executors function within a Spark cluster?
Executors are processes running on worker nodes that execute tasks assigned by the driver, store data in memory or on disk and return results to the driver.
What is Scala with Spark?
Scala is the native language for Spark. It offers deep integration with Spark’s internals, compile-time type safety and performance optimizations that other languages can’t match without additional overhead.
How do I run Scala in Spark?
You can use spark-shell for interactive exploration or create a full project with sbt for production-level code, then submit it with spark-submit.
How do you verify your installation of Spark with Scala?
Run spark-shell in your command line. You should see the Spark logo and a scala> prompt.
What’s the difference between using Scala APIs and PySpark?
Scala APIs offer better performance and type safety because both Scala and Spark run on the JVM with no serialization overhead. PySpark is easier for Python developers but slower due to the Py4J bridge between Python and the JVM.
Can you use Scala 3 with Spark?
Spark 3.5.x officially supports Scala 2.12 and 2.13. Spark 4.x uses Scala 2.13. Full Scala 3 support is not yet available as of 2026. Check the Apache Spark downloads page for the latest compatibility information before choosing a Scala version.
What Spark version should I use in 2026?
For new production work, Spark 3.5.x remains the recommended LTS choice (maintained through November 2027). Spark 4.x is the latest stable release and requires Java 17 or 21 and Scala 2.13. If you’re starting a brand new project and don’t need LTS guarantees, Spark 4.x is worth considering.
Is Scala better than Python for Spark?
Scala provides better raw performance and type safety. Python has a richer data science library ecosystem, making it more popular for exploratory work. For production pipelines where performance matters, Scala is the stronger choice.