What would you do if your whole engineering team were working in the same codebase at the same time and every change had to be tracked manually? Very quickly, things start to get messy and jittery. You would be stuck relying on chat messages, manual file copies and constant back-and-forth just to stay in sync. One engineer writes code, another overwrites it an hour later and by the end of the day, nobody knows which version actually works. There is no history, no diff and no safe way to roll back when something breaks.
Version control was built to solve exactly this. It helps teams to track every change, compare edits side by side, revert when something breaks and work on new features in isolated branches without touching the main codebase. Git is one of the most popular version control systems (VCS). It was first created by Linus Torvalds in 2005 to manage Linux kernel development. It became the dominant player in the market because it is fast, distributed and built to handle collaboration at scale, even among thousands of contributors working at once.
But here is the core issue with Databricks: how do you bring Git-based source control directly into the workspace without jumping back and forth between tools? That’s where Databricks Git folders (Repos) comes in. It is a visual Git client and REST API built directly into the Databricks Data Intelligence Platform. You point it at a remote Git repository and Databricks creates a workspace folder that stays in sync with that repo. Everything inside that folder is tracked by Git. You can create branches, commit changes, push to the remote, pull updates and resolve merge conflicts; all from within Databricks. No terminal is required for the basics, though a Git CLI (Beta) is available if you need raw command access.
💬 Quick note on naming: Databricks Repos and Databricks Git folders are the same feature. “Repos” was renamed to “Git folders”. The core functionality did not change; only the terminology and placement in the UI shifted. If you are familiar with Databricks Repos, Git folders works the same way.
In this article, we will cover every step of setting up Databricks Git folders from absolute scratch, starting from basic prerequisites and Git credentials configuration to branch management, CI/CD integration and limitations you should know. Let’s get started.
What is Databricks Git folders?
Databricks Git folders is a visual Git client and API built directly into the Databricks workspace. It integrates remote Git repositories as folders inside your workspace. The contents of those folders sync with the remote repo, giving you full version control capabilities without leaving the Databricks UI.
It is a lightweight Git interface embedded in your workspace. You get a graphical interface for cloning repos, switching branches, staging changes, committing, pushing, pulling and resolving merge conflicts. On top of the UI, there is a REST API you can use to automate Git operations from CI/CD pipelines.
Databricks Git folders used to be called Databricks Repos. We will get to that naming history shortly.
Databricks Git folders—core features and capabilities
Databricks Git folders support a rich set of common Git capabilities.
1) Native Git client
Databricks Git folders is a Git client built right in. You do not need to open a separate terminal or use a local IDE to work with your remote repository. The workspace UI has a Git dialog you can access from any notebook or the file browser. It lets you do the most common Git operations interactively, making it ideal for interactive development workflows inside the platform.
2) Repository cloning
Databricks Git folders let you clone a remote repository into your workspace using either the UI or the web terminal. From the Databricks UI, you provide the repository URL, select your Git provider and optionally configure sparse checkout or Git CLI access at clone time.
Note that cloning a public Git repository requires no credentials. Private repos and any write operations do require a configured personal access token (PAT) or OAuth credentials. Databricks creates a folder under /Workspace/Users/<your-email>/ for each cloned repository, and the remote contents are immediately accessible as a versioned workspace folder.
3) Branch management
Databricks Git folders gives you full branch management from within the workspace. You can easily create new branches, switch between existing ones and set a base branch at creation time—all via the Git dialog. The UI shows your current working branch next to the Databricks notebook name.
🔮 Note: The branch in Databricks Git folders is shared across all users who have access to the same Git folder object. If you switch branches, it changes for everyone working in that folder.
4) Visual diffs comparison
Databricks Git folders shows you a visual diff of every changed file before you commit. Visual diff works for Databricks notebooks and regular files alike, letting you review exactly what changed since your last commit. Diffs are rendered inline in the Git dialog, with additions and deletions highlighted side by side.
5) Merge conflict resolution
Whenever you pull in changes from a remote branch that conflict with what you have locally, Databricks Git folders shows those conflicts in the UI. You can review the conflicting sections, pick the version you want and finish the merge right from your workspace.
6) Rebase and reset operations
Databricks Git folders also supports rebasing and resetting branches through the advanced operations menu in the Git dialog. You can rebase your current branch onto another or perform a hard reset to bring your local branch in line with the remote.
7) Git CLI support (currently in Beta)
Databricks Git folders now support Git CLI (currently in Beta). When enabled, you can run any standard Git command directly from the Databricks web terminal.
8) Sparse checkout mode
Large monorepos can be a real problem in Git folders. The default behavior clones the entire repository, and there are memory (2 GB) and disk (4 GB) limits per Git operation. Sparse checkout mode solves this by cloning only a subset of directories using cone patterns.
9) Git folders REST API for CI/CD automation
Databricks Git folders expose a REST API (the Databricks Repos API) that lets you programmatically interact with Git folders in your workspace. The most common use case is automated deployment. You can simply call the Databricks Repos API to synchronize a workspace Git folder to the latest commit on a specific branch, which effectively deploys updated Databricks notebooks or configuration files to a workspace.
This API is how you wire Databricks Git folders into CI/CD pipelines.
10) Multiple Git providers supported
Databricks Git folders work with a broad set of cloud-hosted and self-hosted Git servers.
Cloud (SaaS) providers:
- GitHub, GitHub Advanced Enterprise and GitHub Enterprise Cloud
- GitLab and GitLab Enterprise Edition
- Atlassian Bitbucket Cloud
- Microsoft Azure DevOps (Azure Repos)
- AWS CodeCommit
On-premises / self-managed providers:
- GitHub Enterprise Server
- Atlassian Bitbucket Server and Data Center
- GitLab Self-Managed
- Microsoft Azure DevOps Server
11) Multiple Git credentials per user
Databricks lets each user store up to 10 Git credentials across different providers or accounts, which is useful when you work with multiple GitHub organizations or separate personal and company GitLab accounts. Each Databricks Git folder can use its own credential. If you do not choose one, Databricks uses the default credential for that Git provider. The first credential you add for a provider becomes the default, and you can change it in Settings > Linked accounts.
12) Private Git server proxy
Databricks Git folders can connect to self-hosted Git servers behind a firewall or virtual private network (VPN) that are not reachable from the public internet. To do this, you set up a Git server proxy in your workspace’s compute plane, then route Git commands through that proxy to your private Databricks repository.
13) Granular access control permissions
Databricks Git folders support workspace-level access control through a five-tier permission model:
- NO PERMISSIONS ⇒ no access to the Git folder
- CAN READ ⇒ view files only
- CAN RUN ⇒ view and run files
- CAN EDIT ⇒ view, run and modify files
- CAN MANAGE ⇒ full control, including sharing and deletion
Permissions apply to everything within a Databricks Git folder.
14) Secrets detection before commits
Databricks Git folders automatically scan your code for exposed credentials before you commit. If it detects sensitive credential patterns (such as AWS access tokens starting with AKIA), it warns you before the commit goes through.
15) Audit logging
Databricks Git folders activity is logged in workspace audit logs when audit logging is enabled. Databricks records Git folder activity under the repos service, including creating, updating, deleting, listing and synchronizing Git folders with remote Git repositories. Git credentials activity is logged separately under the gitCredentials service.
16) Service principal support for automated workflows
For CI/CD pipelines and scheduled Databricks jobs that need to interact with Git folders programmatically, Databricks supports service principals as the authentication identity. A service principal can be assigned Git provider credentials through the workspace admin UI or the Databricks CLI, then used to perform Git folder operations as part of automated Git workflows.
17) Multiple asset types supported
Databricks Git folders isn’t limited to Databricks notebooks. The full list of asset types it supports for version control includes:
- Databricks notebooks in Python (.py), Scala (.scala), SQL (.sql), R (.r) and IPYNB (.ipynb) formats
- Workspace files (serialized data such as libraries, binaries, arbitrary code or images)
- Databricks folders
- Databricks SQL queries (saved as .dbquery.ipynb files via the new SQL editor)
- Databricks AI/BI dashboards (saved as .lvdash.json files)
- Databricks Alerts (saved as .dbalert.json files)
18) Encryption of Git folder contents and credentials
Databricks encrypts Git folder contents using a platform-managed default encryption key. For Git credentials specifically (personal access tokens and OAuth secrets), you can go further with customer-managed keys (CMKs). On AWS, this uses AWS Key Management Service (KMS); on Azure, it uses Azure Key Vault.
⚠️ Important: Customer-managed keys apply to Git credentials only; not to Git folder contents themselves. Folder contents use the platform-managed default key.
19) .gitignore support
Databricks Git folders respects .gitignore files. To prevent Git from tracking specific files, add their filenames (including extensions) to a .gitignore file either created in the folder or inherited from a cloned repository. This works the same way as in any standard Git workflow. Note that .gitignore only works for untracked files. If a file has already been committed, adding it to .gitignore will not remove it from Git history.
What changed: Databricks Repos to Git folders
Databricks Repos are now called Databricks Git folders. Like Databricks Repos, Databricks Git folders let you synchronize workspace folders with remote Git repositories for version control. The core functionality has not changed…only the terminology. UI operations now refer to “Git folders” instead of “Repos”.
If you are maintaining existing automation or job configurations that reference /Repos paths, do not panic. Existing /Repos paths continue to work. Both /Repos and /Workspace/Repos refer to the same folder, so paths in Databricks jobs, dbutils.notebook.run and %run references do not need to change.
So what actually changed?
- New entry point in the UI. You used to create a Repo by selecting New > Repo. That option is gone. Now, select New > Git folder, accessible from the Workspace sidebar
- Flexible folder placement. Databricks Repos could only exist at a fixed level like /Workspace/Repos/<user-email>/<Repo-name>. Databricks Git folders, on the other hand, can exist at any level of the workspace file tree. You can have multiple Git folders per user, nested however you like
- Broader asset type support. Databricks Repos supported notebooks, code files and configuration files. Databricks Git folders extend that to include Databricks SQL queries (.dbquery.ipynb), Databricks AI/BI dashboard drafts (.lvdash.json) and Databricks Alerts (.dbalert.json), all currently in Public Preview
- Remote URL is now required. Databricks Git folders require a remote Git repository URL. Databricks Repos did not have this requirement
- Permissions. Databricks Git folders use normal workspace ACLs. Most Git operations require CAN MANAGE permission on the folder, so admins may need to adjust workspace folder ACLs accordingly
So, if you used Databricks Repos before, treat Git folders as the same thing under a new name. The core idea (“a workspace folder backed by Git”) is identical. You may need to click “Git folder” instead of “Repo” and pick a new location, but otherwise it “just works.” We recommend that new projects use Git folders, since you have more flexibility placing them in user folders rather than a single global /Repos node.
Databricks also recommends using Databricks Runtime 15.0 or above in your clusters and Databricks notebooks when working with Git folders. Newer runtimes have better consistency for current working directory, sys.path and Python library lookup inside Git folders.
What Databricks Git folders can (and cannot) version control?
Only certain Databricks asset types are supported by Git folders. When an asset type is supported, it can be serialized, version-controlled and pushed to the backing Git repository.
Supported asset types:
1) Databricks Notebooks
Databricks Git folders identifies Databricks notebooks by file extension (.ipynb) or by a special marker in the file content, such as a # Databricks notebook source comment at the beginning of .py files. Notebooks are not serialized like other file types. Source-format notebooks use .py for Python, .scala for Scala, .sql for SQL and .r for R.
2) Code files and configuration files
Workspace files like libraries, binaries, scripts, configuration files, images are fully supported. These are serialized as-is and committed like any other file in a standard Git workflow.
3) SQL queries (Public Preview)
Databricks SQL queries saved as .dbquery.ipynb files are supported. You cannot commit queries created with the legacy SQL editor. You will need the new SQL editor for that.
4) Databricks AI/BI dashboard drafts (Public Preview)
Databricks Git folders track Databricks dashboard changes and history, support team collaboration and let you deploy dashboards to production and recover previous versions. Drafts are saved as .lvdash.json files.
A few things to keep in mind. Git does not track publishing and scheduling configurations, such as warehouse selection and schedule creation. Branch switches are not dashboard-friendly either. Switching Git branches is a destructive operation for Databricks dashboards. Databricks removes dashboards that do not exist on the target branch. If you switch back, dashboards reappear with new URLs and IDs, which breaks published links, bookmarks and API integrations. Dashboard serialization also generates long JSON strings, which makes pull request diffs hard to read in practice.
There is also a current limit of 100 dashboards per Git folder during Public Preview.
5) Databricks Alerts (Public Preview)
Databricks Alerts are saved as .dbalert.json files. Databricks Git folders track alert schedules, but cloned alerts start in a paused state. You must manually resume them after cloning.
Unsupported asset types:
There are some workspace things you simply cannot commit to Git.
1) Legacy dashboards
Old-generation SQL Databricks dashboards are not serializable. You can physically move them into a Git folder, but committing will fail.
2) Legacy alerts
Same situation as legacy Databricks dashboards. Movable but not committable.
3) Databricks MLflow experiments
There are two types of Databricks MLflow experiments: workspace and notebook.
- Workspace experiments cannot be created inside a Git folder at all. Log Databricks MLflow runs to an experiment created in a regular workspace folder instead.
- Notebook experiments can exist in a Git folder, but they are not committed to source control. Notebook Databricks MLflow experiments created using Lakeflow Jobs with source code in a remote Git repository are stored in temporary storage. These experiments persist after workflow execution but risk deletion during scheduled cleanup. Switching to a branch that does not contain the associated notebook also risks losing the experiment’s run data permanently if you do not access the prior branch within 30 days.
4) Genie spaces
Databricks Genie Spaces (Databricks Genie AI/BI conversational analytics) do not have Git serialization support.
5) Data, Delta tables and datasets
Git tracks code, not data. These live in object storage and Databricks Unity Catalog, not in your workspace folder structure. Attempting to version control a Delta table using a Git folder is a category error.
6) Cluster configurations and secrets
Databricks Cluster configs are managed through the compute API, and secrets live in Databricks secret scopes. Neither is a workspace file asset, so there is nothing for Databricks Git folders to serialize.
7) Job and pipeline definitions—sort of
The job or pipeline as a workspace object does not support serialization in Databricks Git folders. But if you define your Databricks jobs and pipelines using Databricks Asset Bundles, those definitions are stored in YAML files, which are just files that live in your Git folder and commit like any other.
Which Git providers are supported by Databricks Git folders?
A Git provider is a service that hosts a Git-based source control version control system. These platforms come in two main forms: a SaaS cloud solution hosted by the vendor, or an on-premises service that your organization installs and manages on its own hardware (often called a self-hosted Git server). Here is the full list supported by Databricks Git folders.
a)Cloud (SaaS) providers:
Databricks Git folders integrate with the following on-premises Git providers:
1) GitHub (public repos and private repos with authentication)
4) GitLab (SaaS)
5) GitLab Enterprise Edition (SaaS)
7) Microsoft Azure DevOps (Azure Repos)
b)On-premises/ self-managed:
Databricks Git folders integrate with the following on-premises Git providers:
2) Atlassian Bitbucket Server & Data Center
4) Microsoft Azure DevOps Server
🔮 Note on credentials: For private repositories or write operations, you will need a PAT or OAuth credentials from your Git provider. You can clone public remote repositories without Git credentials. Each user can save up to 10 Git credentials from various sources and each Git folder can be linked to a specific credential.
Databricks Git folders vs regular workspace folders
Table 1: Databricks Git folders vs regular Workspace folders
| 🔮 | Databricks Git folder | Regular workspace folder |
| Git Integration | ✅ Native | ❌ Manual |
| Version History | ✅ Yes | ⚠️ Limited |
| Branching | ✅ Yes | ❌ No |
| CI/CD Ready | ✅ Yes | ❌ No |
| Collaboration | ✅ Yes | ⚠️ Basic |
How to configure Databricks Git folders from an absolute scratch?
Now, let’s walk through getting Databricks Git folders up and running in a fresh workspace.
Prerequisites and setups:
- Git folders must be enabled in your workspace (enabled by default in new workspaces)
- You need an account on the Git provider you intend to use (GitHub, GitLab, Atlassian Bitbucket Cloud, Azure DevOps or AWS CodeCommit)
- You can clone remote repository contents without Git credentials when the repository is public
- To modify a public remote Databricks repository or to work with private Git repositories, you will need to configure Git credentials with write permissions (a PAT or OAuth connection, depending on your provider)
- You (or your admin) must have CAN MANAGE permission on the parent folder where you want to create the Git folder. If you are cloning under your own user path (/Workspace/Users/<your-email>), you already have this by default. If you want to create a folder in a shared project area, get that permission sorted first
- Databricks Git folders require network connectivity to your Git provider. Most configurations work over the internet without additional setup. Public repos on GitHub, GitLab, Atlassian Bitbucket Cloud and Azure DevOps work out of the box. If your Git server is a self-hosted Git server or behind a private network, you will need extra configuration (covered in Step 27)
If you plan to use Git CLI (Beta):
- Serverless compute must be available (Databricks Serverless or Unity Catalog environment)
- For CLI in the web terminal, use environment version 4+ on serverless or Databricks Runtime 17.0+ on classic clusters
- Enabling the CLI is a toggle you set when you clone or create the Git folder (you cannot turn it on later)
If you plan to automate with a service principal (CI/CD):
- You need Databricks workspace admin privileges
- Databricks CLI installed and configured
- A Git PAT configured for your Git provider
- The service principal must be created and authorized in your Databricks account
We will cover this in the CI/CD section later.
With that checked, let’s get into the actual setup.
Step 1—Log in to Databricks
Nothing fancy. Open your Databricks workspace in a browser and sign in with your credentials. Make sure you have a user account that can access the workspace.
Step 2—Check whether Databricks Git folders are enabled
Databricks Git folders are enabled by default for new workspaces. If not, have an admin enable this feature using the /api/2.0/workspace-conf REST API endpoint or a Databricks SDK.
To check or toggle this at the workspace level, use the Workspace Settings API (admin-only). A workspace admin can call:
GET /api/2.0/workspace-conf?keys=enableProjectTypeInWorkspace
If the key returns true, Databricks Git folders are active. To enable it:
PATCH /api/2.0/workspace-conf

{ "enableProjectTypeInWorkspace": "true" }
For step-by-step instructions, see Enable or disable Databricks Git folders.
Step 3—Pick a supported Git provider
Know which Git provider your team uses and specifically whether it is the cloud (SaaS cloud solution) version or a self-managed version. It matters because self-hosted Git servers often live behind a virtual private network (VPN) and require extra network connectivity configuration.
If you are unsure which variant your organization uses, check the URL pattern. github.com is SaaS. github.yourcompany.com is GitHub Enterprise Server.
Step 4—Add Git credentials for your user
To configure Git credentials in Databricks:
Click your username in the top bar of the Databricks workspace and select Settings
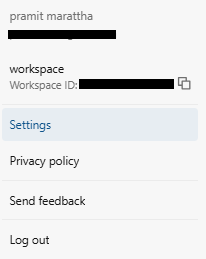
Figure 1: Accessing Settings from the Databricks workspace top bar
Click Linked accounts.
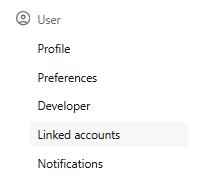
Figure 2: The Linked accounts section within Databricks Settings
Click Add Git credential.
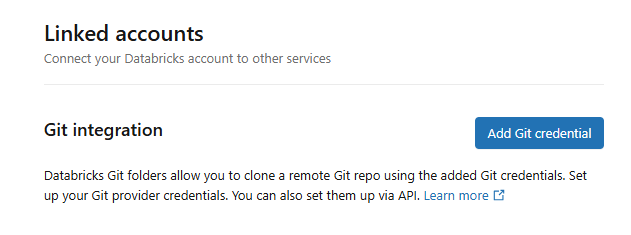
Figure 3: Adding Git credential in the Linked accounts panel—Databricks Git folders
Select your Git provider from the dropdown.
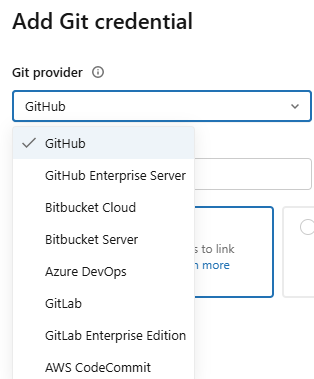
Figure 4: Selecting Git provider from the drop-down menu—Databricks Git folders
If OAuth account linking is available for that provider, you can complete an OAuth login flow using the Databricks GitHub App (for GitHub) or the equivalent OAuth integration for other providers. Otherwise, get a personal access token (PAT) from your Git host.
Enter your email in the Git provider email field. And then paste your PAT in the Token field.

Figure 5: Filling out Git provider email and token fields in the credential configuration form—Databricks Git folders
Click Save.
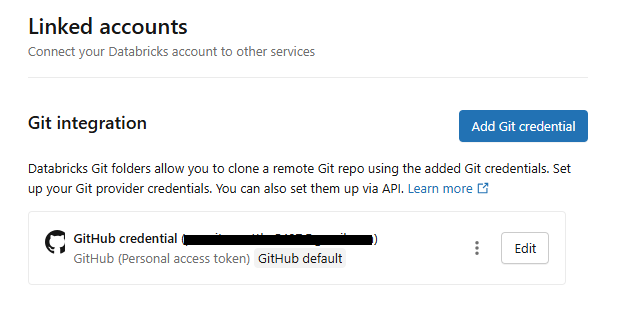
Figure 6: Saving the newly configured Git credential—Databricks Git folders
A note on commit identity: If you do not specify an email address, Databricks uses your Git username as the email. This can prevent proper commit attribution in your Git provider. Always fill in the email field.
Multiple credentials: Databricks lets each user store multiple Git credentials, so you can use different providers or accounts without switching credentials each time. Each Git folder can then use a specific credential. The maximum is 10 Git credentials per user.
Azure DevOps on AWS Databricks: Git integration on AWS Databricks does not support Microsoft Entra ID tokens. You must use an Azure DevOps PAT. On Azure Databricks, however, the integration uses your Microsoft Entra ID token by default; you only need a PAT if you want to override that behavior.
Step 5—Create Databricks Git folder (clone the repository)
When you clone a remote repository, Databricks creates a Git folder in your workspace that contains the repo contents and tracks changes. You can create Git folders using the Databricks UI or the web terminal.
To clone from the Databricks UI:
In the sidebar, select Workspace and browse to the folder where you want to create the Git repository clone
Click Create > Git folder.
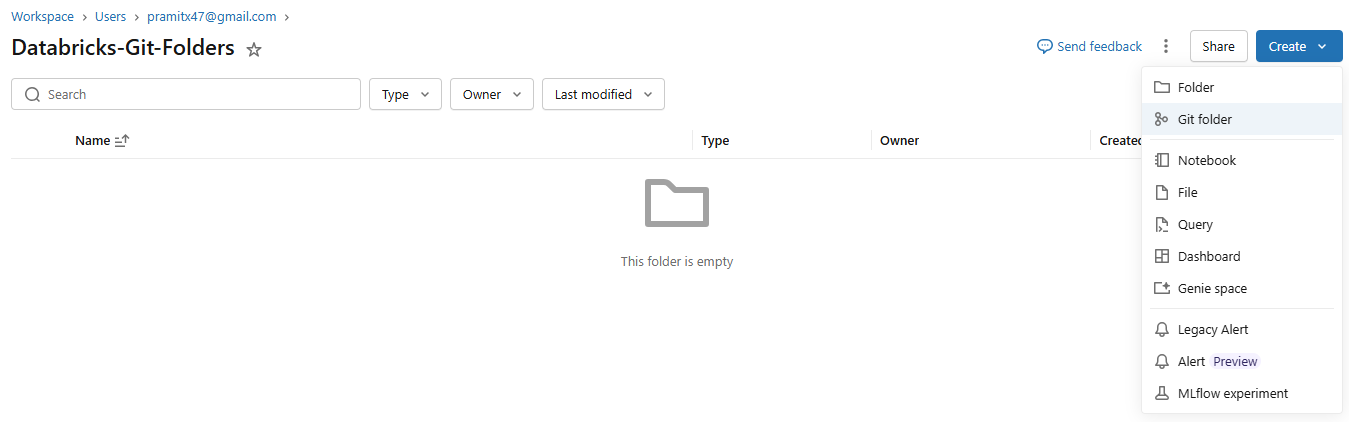
Figure 7: Create > Git folder option in the Databricks Workspace sidebar—Databricks Git folders
In the Create Git folder dialog, fill in the following:
- Git repository URL (in the format: https://example.com/organization/project.git)
- Git provider
- Git folder name (the name that will appear in your workspace)
You will also see an option to toggle on sparse checkout mode. Only enable this if your Git repository is large and you need only a subset of directories.
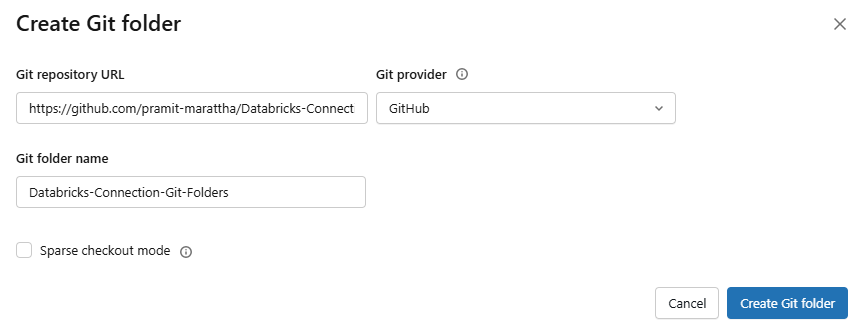
Figure 8: Creating Git folder with repository URL, provider and name fields—Databricks Git folders—Databricks Git folders
Click Create Git folder.

Figure 9: Databricks workspace after cloning—the Git folder appears in the Workspace tree
As you can see, Databricks clones the remote repository into your workspace. The contents appear in the Workspace tree under the path you chose.
You must have CAN MANAGE permission on the parent folder to create a Git folder there.
🔮 Quick Note: You can clone public remote repositories without Git credentials. To modify a public remote repository or to work with private repositories, configure Git credentials with write permissions.
Step 6—Set the right credentials for each Git folder
If you have multiple Git credentials (for example, one GitHub account for internal repos and one for a public org), make sure each Databricks Git folder uses the right one.
To change the credentials for a Git folder. First, open the Git folder and go to the Git settings tab. Under Git credential, select a credential from the drop-down menu. Click Save.
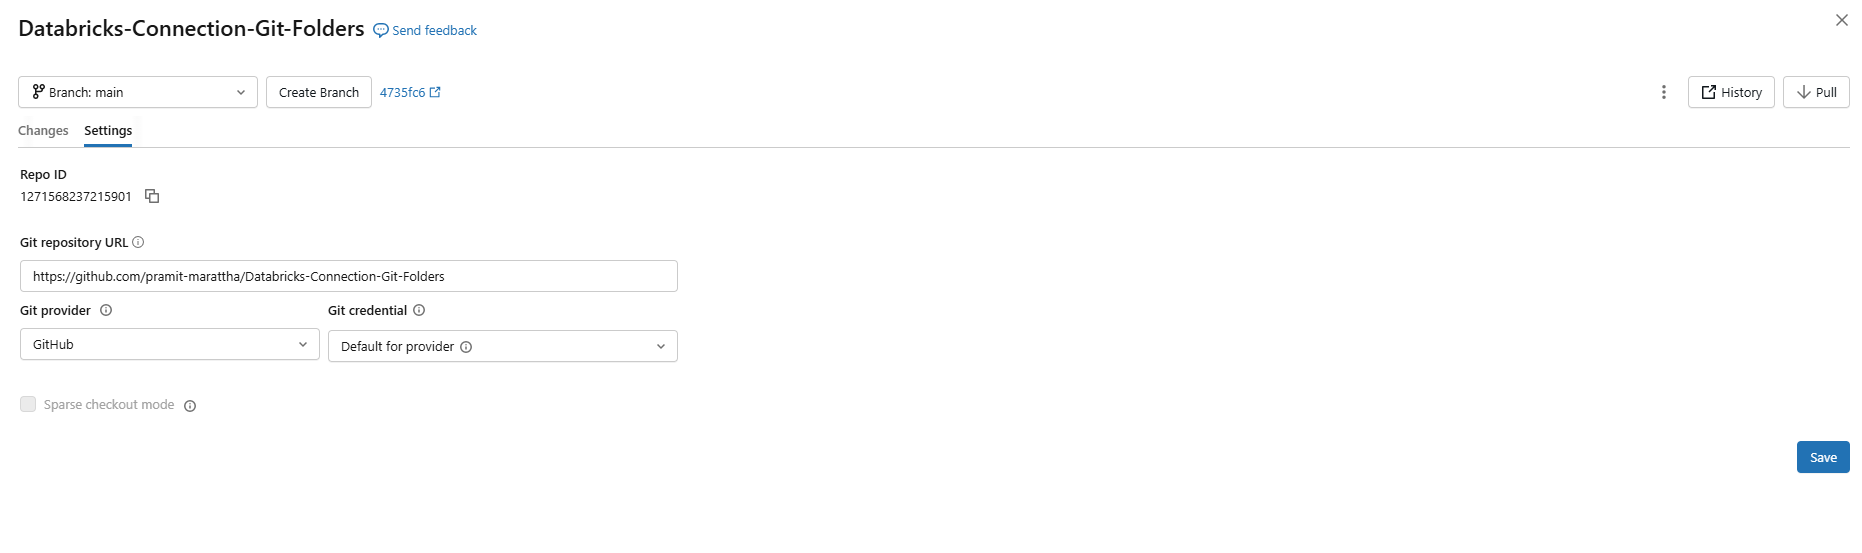
Figure 10: Git settings tab showing the credential drop-down for a Git folder—Databricks Git folders
Each Databricks Git folder can use a different credential, so a developer working across multiple Git providers or accounts does not need to touch global settings every time.
Step 7—Verify connectivity (for private repos)
Databricks Git folders require network connectivity to your Git provider. Most configurations work over the internet without additional setup. But you might need extra configuration if you have IP allowlists on your Git provider, self-hosted Git servers or private network connectivity.
For internet-accessible repos with an IP allowlist:
Find your Databricks control plane network address translation (NAT) IP address for your region and add it to your Git server’s IP allowlist.
For private or self-hosted Git servers:
You need to set up a Git proxy server within your virtual private network (VPN). The Databricks compute plane must be able to reach the proxy, which forwards HTTPS requests to your Git server (covered in Step 27).
Do not skip this. Cloning will fail with a confusing timeout error if network connectivity is not set up.
Step 8—Lock down Git access with security controls
Once Databricks Git folders are up, you will want to tighten security.
Encrypt Git credentials with customer-managed keys. On AWS, use AWS KMS. On Azure, use Azure Key Vault. Note that CMKs apply to Git credentials (personal access tokens and OAuth secrets) only, not to Databricks Git folder contents.
Set up Git URL allowlists. Go to Settings > Development > Git URL allowlist. You can enter URL prefixes (like https://github.com/<CompanyName>) to restrict which repos users can clone or push to. Git URL allowlists are a straightforward way to enforce repository policies across your workspace.

Figure 11: Configuring Git URL allowlist in Databricks Settings—Databricks Git folders
🔮 Quick Note: Git URL allowlists are ignored for Databricks Git folders that have Git CLI support enabled.
Manage Workspace permissions. Right-click the Git folder in the Workspace tree, select Permissions and assign:
- CAN MANAGE for users who need full Git operations (commit, push, branch management)
- CAN EDIT for users who need to edit files but not manage the repo
- CAN RUN for service principals running automated workflows
- CAN VIEW for read-only access
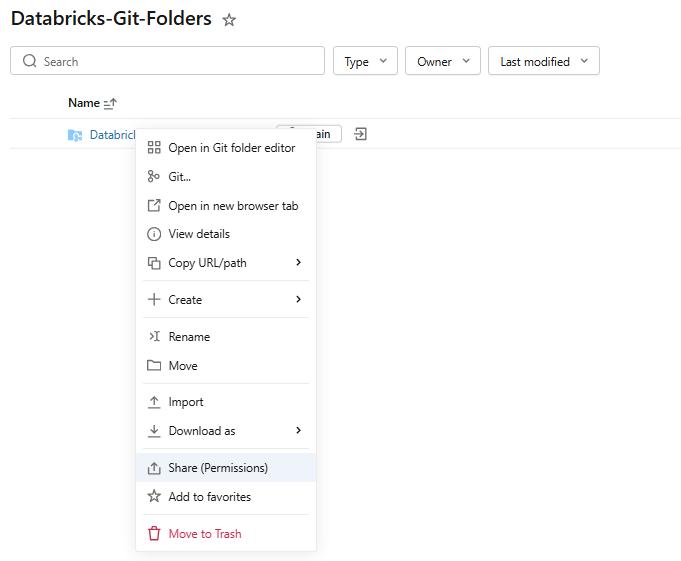
Figure 12: Configuring Databricks Git folder permission
Remember, almost any Git operation (like cloning or pushing) requires CAN MANAGE on the folder by default.
Enable Audit logging in the workspace if you want to track who creates, updates, deletes or synchronizes Git folders. Audit logging is especially important for organizations managing compliance requirements on the Databricks Data Intelligence Platform.
Step 9—(Optional) Enable Git CLI support
You cannot enable Git CLI support on an existing Databricks Git folder. It must be selected when you create the folder.
Git folders with Git CLI access let you run standard Git commands directly from a Databricks terminal. You can run any Git command including git stash, git pull –force and git rebase -i, integrate linting and code scanning with pre-commit hooks, work with Git repositories that exceed the 2 GB memory and 4 GB disk limits of standard Git folders, use Git submodules and LFS and stage multiple commits locally before Git push changes to the remote Git repository.
To use Git CLI from the web terminal:
- Open the web terminal from a cluster (Serverless, environment version 4+, or classic compute with Databricks Runtime 17.0+)
- Navigate to the Git folder path in /Workspace/Users/<your-email>/<project-name>/<repo-name>
- Run any standard Git command:
cd /Workspace/Users/<your-email>/<project-name>/<repo-name>

git rebase -i main

git stash

git submodule update --init --recursive
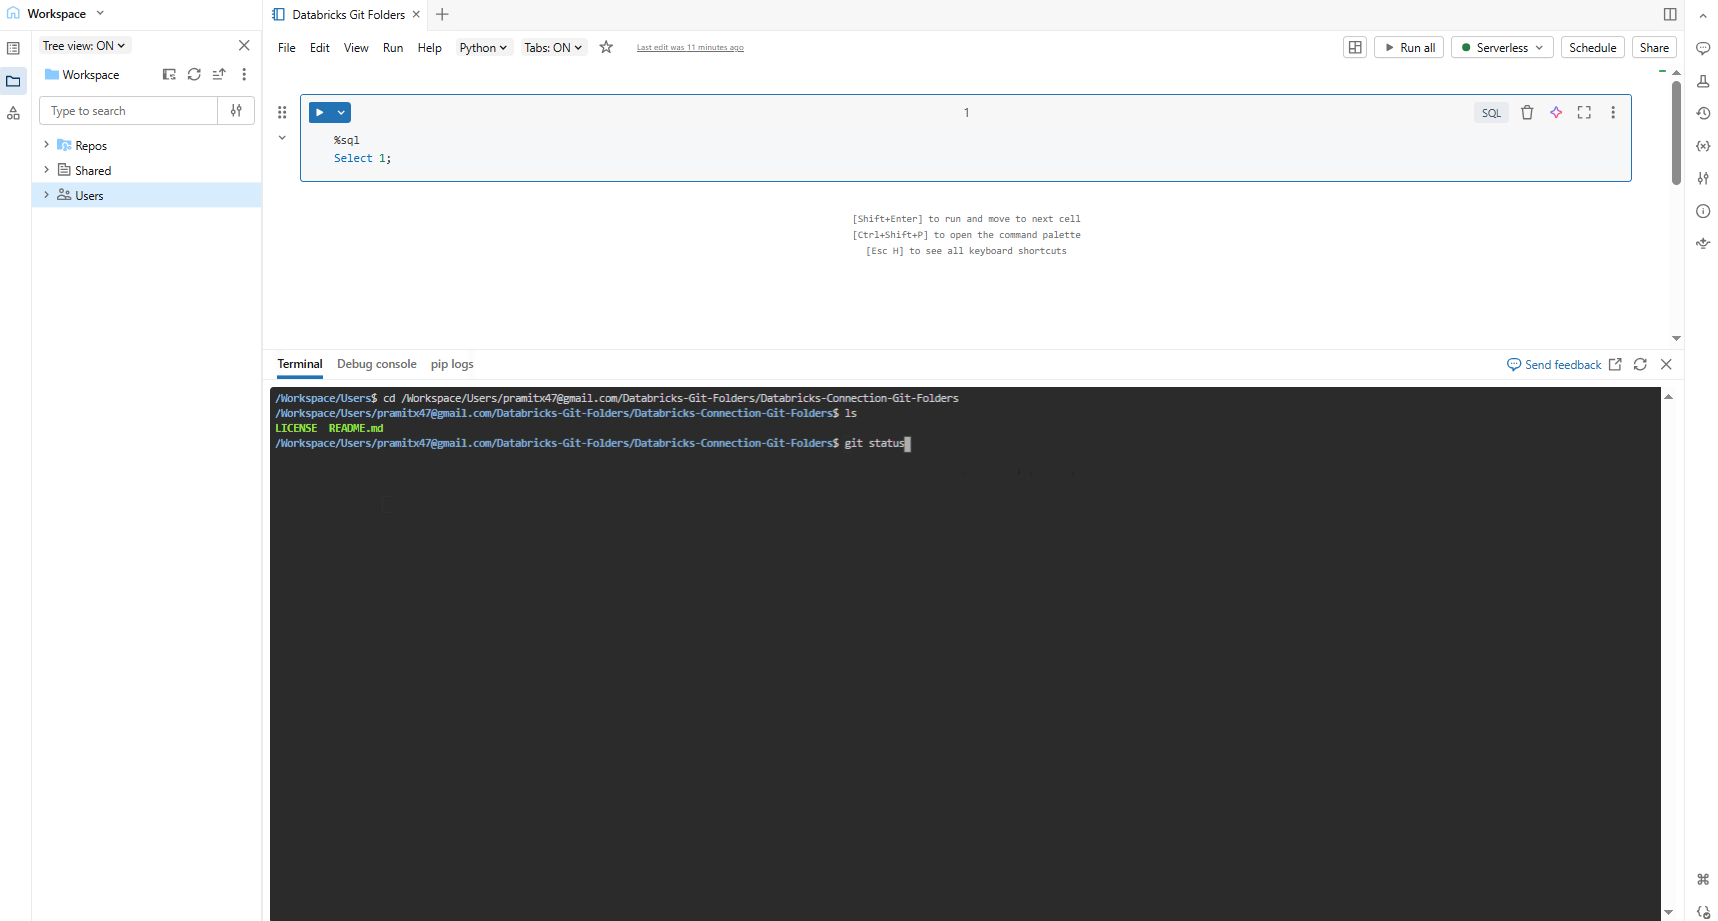
Figure 13: Running standard Git CLI commands from the Databricks web terminal—Databricks Git folders
Step 10—Access the Git dialog
Once your Git folder is created, every Databricks notebook inside it shows the current branch name as a clickable button in the toolbar.
Access the Git dialog from a Databricks notebook or from the Databricks Git folders browser.
From a Databricks notebook, click the button next to the notebook name that identifies the current Git branch.

Figure 14: Current branch button in the Databricks notebook toolbar—Databricks Git folders
From the Databricks Git folders browser, right-click on the repo and click Git…
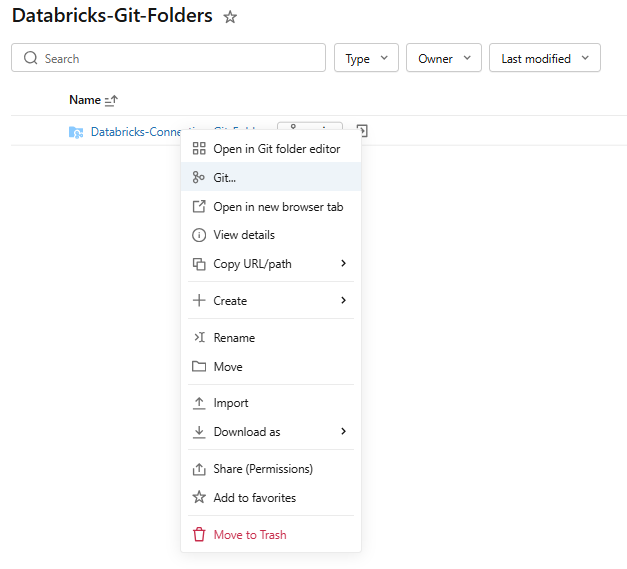
Figure 15: Right-click context menu showing the Git option on a Databricks Git folder
Git dialog gives you a full-screen view of your current branch, changed files, commit message field and buttons for Pull and Commit & Push. The kebab menu (three dots) at the top right gives access to Merge, Rebase and Reset options.
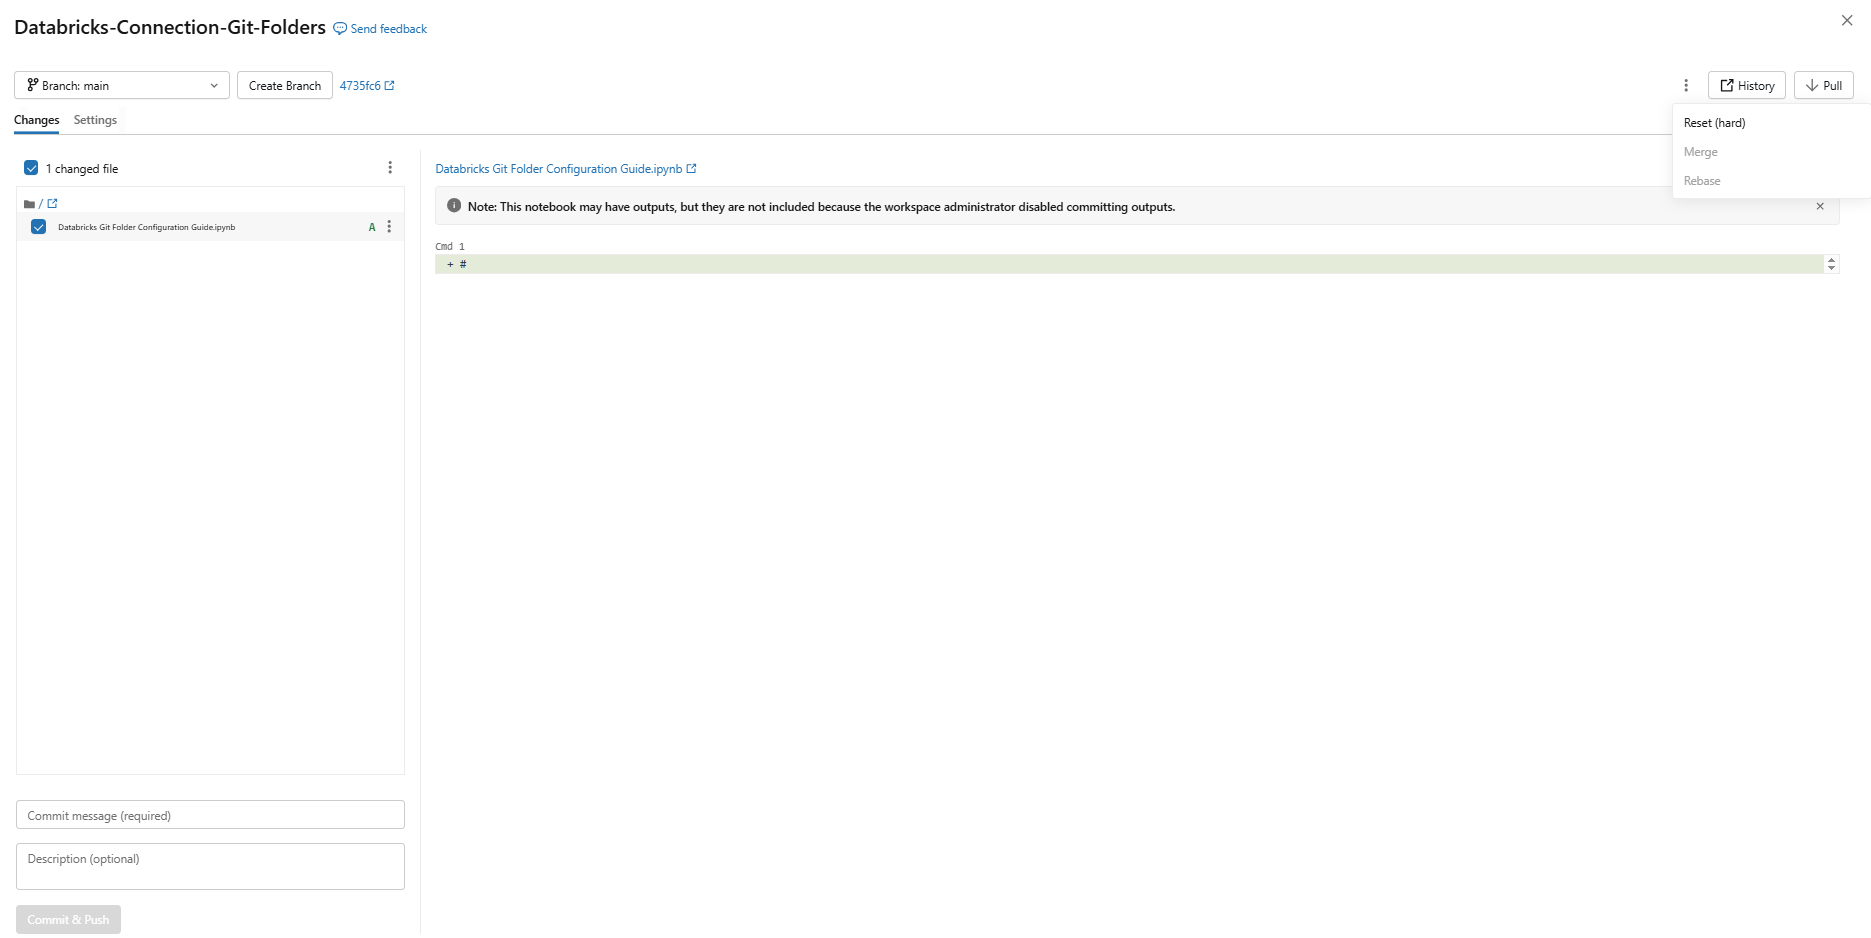
Figure 16: Databricks Git dialog showing branch, changed files and action buttons—Databricks Git folders
Step 11—Create a new branch
Always work in a branch. Working directly on main is a bad idea in any shared Git repository. Create a feature or development branch instead.
In the Git dialog, click Create Branch. Enter a name for the new branch and select the base branch. And then click Create.
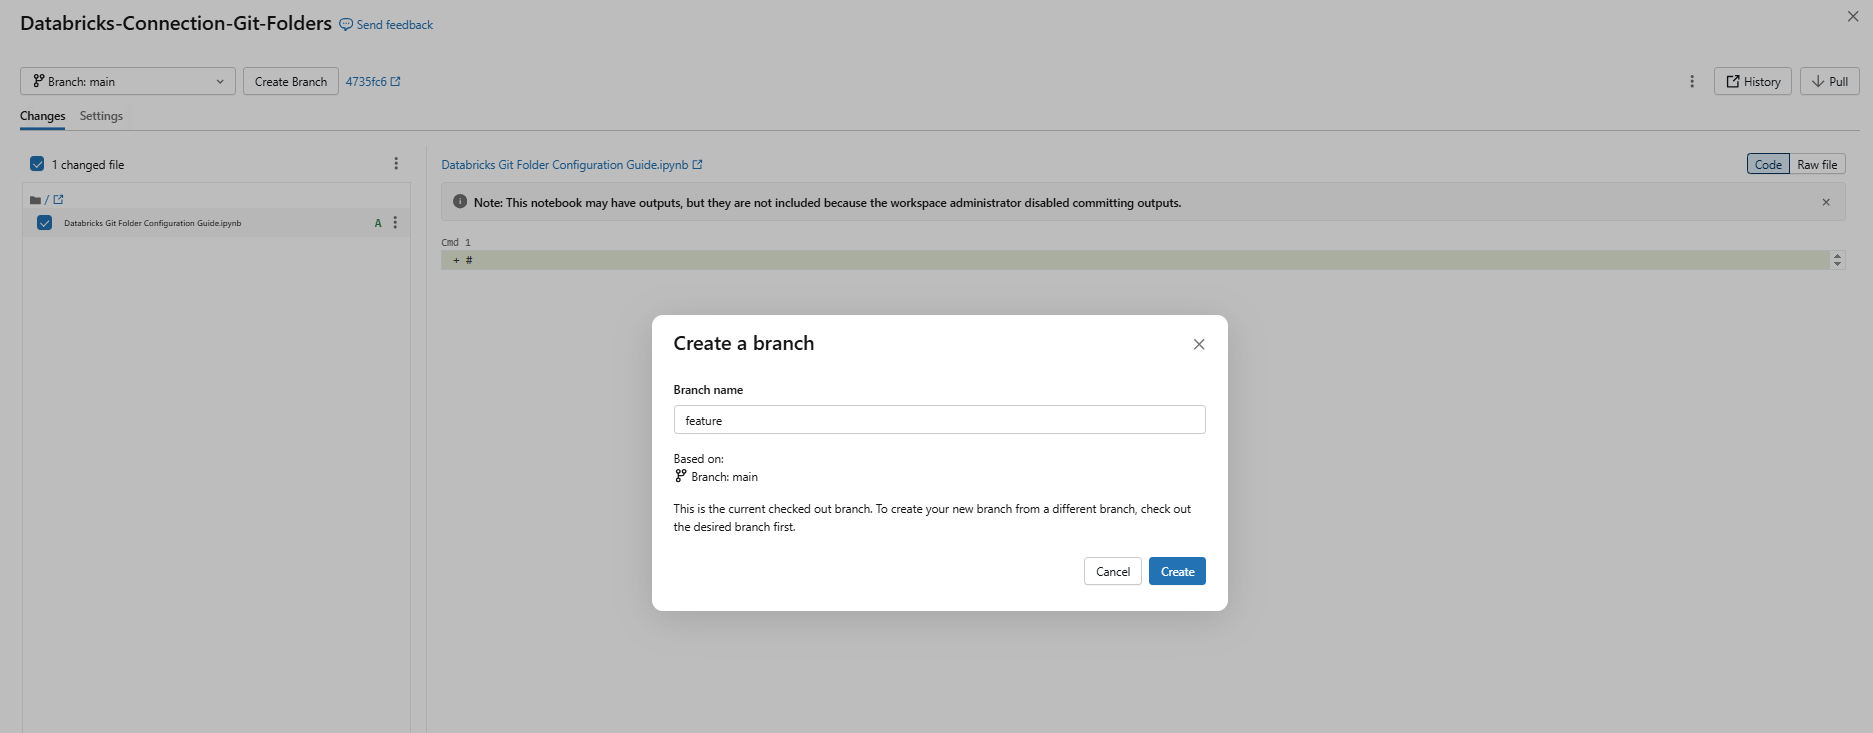
Figure 17: Create Branch dialog showing the branch name field and base branch selector—Databricks Git folders
The workspace immediately switches to the new branch.
Step 12—Switch to a different branch
To check out a different branch, use the branch dropdown in the Git dialog.
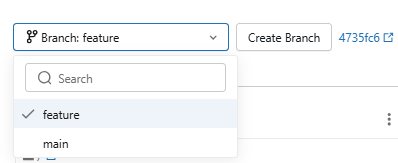
Figure 18: Switching branches in Databricks Git folders—Databricks Git folders
⚠️ Important: Switching branches changes the branch for everyone sharing that Databricks Git folder.
⚠️ Another important warning: Switching to a branch that does not contain certain workspace assets will delete those assets from your workspace. Switching back recreates them, but with new IDs and URLs.
Also remember that uncommitted changes on the current branch carry over and show as uncommitted changes on the new branch, if they do not conflict with code on the new branch. Discard the changes before or after branch switches if you do not intend to carry them over.
Step 13—Edit Databricks notebooks and files
Now do your coding.
Open a Databricks notebook or file inside the Git folder and edit it normally. Databricks tracks changes relative to the last Git commit. Modified files appear in the “Changes” section of the Git dialog when you open it.
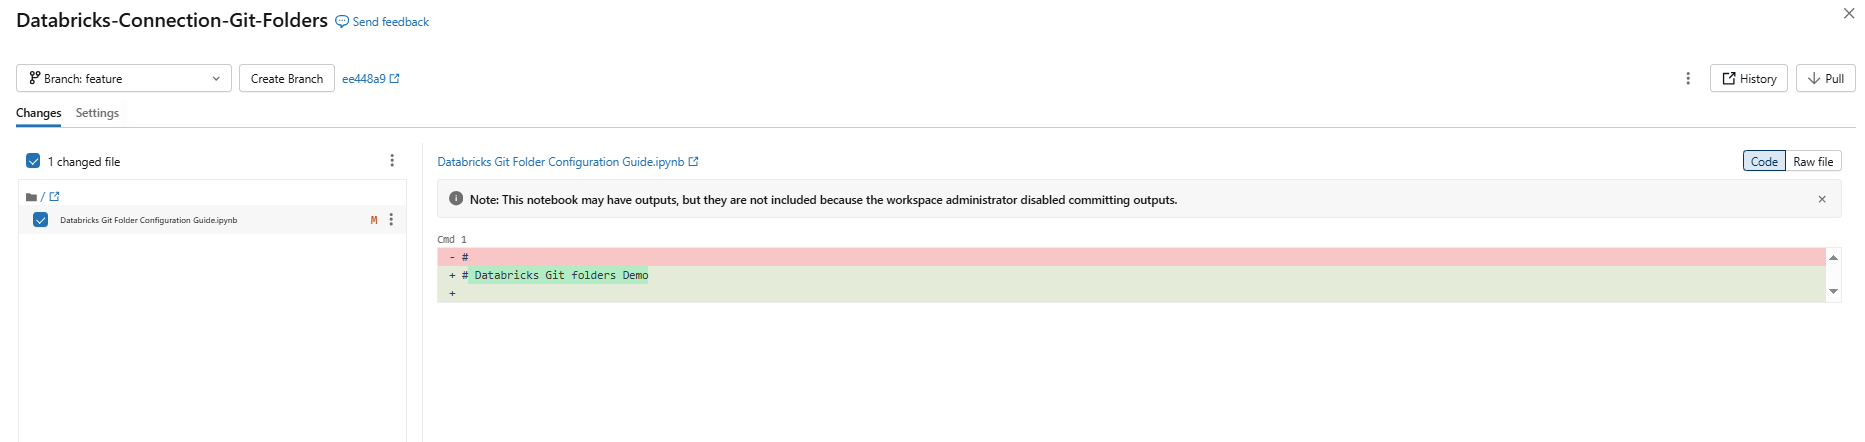
Figure 19: Git dialog showing modified files in the Changes section—Databricks Git folders
Step 14—Stage and commit changes
When you add new Databricks notebooks or files, or make changes to existing ones, the Git folder UI highlights the changes. Add a required commit message for the changes and click Commit & Push to Git push changes to the remote Git repository.
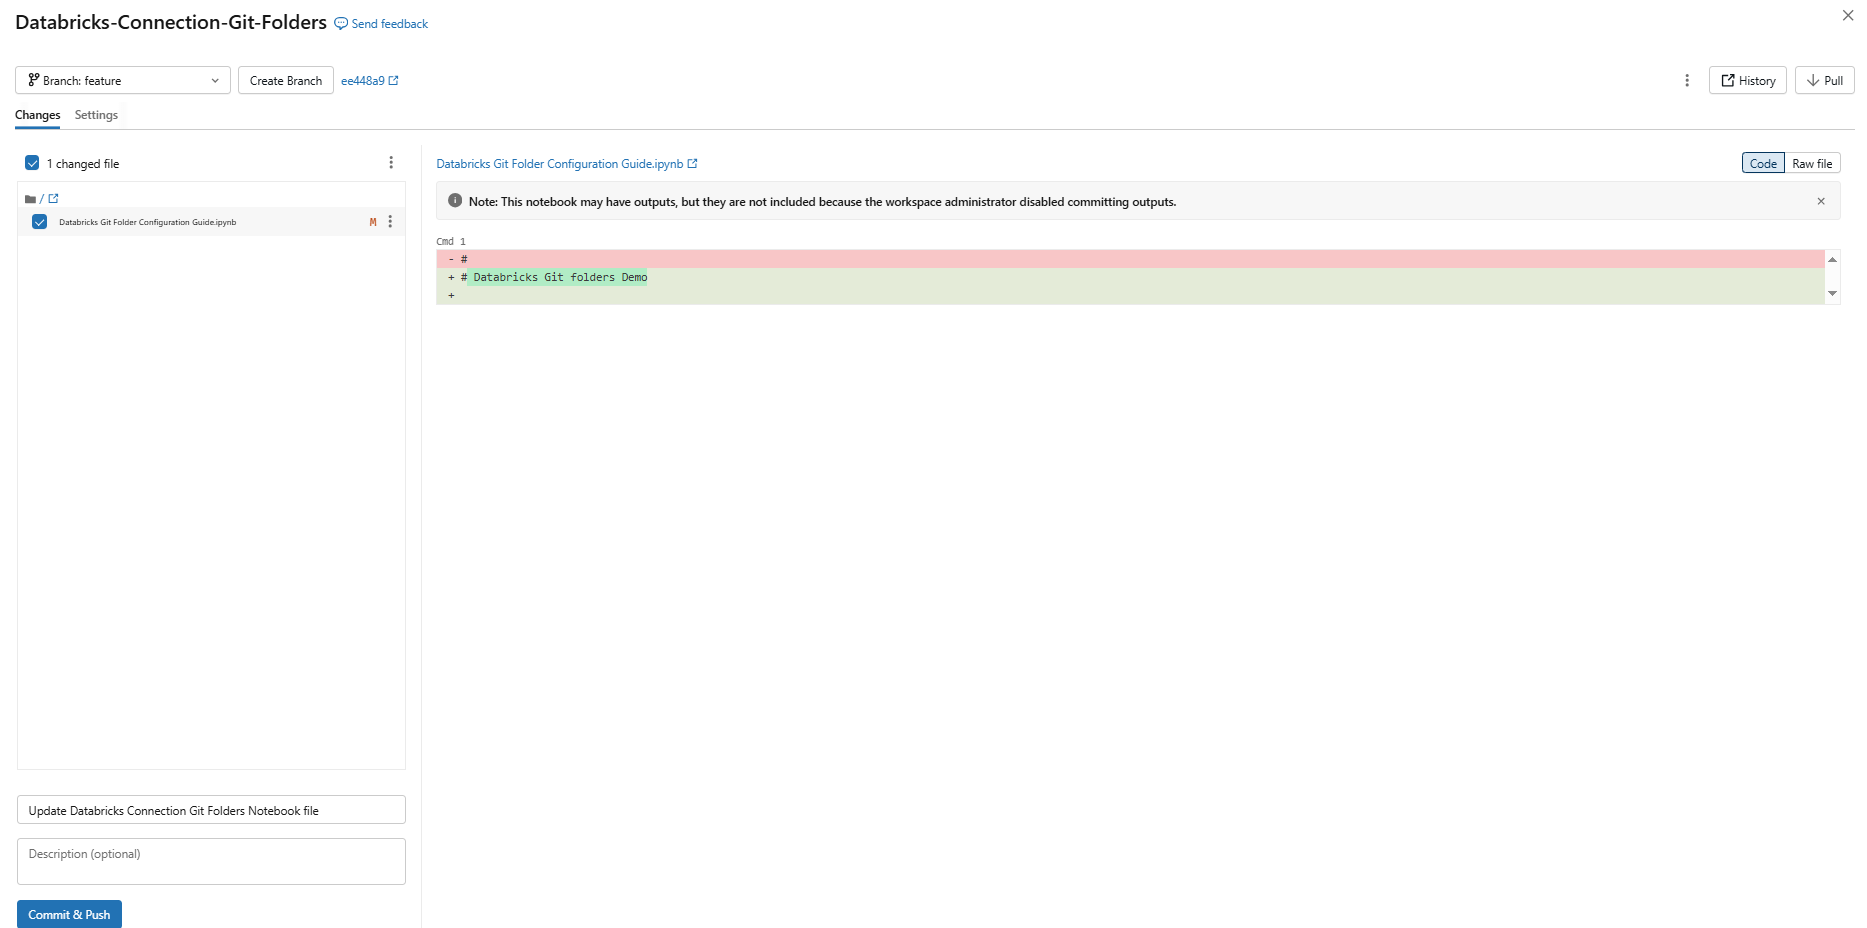
Figure 20: Committing and pushing changes to remote Git repository—Databricks Git folders
This is equivalent to git add -A && git commit -m “message” && git push in one step. There is no separate staging step from the UI. If you need to stage selectively, you will need the Git CLI (Step 9).
Step 15—Pull changes from remote
To synchronize your local Git folder with the latest commits from the remote branch, click Pull in the Git dialog. This is the standard git fetch and pull workflow, executed directly from the Databricks UI in a single click.
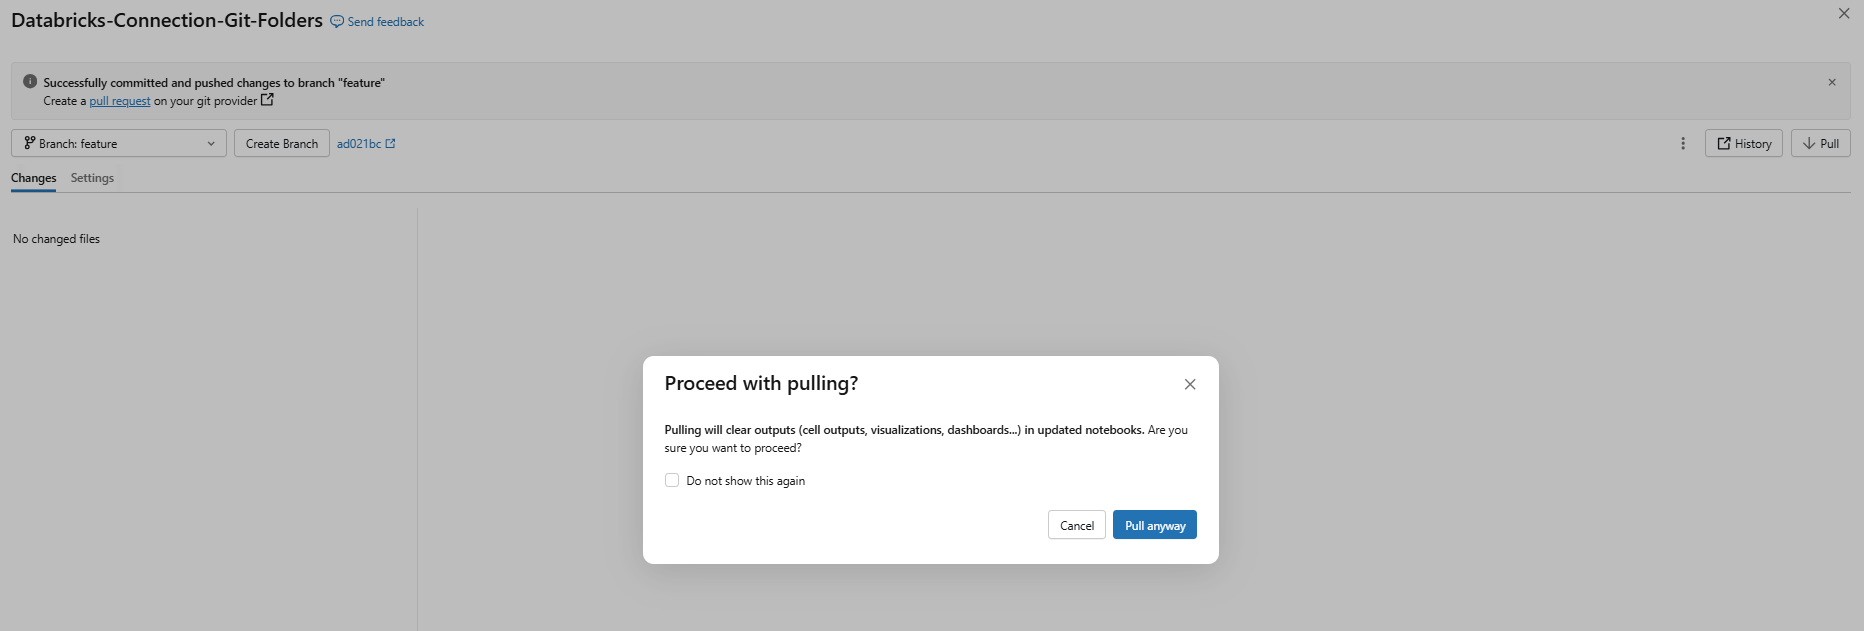
Figure 21: Pulling changes from remote repository—Databricks Git folders
Git pull changes that alter Databricks notebook source code will cause Databricks to overwrite the existing notebook, which loses notebook state. Commit and push do not have this side effect.
If upstream changes conflict with your local uncommitted edits, the pull will fail. Commit or discard your local changes first.
Step 16—Collaborate with team members
The mental model for team collaboration in Databricks Git folders: one person, one branch, one Git folder.
Each team member has their own Git folder mapped to the remote Git repository, where they work in their own development branch. Only one user performs Git operations on each Git folder. Multiple users performing Git operations on the same folder can cause branch management issues, such as one user unintentionally switching branches for everyone.
To share your Git folder configuration with a collaborator, click Share, then Copy link to create Git folder and send the URL to your collaborator.
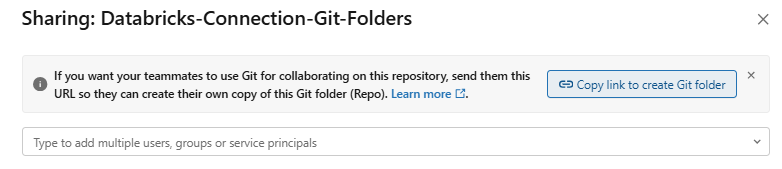
Figure 22: Sharing Git folder configuration with a collaborator—Databricks Git folders
When they open the URL, they see a dialog pre-populated with your Git folder configuration. They click Create Git folder to clone the repository into their own workspace under their current working folder.
Step 17—Merge branches
When you are ready to merge a feature branch into another, switch to the target branch (the one you want to merge into) in the Git dialog.
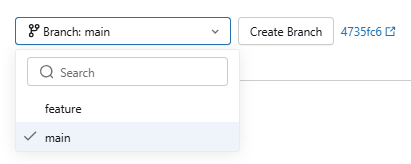
Figure 23: Branch dropdown showing the target branch selected before a merge—Databricks Git folders
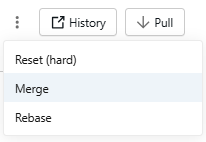
Figure 24: Initiating the merge operation from the action menu—Databricks Git folders
Click the kebab menu > Merge.
Select the source branch to merge from.
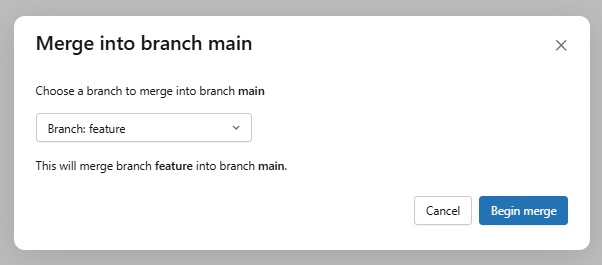
Figure 25: Selecting the source branch for the merge—Databricks Git folders
If there are no conflicts, the merge pushes to the remote automatically using git push. If there are conflicts, the UI surfaces them for resolution.
Databricks recommends merge over rebase because it does not rewrite commit history and does not require force-pushing. Merge is safer in team environments.
You can also merge directly through your Git provider’s PR interface, which is often the preferred approach in professional workflows since it enables code review before merging.
Step 18—Resolve merge conflicts
If Git encounters conflicts, the Git dialog lists them. Click each file to open an inline editor showing <<<< markers. To resolve, either:
- Manually edit the code to the desired version and delete the conflict markers, then click Mark as Resolved
- Or use the buttons to “Keep all current changes” (yours) or “Take all incoming changes” (theirs)
- If you change your mind, abort the merge to revert to the pre-merge state
Once all conflicts are resolved, click Continue Merge (or Continue Rebase if doing a rebase) to finish the Git operation and commit the resolution.
Step 19—Configure sparse checkout (for large repos)
If your Git repository is large, you can avoid cloning everything by using sparse checkout. Enable this only at clone time (in the Create Git folder dialog, tick Sparse checkout mode). Then specify one or more “cone patterns”.
If you do not specify cone patterns, the default is to clone only files in the root directory, with no subdirectories. You must explicitly list each subdirectory you want included.
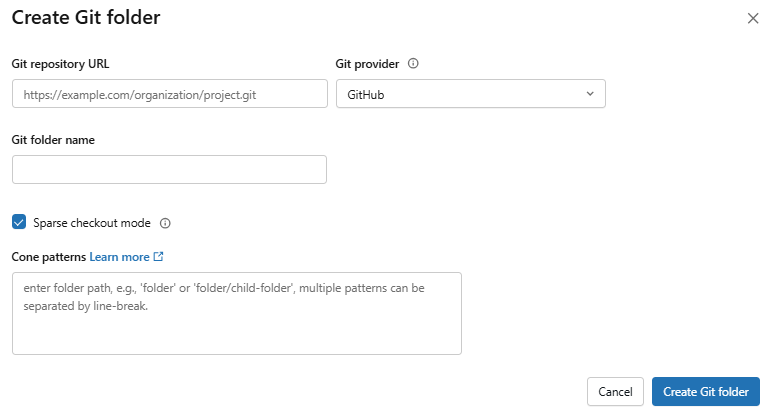
Figure 26: Applying cone patterns for sparse checkout—Databricks Git folders
Two limitations to know:
- Sparse checkout cannot be disabled once enabled. You can modify cone patterns, but you cannot turn it off without deleting and recreating the Git folder
- On Azure DevOps, sparse checkout is not supported for Git repositories larger than 4 GB
Step 20—Keep only supported assets in the Git folder
This sounds obvious, but it causes significant issues if ignored. You can physically move unsupported Databricks assets (legacy Databricks dashboards, legacy Databricks Alerts, Databricks MLflow workspace experiments, Databricks Genie Spaces) into a Git folder. Databricks will not stop you. But when you try to commit, the operation fails because those asset types cannot be serialized.
The same applies to data files and Delta tables.
Keep your Git folders lean and clean: Databricks notebooks, code files, configuration files and (in preview) Databricks SQL queries, Databricks dashboards and Databricks Alerts.
Step 21—Use Databricks Git folders for development, not prod deployment
Databricks Git folders are a development tool, not a deployment mechanism.
Git folders are designed for individual developer workflows: write code, commit, push, branch, iterate. They are not built to replace a proper CI/CD pipeline.
For production deployments, Databricks recommends Databricks Asset Bundles. Bundles let you define Databricks jobs, pipelines and other resources as code (in YAML), package them and deploy them through versioned artifacts. They integrate natively with CI/CD tools like GitHub Actions, GitLab CI and Azure DevOps Pipelines.
If you are not ready to adopt Bundles yet, use a production Git folder pattern (Step 22) 👇.
Step 22—Create a production Git folder
Production Git folders serve a different purpose than developer Git folders.
A production Git folder is a shared, team-level Git folder that always tracks a specific deployment branch. Unlike user-level folders, it lives outside any individual’s user directory.
- Create a folder in the workspace at a path like /Workspace/Shared/<project-name>/
- Create a Git folder inside it, pointing to your repo’s deployment branch
- Set permissions:
-
- CAN RUN for project users who need to execute workflows against the folder
-
- CAN RUN for any service principal that runs automation
-
- CAN VIEW (optional) for workspace users who need read access
-
- CAN MANAGE only for admins and the service principal that updates the folder
- Update the production Git folder via external CI/CD (GitHub Actions triggering the Repos API) or a scheduled notebook job
Step 23—(Admin) Configure Git URL allowlists
Git URL allowlists let workspace admins restrict which remote Git repositories users can access from the workspace.
To configure a Git URL allowlist:
Click your username in the top bar of the Databricks workspace and select Settings and then click Development
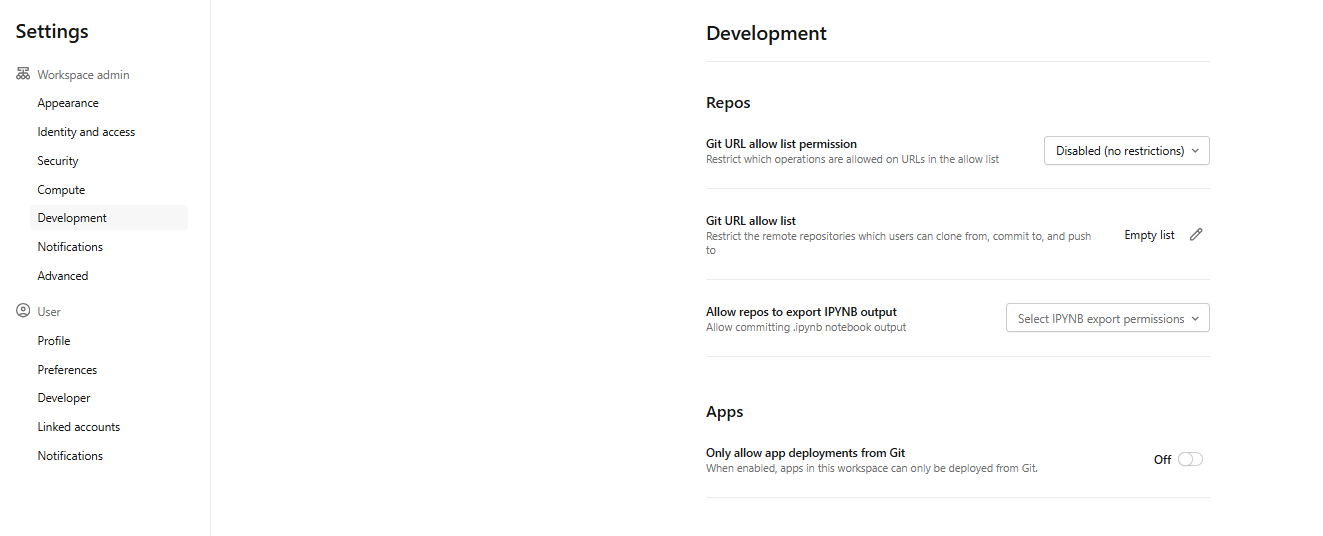
Figure 27: Accessing development settings for allowlists—Databricks Git folders
Select a Git URL allowlist permission option:
- Disabled (no restrictions) ⇒ no allowlist enforcement
- Restrict Clone, Commit & Push to allowed Git repositories ⇒ restricts all operations to allowlist URLs
- Only restrict commit & Push to allowed Git repositories ⇒ restricts only write operations; clone and pull remain unrestricted
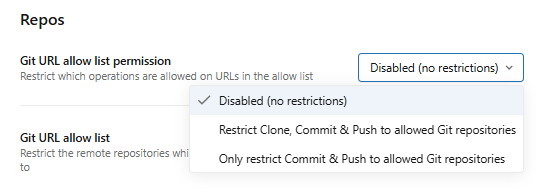
Figure 28: Applying security restrictions to repository operations—Databricks Git folders
Click the edit icon next to Git URL allowlist: Empty list. And enter a comma-separated list of URL prefixes. Here are some examples of valid prefixes:
- https://github.com ⇒ allows all GitHub repositories
- https://github.com/YourOrgName ⇒ restricts to your specific organization
- https://dev.azure.com/YourOrgName ⇒ restricts to your Azure DevOps organization
🔮 Quick Note: Databricks Git folders with Git CLI support enabled ignore URL allowlists. That is a current limitation.
Step 24—(Admin) Set access control on Databricks Git folders
Access control in Databricks Git folders uses the standard workspace folder permission model. The relevant permission levels are:
- CAN RUN for project users who need to execute workflows
- CAN RUN for service principals running automation
- CAN VIEW for all workspace users to support discovery
- CAN MANAGE for admins only
To set permissions, right-click the Git folder in the Workspace tree, select Share (Permissions) and configure per user or group.
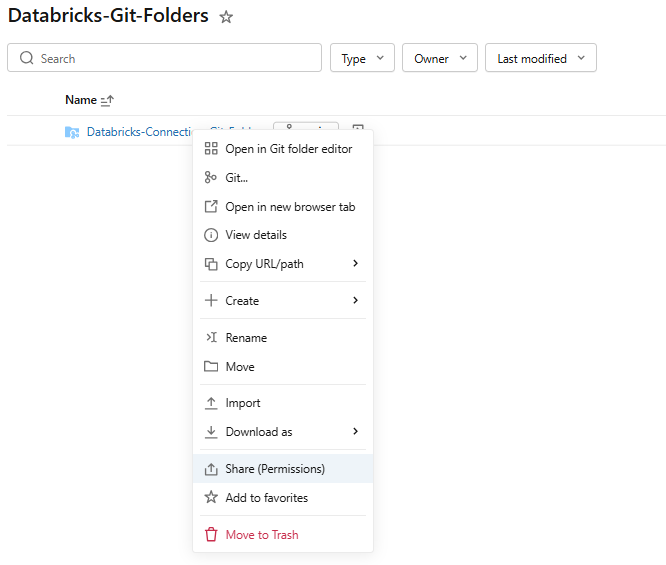
Figure 29: Assigning permissions to users—Databricks Git folders
Step 25—Set up CI/CD with a production Databricks Git folder
Once the production Git folder is set up, you can connect it to your CI/CD pipeline. You have two main options.
Option 1—External CI/CD
Use GitHub Actions (or Azure DevOps, Jenkins) to pull the latest commits automatically when a PR merges into the deployment branch. When the merge event fires, the GitHub Action calls the Databricks Repos API to update the production Git folder to the latest commit on the target branch. This is the cleaner approach if you have access to external CI/CD pipelines. For more detail, see Run a CI/CD workflow that updates a Git folder.
Option 2—Scheduled Databricks job
If you do not have access to an external CI/CD pipeline, run a scheduled Databricks notebook that calls the Databricks Repos API to update the folder:
from databricks.sdk import WorkspaceClient

w = WorkspaceClient()

w.repos.update(

    w.workspace.get_status(path="<git-folder-workspace-full-path>").object_id,

    branch="<branch-name>"

)
This code finds the repo object ID from the folder path and tells Databricks to update it to the latest commit on the target branch. You’d run this notebook on a schedule or whenever you expect updates. But it introduces polling lag. The folder only updates on schedule, not immediately on merge. For teams that need fast deployments, the external CI/CD approach is worth the setup effort.
Again, for serious production deployments, Databricks Asset Bundles are the more robust path. The Databricks Repos API approach works, but it does not handle resource definitions (Databricks jobs, clusters, pipelines); only code.
Step 26—Authorize a service principal to access Databricks Git folders
Service principals are how you run unattended automation without tying it to a human user’s credentials. Here is how to set it up.
Option 1—Adding Git credentials via the Databricks UI
This is the fastest path if you are setting up one service principal manually.
As a workspace admin, log in to the Databricks workspace. Click your username in the top bar and select Settings. And then click the Identity and access tab.
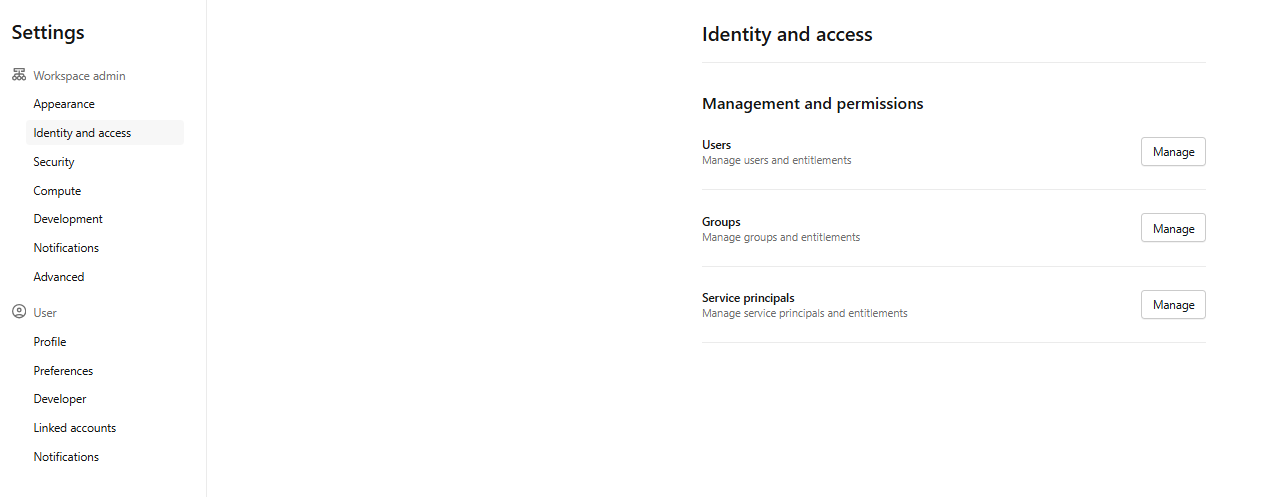
Figure 30: Accessing identity management for service principals—Databricks Git folders
Next to Service principals, click Manage.

Figure 31: Managing existing service principals in the workspace—Databricks Git folders
Create or select the service principal you want to update.

Figure 32: Selecting a specific service principal for configuration—Databricks Git folders
Click the Git integration tab. And click Add Git credential.

Figure 33: Adding Git integration to an automated account—Databricks Git folders
Choose your Git provider from the dropdown and fill in the required fields.
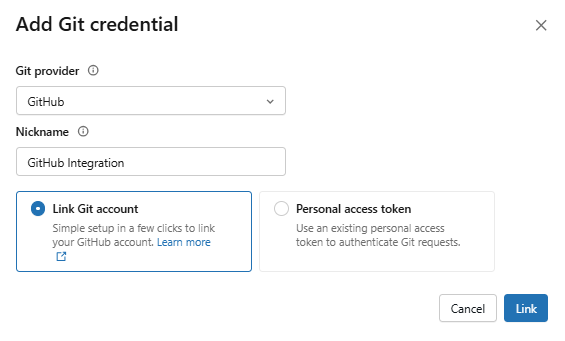
Figure 34: Adding Git credentials for the service principal—Databricks Git folders
Click Save or Link, depending on which provider you choose.

Figure 35: Saving the service principal Git configuration—Databricks Git folders
The service principal now uses those linked credentials whenever it accesses Git folder resources in the workspace.
Option 2—Adding Git credentials via the Databricks CLI
The CLI path gives you reproducibility and fits into automation scripts. Before you start, you will need the Databricks CLI installed and configured, plus a personal access token (PAT) from your Git provider.
Create a service principal
databricks service-principals create \

  --display-name "Git Automation Service Principal"
Note the applicationId and id values from the output. The id is the 15-digit internal identifier; applicationId is the OAuth client ID. You will use both.
Generate an OAuth secret for the service principal
databricks service-principal-secrets-proxy create \

  <service-principal-id>
Replace <service-principal-id> with the 15-digit id from the previous step. Copy the secret from the output immediately.
Authenticate the CLI as the service principal
Configure the CLI to act as the service principal using OAuth machine-to-machine (M2M) credentials:
export DATABRICKS_HOST=<workspace-url>

export DATABRICKS_CLIENT_ID=<application-id>

export DATABRICKS_CLIENT_SECRET=<oauth-secret>
Replace <workspace-url> with your workspace URL, <application-id> with the applicationId from the first step and <oauth-secret> with the secret from second step. Do not include /api in the host URL.
Add Git provider credentials for the service principal
databricks git-credentials create <git-provider> \

  --personal-access-token <git-pat> \

  --git-email <git-email>
Replace:
- <git-provider> with your provider
- <git-pat> with the personal access token from your Git provider
- <git-email> with the email address associated with your Git account
🔮 Quick Note: Some providers need –git-username or –git-email to properly authenticate. GitHub, for example, requires at least one of these parameters. If you skip it, the credential may be created but fail silently during actual Git operations.
You can verify the credential was created correctly. The response should look like this:
{

  "credential_id": "XXXXXXX",

  "git_provider": "github",

  "git_username": "<your-service-principal-username>"

}
That’s basically it.
Once you have service principals in place, you can reference them in scripts or automation via the Databricks SDK, REST API or CLI.
Using the Databricks SDK from a notebook:
%pip install databricks-sdk --upgrade


from databricks.sdk import WorkspaceClient

from databricks.sdk.core import ApiClient

w = WorkspaceClient()

# List all service principals in the workspace

service_principals = w.service_principals.list()

for sp in service_principals:

    print(sp.display_name, sp.application_id)
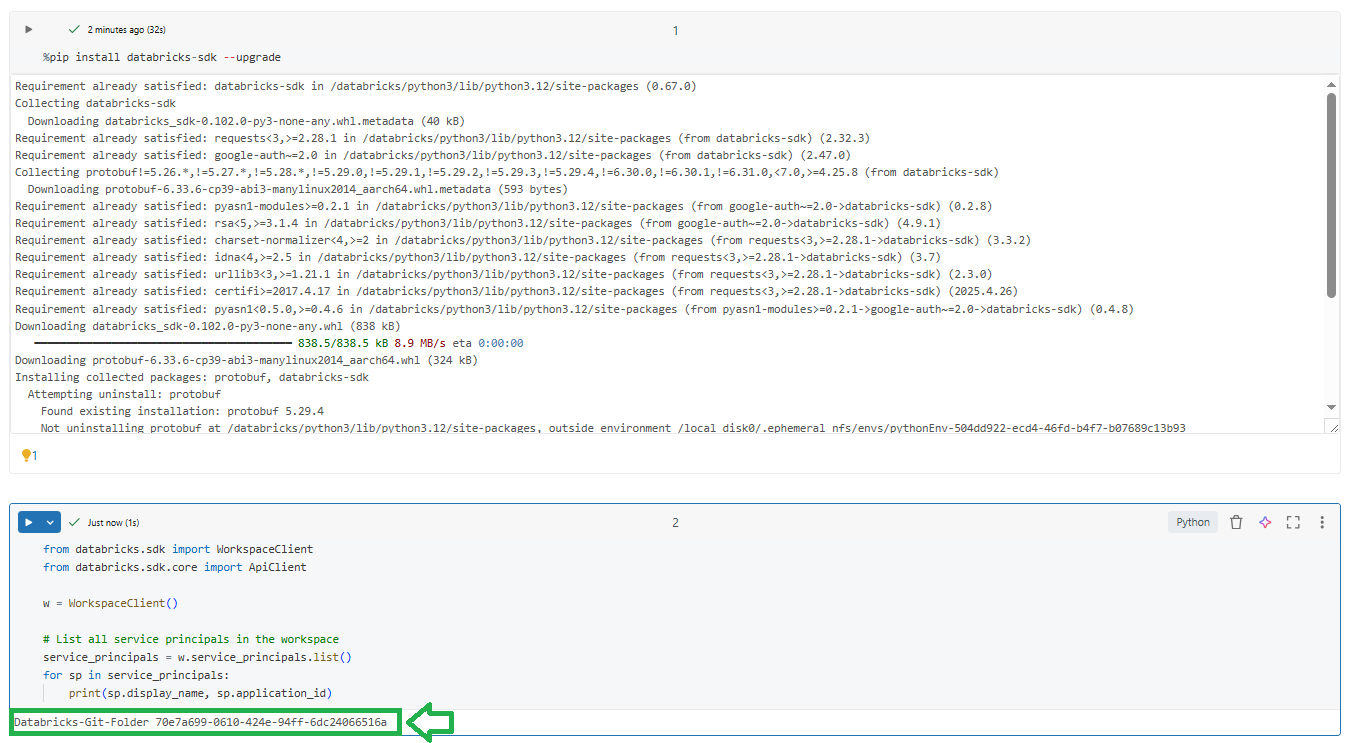
Figure 36: Listing service principals via the Databricks SDK—Databricks Git folders
You can also retrieve a specific service principal by ID:
sp = w.service_principals.get(id=<service-principal-id>)

print(sp.display_name, sp.application_id)
For infrastructure-as-code tooling, Terraform’s databricks_service_principal resource and the Databricks REST API’s /api/2.0/preview/scim/v2/ServicePrincipals endpoint both work for programmatic retrieval. The CLI equivalent is:
databricks service-principals list
Step 27—(Optional) Set up private Git connectivity (Admin)
If your Git server is not internet-accessible, you need a proxy. The proxy handles HTTPS Git authentication requests from Databricks and forwards them to your internal Git server. This is a common requirement for organizations running self-hosted Git servers inside a corporate VPN.
The proxy must:
- Be deployed inside your company’s Virtual Private Network (VPN) or private network
- Be reachable from the Databricks compute plane
- Forward HTTPS traffic to your self-hosted Git server
- Support PAT-based authentication
Follow this step on enablement notebook, which creates a “Databricks Git Proxy” cluster in your VPC. This cluster gets a static IP (via network address translation (NAT)) that you allowlist on your Git host. The enablement script also enables a feature flag in the workspace. Once set up, Databricks control-plane Git commands route through that proxy.
For full details, see Set up private Git connectivity for Databricks Git folders
Step 28—(Optional) Refine proxy or IP setup
Make sure the proxy cluster is always running if you depend on it. If you have multi-branch pipelines, check that the proxy allows HTTPS and PAT authentication to your Git server. If your network has additional layers (like private subnets), work with your network team to open the necessary firewall rules. You should also coordinate on the service principal’s PAT for that Git server.
For full details, see Configure Databricks Serverless Private Git
Step 29—Delete the Databricks Git folder when you are done
And finally, if you ever want to remove a Git folder, just right-click it in the workspace tree and choose Move to Trash. This unlinks it from the repo.
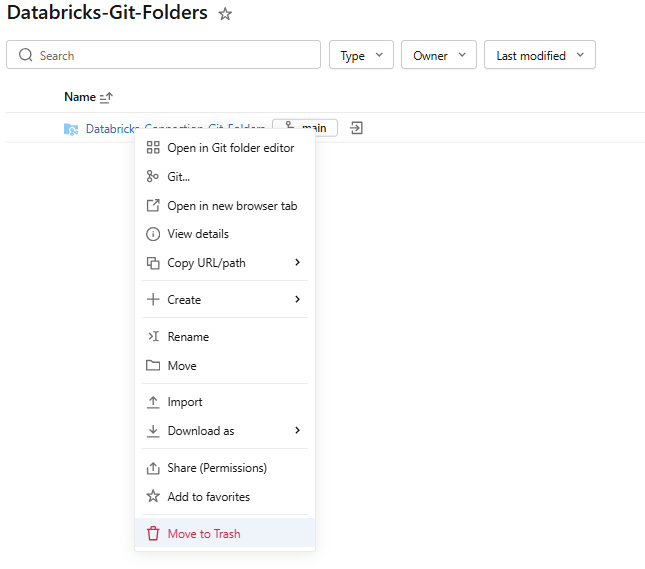
Figure 37: Deleting a Databricks Git folder by moving it to the trash—Databricks Git folders
Note that this does not delete the remote Git repository; it only removes the workspace copy. To fully remove local history of a branch, you’d delete the repo folder.
That’s it. Your Databricks workspace now has Git-powered source control. You can clone more Git repositories, create new branches, push your changes and collaborate through pull requests; all without leaving Databricks.
Quick reference
Table 2: Databricks Git folders quick reference
| Operation | Path |
| Add Git credentials | Settings > Linked accounts > Add Git credential |
| Clone a repo (create Git folder) | Workspace tree > Create > Git folder |
| Create branch | Git dialog > Create Branch |
| Switch branches | Git dialog > branch dropdown |
| Commit & push | Git dialog > Commit & Push (enter message) |
| Pull changes | Git dialog > Pull |
| Merge branches | Git dialog > kebab menu > Merge |
| Rebase | Git dialog > kebab menu > Rebase |
| Reset | Git dialog > kebab menu > Reset |
| Delete Git folder | Right-click folder > Move to Trash |
| Configure URL allowlist | Settings > Development > Git URL allowlist |
Supported asset types reference
Table 3: Supported asset types reference
| Asset type | File extension | Status | Notes |
| File (code, config, libraries, binaries, images) | Any | Generally Available | Standard files, stored as-is |
| Databricks Notebook | .py, .scala, .sql, .r, .ipynb | Generally Available | Identified by extension or # Databricks notebook source marker |
| Folder | N/A | Generally Available | Appears as a directory in Git |
| Query | .dbquery.ipynb | Public Preview | New SQL editor only |
| Databricks AI/BI dashboard | .lvdash.json | Public Preview | Draft state only; publishing/scheduling not tracked |
| Databricks Alert | .dbalert.json | Public Preview | Cloned alerts start paused; must be manually resumed |
Unsupported asset types
These can be physically moved into the Databricks Git folder, but cannot be committed:
- Legacy alerts
- Legacy dashboards
- Databricks MLflow workspace experiments
- Databricks Genie Spaces
These asset types have no meaningful serializable representation in a file tree:
- Data, Delta tables, datasets
- Cluster configurations
- Secrets
- Databricks Jobs and pipeline definitions (use Databricks Asset Bundles instead)
File naming rules for Databricks Git folders
When you work with assets in Databricks Git folders, follow these rules to avoid errors:
- No duplicate names within the same folder (even with different extensions)
- No forward slashes (/) in asset names
- Maximum name length: 255 bytes (UTF-8 encoded)
- Avoid special characters that conflict with Git or the operating system: * : ? \ < > |
- Case sensitivity applies. MyNotebook.ipynb and mynotebook.ipynb are different names
Limitation of Databricks Git folders
Databricks Git folders have some genuine limitations you should be aware of.
1) Version control scope is limited to specific asset types
Only the supported files and Databricks notebooks listed above are version-controlled. None of your data (tables, clusters, libraries, secrets) lives in the Git repository.
2) Working branch size limit
Each working branch is capped at 1 GB. Files larger than 10 MB cannot be viewed in the Databricks UI (though they can be committed). Each Git operation is limited to 2 GB of memory and 4 GB of disk writes.
3) No duplicate notebook names
A folder cannot contain two Databricks notebooks with the same serialized name, even with different extensions.
4) Forward slash restriction in asset names
Forward slashes (/) are not permitted in asset names.
5) Branch switching can delete assets
Switching to a branch that does not contain certain workspace assets deletes those assets locally (until you switch back). This is expected Git behavior—just be aware you might lose local edits.
6) Git CLI cannot be added to existing Databricks Git folders
Git CLI must be enabled at creation time. If you did not enable it then, you need to delete and re-create the folder to get CLI access.
7) Sparse checkout cannot be disabled
Once you create a folder with sparse mode, you cannot disable it. Azure DevOps repos larger than 4 GB are also not supported in sparse mode.
8) One Git credential per service principal
Individual users can have up to 10 Git credentials; service principals are limited to one.
9) No GPG commit signing
Commits from Databricks Git folders cannot be GPG-signed. If your organization requires signed commits, this is a gap.
10) HTTPS only, no SSH
All Git operations in Databricks Git folders use HTTPS. SSH is not supported.
11) No native git stash in the UI
The standard Git dialog does not expose stash. You need Git CLI access to stash changes.
12) Notebook output state is cleared on incoming changes
Pulling, merging, rebasing or checking out clears cell outputs, comments, version history within the notebook and widgets. Creating a new branch or committing does not have this effect.
13) URL allowlists are bypassed by Git CLI folders
If you rely on URL allowlists for security, note that Git CLI-enabled folders ignore them.
14) Commit identity tied to Git credentials
The author email and username in commits come from your configured Git credentials. Incorrect credentials produce misleading commit history.
15) Monorepo support is discouraged
Databricks explicitly recommends against backing Databricks Git folders with monorepos. Large single-organization Git repositories with thousands of files cause performance issues and frequently hit size limits.
Conclusion
And that’s a wrap! Databricks Git folders puts a full Git client inside your workspace. No more downloading Databricks notebooks to your local machine, no more copy-pasting code between environments. You clone a remote repository, create branches, commit changes and Git push changes—all from the Databricks UI.
In this article, we have covered:
- What is Databricks Git folders?
- What are the key features of Databricks Git folders?
- What happened to Databricks Repos?
- What Databricks Git folders can (and cannot) version control
- How to configure Databricks Git folders from absolute scratch
- Limitations of Databricks Git folders
… and so much more!
Want to learn more? Reach out for a chat
FAQs
What is Databricks Git folders (Repos) and how does it work?
Databricks Git folders is a visual Git client and API built into the Databricks workspace. It clones a remote repository into a workspace folder and lets you perform Git operations directly from the Databricks UI.
What is the difference between Databricks Git folders and Databricks Repos?
Databricks Git folders and Databricks Repos are the same feature with a new name. Databricks Repos is the legacy term; Databricks Git folders is the current name. The core Git workflow is identical.
What changed when Databricks Repos became Databricks Git folders?
The Databricks UI label changed from New > Repo to New > Git folder. New folders appear under /Workspace/Users/<email>/ instead of the old fixed /Repos/<email>/ structure. Databricks Git folders require a remote URL; Databricks Repos didn’t. Git folders support newer asset types (Databricks SQL queries, AI/BI Databricks dashboards, Databricks Alerts) that Databricks Repos did not. Existing /Repos paths continue to work without any changes.
Which Git providers are supported by Databricks Git folders?
Databricks Git folders work with a broad set of cloud-hosted and self-hosted Git servers.
Cloud:
- GitHub, GitHub Advanced Enterprise and GitHub Enterprise Cloud
- GitLab and GitLab Enterprise Edition
- Atlassian Bitbucket Cloud
- Microsoft Azure DevOps (Azure Repos)
- AWS CodeCommit
On-premises:
- GitHub Enterprise Server
- Atlassian Bitbucket Server and Data Center
- GitLab Self-Managed
- Microsoft Azure DevOps Server
Do I need a PAT to use Databricks Git folders?
Not to clone a remote repository that is public. But for private Git repositories or any write operation (Git push changes, commit), you need either a personal access token (PAT) or OAuth credentials with write permissions. On Azure Databricks with Azure DevOps, Microsoft Entra ID authentication is used by default if no PAT is provided. On AWS Databricks with Azure DevOps, you must use a PAT.
What types of files and assets can be version-controlled?
Databricks Git folders supports files (code, config, libraries, binaries, images), Databricks notebooks (Python, Scala, R, SQL, Jupyter), folders, Databricks SQL queries (Public Preview), AI/BI Databricks dashboard drafts (Public Preview) and Databricks Alerts (Public Preview).
Can multiple users work in the same Databricks Git folder at the same time?
Technically yes, but it is strongly discouraged. Multiple users performing Git operations on the same folder causes branch management issues; one user can unintentionally switch branches for everyone else. The recommended pattern is for each user to clone the remote repository into their own Git folder under their user directory and work on separate branches.
How do I connect Databricks Git folders to a private or on-premises Git server?
If the server is internet-accessible, configure your Git credentials as usual and optionally add Databricks’s network address translation (NAT) IP to the server’s IP allowlist. If the server is not internet-accessible, set up private network connectivity (VPC peering or Virtual Private Network (VPN)) or configure the Databricks Git server proxy. Git folders support HTTPS only; SSH is not supported.
How do I resolve merge conflicts?
Open the Git dialog when a conflict occurs. The UI shows conflicting files and offers three options: keep all current changes, take all incoming changes or edit the file manually. After resolving all conflicts, commit the resolution. You can also abort the operation to discard all conflicting changes.
Can I use Databricks Git folders in a CI/CD pipeline?
Yes, through the Databricks Repos API. The typical pattern is to use the PATCH endpoint to update a production Git folder to a specific branch or commit after a PR merges. That said, Databricks recommends Databricks Asset Bundles for production CI/CD on Databricks.
How does commit identity work in Databricks Git folders?
Commits use the email and username from your configured Git credentials. If you do not set an email address, Databricks uses your Git username, which breaks proper commit attribution. GPG commit signing is not supported.
How do I control which Git repositories users can access?
As a workspace admin, configure Git URL allowlists under Settings > Development. Add URL domain patterns (https://github.com/your-org/) to restrict which remote Git repositories users can clone from. Note that Git URL allowlists are bypassed by Git folders with Git CLI support enabled.
What are the main limitations of Databricks Git folders?
Working branches are capped at 1 GB. No SSH support. No commit signing. No git stash in the Databricks UI (requires CLI). Sparse checkout cannot be disabled once enabled. Git CLI cannot be added to existing folders. Service principals are limited to one credential. Switching branches can delete local workspace assets. Git URL allowlists do not apply to CLI-enabled folders. Max 100 AI/BI Databricks dashboards per Git folder during Public Preview.
What is sparse checkout and should I use it in Databricks Git folders?
Sparse checkout clones only specific subdirectories of a Git repository, using cone patterns. Use it when your repo is large enough to hit Git Folder size limits (2 GB per Git operation). Do not use it by default—it adds complexity, cannot be disabled once enabled and is not supported for Azure DevOps repos larger than 4 GB. If you are hitting size limits regularly, splitting the repo is a better long-term solution.
Are notebook outputs committed to Git?
No, not by default. For source-format notebooks (.py, .scala, .sql, .r), outputs are excluded from commits. If you need to commit outputs, use .ipynb format and configure IPYNB output commits explicitly.
What happens to uncommitted changes when I switch branches?
Uncommitted changes carry over to the new branch if they do not conflict with that branch’s code. If they do conflict, you will need to discard them before or after switching. If the new branch does not contain certain assets that exist on the current branch, those assets are deleted from your workspace. They can be restored from the remote Git repository, but their workspace IDs and URLs will change.
Does Databricks Git folders support Git submodules?
Standard Git folders do not support submodules. Databricks Git folders with Git CLI access (Beta) can use git submodule update –init –recursive from the terminal.
Can I delete a branch from within Databricks?
No. You must delete branches through your Git provider’s interface (GitHub, GitLab, Azure DevOps, etc.). The Databricks Git dialog does not expose branch deletion.
What happens to MLflow experiments in a Databricks Git folder?
Workspace-level Databricks MLflow experiments cannot be created inside a Git folder at all. Notebook-level experiments can exist there but are not committed to source control. Switching to a branch that does not contain the associated Databricks notebook risks losing the experiment’s run data permanently after 30 days. Use workspace-level experiments outside Git folders for anything you care about keeping.