Machine learning (ML) is driving innovation across industries, helping teams cut costs and move faster. But building and deploying reliable ML models takes serious skill and time. Everyone (from small startups to large enterprises) is trying to build and train ML models to gain competitive insights and efficiencies, which has led to a massive surge in demand for reliable and effective ML models. This is where automation through AutoML plays a key role. Automating parts of the machine learning workflow not only enhances user-friendliness and accessibility but also significantly reduces the time and expertise required for model development.
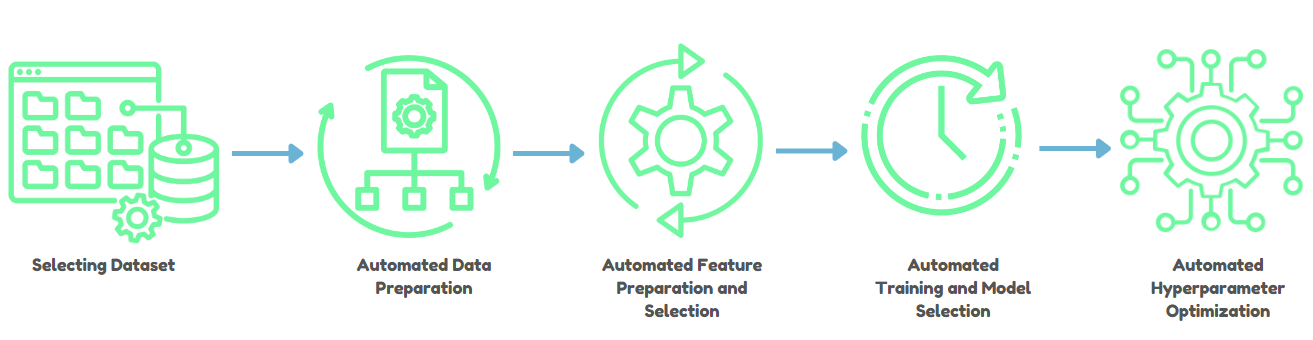
AutoML tools, especially those that are low-code/no-code, are gaining real traction because they let users with varying technical backgrounds build powerful ML models without needing deep expertise. Databricks AutoML, launched at the 2021 Data + AI Summit, is a standout solution integrated within the Databricks platform. It automates the entire ML lifecycle (data preparation => feature engineering => model training => hyperparameter tuning) and generates customizable source code, accelerating the time-to-value for ML projects.
Note: As of Databricks Runtime 18.0 ML, AutoML has been removed as a built-in library. You now need to install databricks-automl-runtime from PyPI explicitly on Runtime 18.0 ML and above. If you’re on Runtime 17.x or below, AutoML is still pre-installed. Keep this in mind as you follow this guide.
In this article, we will cover everything you need to know what Databricks AutoML actually is, its features, inner workings and practical applications. On top of that, we’ll examine how it addresses common challenges faced by existing AutoML solutions and and provide you with step-by-step guide for training and deploying models through both the user interface and the Python API.
What is AutoML?
AutoML, short for Automated Machine Learning, aims to democratize machine learning by automating key stages of the ML pipeline—data preprocessing, feature engineering, model selection, hyperparameter tuning and model evaluation. AutoML handles these steps to enable data scientists and engineers to concentrate on interpreting results rather than on the intricacies of model development and tuning.
1. Data preparation and ingestion
AutoML starts with preprocessing data, which includes tasks like handling missing values, normalizing data and detecting data types; whether they’re numbers, categories, or text. This step is crucial because it sets the stage for accurate model training.
2. Feature engineering and selection
One of the most time-consuming aspects of ML is creating and selecting features that improve model performance. AutoML automates feature engineering by identifying and generating features that are most predictive, thus speeding up the process while maintaining interpretability—especially important in highly regulated industries.
3. Model selection and training
AutoML iterates over multiple algorithms and configurations to find the best fit for a given task. It uses optimization techniques (we’ll take about this later) to do this efficiently rather than just brute-forcing every possible combination.
4. Hyperparameter optimization
Hyperparameter tuning is one of those tasks that can eat days of compute time if done naively. AutoML applies smarter search strategies to find good configurations faster.
5. Evaluation and validation
AutoML rigorously tests models using cross-validation and a range of metrics. It also checks for issues like data leakage and misconfiguration before anything gets deployed.
6. Deployment and monitoring
After training and validating a model, AutoML streamlines deployment so the model integrates smoothly into production systems. Many AutoML tools also offer monitoring features to track performance over time and trigger retraining when needed.
Benefits of AutoML
AutoML provides a number of advantages that can improve the productivity and usability of machine learning. Let’s dive in.
First and foremost, AutoML can significantly minimize the time and effort necessary to develop and deploy machine learning models. Data engineers and data scientists can devote more time to the strategic parts of ML model development and deployment by automating tedious chores.
Second, AutoML makes machine learning more accessible to a larger number of people and organizations. Even if you don’t have a deep understanding of machine learning methods and techniques, AutoML can help you utilize advanced ML capabilities to improve business outcomes.
Key problems AutoML solves
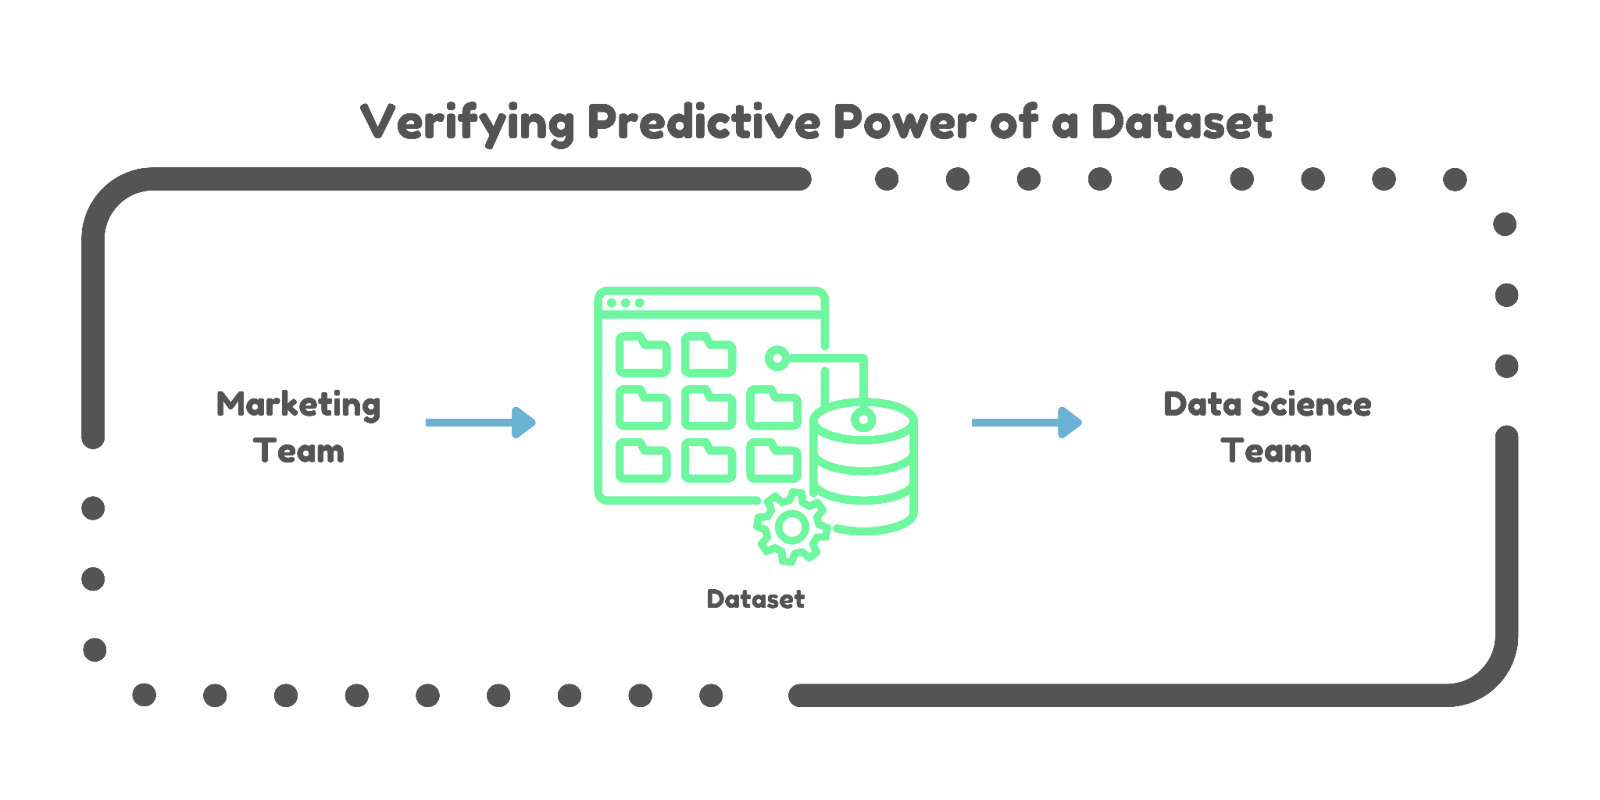
Verifying predictive power. Data scientists can spend weeks or months determining whether a dataset actually has the predictive signal needed for a task. AutoML accelerates that process dramatically, giving you quicker insight into dataset viability.
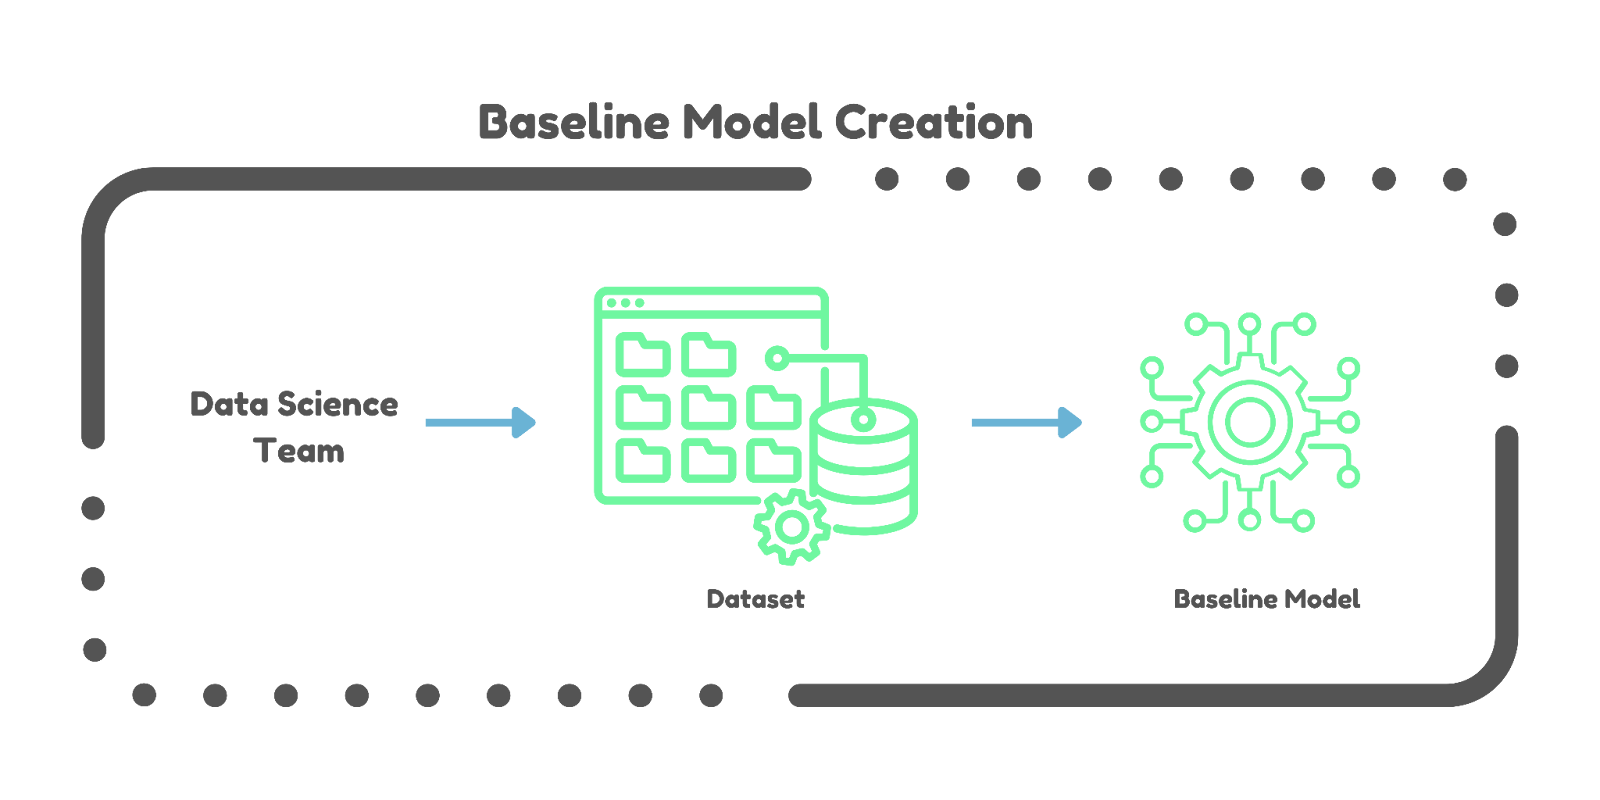
Baseline model creation. Establishing a baseline model is traditionally slow work. AutoML generates baseline models automatically, helping teams validate project direction without burning weeks on it.
Challenges with existing AutoML solutions
AutoML has made ML more accessible, but the existing tools have two well-known problems: the “Opaque-Box” problem and the “Production Cliff.”
1. The opaque-box problem
The Opaque-Box problem is about the lack of transparency in how AutoML models are built and optimized.
Regulatory compliance. In healthcare and finance, regulations typically require that companies explain how their models make decisions. If the process is hidden inside a black box, meeting those requirements is nearly impossible.
Trust and interpretability. When users can’t see inside the model, trust becomes an issue. Understanding how a model works is fundamental to making sound decisions and improving the model further.
2. The Production Cliff
The Production Cliff happens when the “best model” from an AutoML tool still isn’t production-ready.
Need for customization. Auto-generated models often need significant tweaking to fit specific business needs or integrate with existing systems. That customization work falls on data scientists.
Reverse engineering. Data scientists may spend considerable time figuring out how an auto-generated model actually works before they can modify it for their use case.
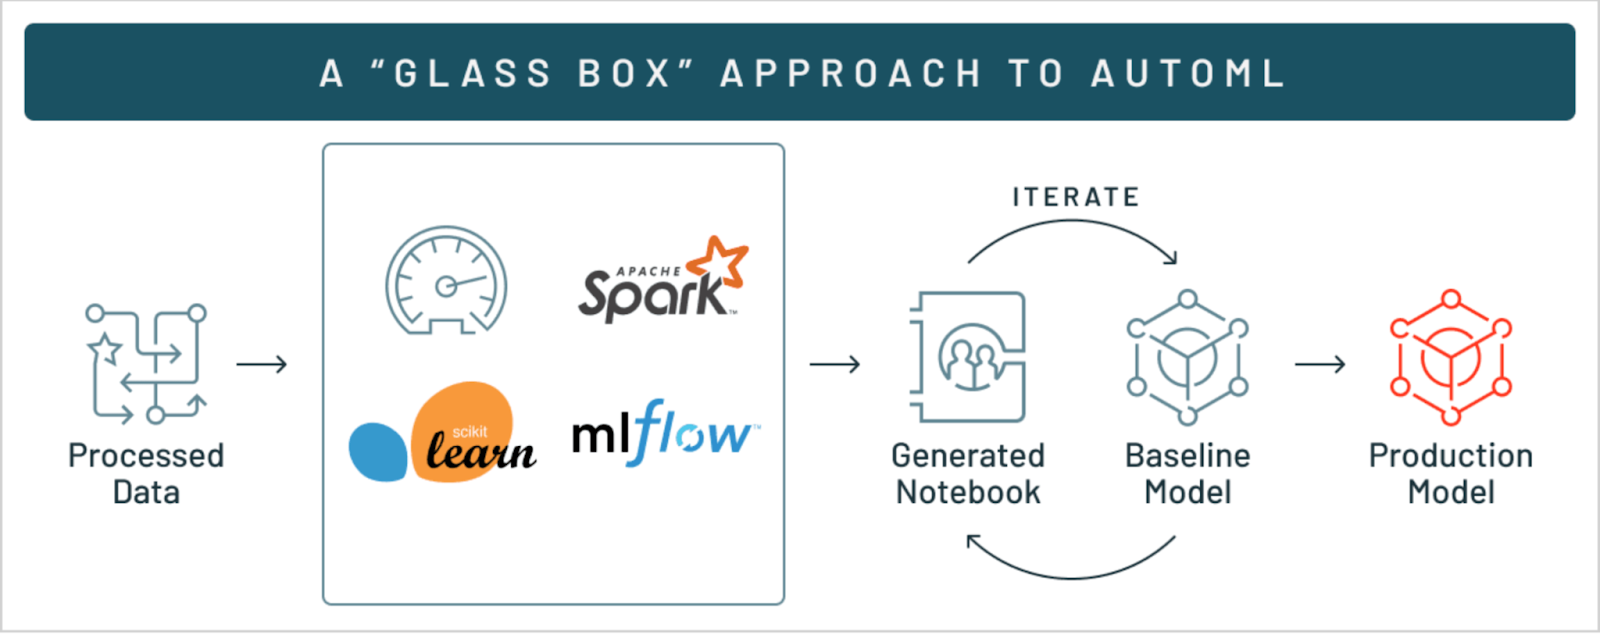
So how does Databricks AutoML handle this? It takes a “glass-box” approach, providing full transparency into the training process while also generating editable, production-ready source code for every trial. That’s the core of what makes it different.
Now, let’s dive in deep and understand what Databricks AutoML actually is.
What is Databricks AutoML?
Databricks AutoML is a tool designed to simplify and accelerate the process of building and deploying machine learning models all within the Databricks platform. It automates essential tasks such as preprocessing, feature engineering, tuning and training machine learning models, allowing data teams to focus on higher-level decisions and insights.
Key features of Databricks AutoML
The following are some significant features of Databricks AutoML:
1. Data cleaning and preprocessing
Databricks AutoML handles missing value imputation, feature normalization and categorical encoding automatically. Datasets arrive ready for training without requiring heavy manual intervention.
2. Semantic type detection
Databricks AutoML detects and assigns semantic types to columns, which helps in applying appropriate preprocessing procedures based on the data type.
3. Algorithm variety
Databricks AutoML leverages a range of algorithms from popular ML libraries such as scikit-learn, XGBoost, LightGBM, Prophet and Auto-ARIMA. This covers classification, regression and time series forecasting. For serverless forecasting specifically, DeepAR is also available (see the algorithms section below for the full breakdown).
4. Parallelized training
AutoML distributes hyperparameter tuning trials across multiple worker nodes in a cluster, speeding up the training process considerably.
5. Customizable notebooks
For every trial run, AutoML generates a Python notebook that contains the complete source code: data loading, preprocessing, model training, evaluation and logging. These notebooks are fully editable and reproducible.
For classification and regression experiments, only the data exploration notebook and the best trial notebook are automatically imported into your workspace. Notebooks for other trials are saved as MLflow artifacts on DBFS. You can import them manually using the AutoML experiment UI or the databricks.automl.import_notebook API.
For forecasting experiments, notebooks for all trials are automatically imported.
6. Integration with MLflow
Databricks AutoML integrates with MLflow for tracking metrics and parameters across every trial. This makes it easier to compare model performance and streamlines model registry and deployment workflows.
7. Transparency and explainability
AutoML-generated notebooks for regression and classification include code to calculate Shapley values (SHAP), which estimate each feature’s contribution to model predictions. One important caveat: SHAP calculations are not enabled by default because they’re memory-intensive. To activate them, go to the “Feature importance” section in the trial notebook, set shap_enabled = True and re-run the notebook.
8. Configurable evaluation metrics
Users can specify which evaluation metric to use for ranking models. This means models get optimized based on what actually matters for the specific use case, not just a generic default.
9. Enterprise reliability
AutoML uses Databricks’ distributed computing infrastructure to handle large datasets and complex computations at scale.
10. Handling imbalanced datasets
For classification problems, AutoML automatically adjusts class weights and downsamples the majority class to improve performance on imbalanced datasets. Note: this balancing applies to the training dataset only; test and validation sets are not balanced, which is worth keeping in mind when interpreting your performance metrics.
11. UI and API access
You can kick off AutoML experiments through a graphical user interface or programmatically through the Python API. This serves both non-technical users and those who prefer scripting and automation.
12. Efficient resource utilization
AutoML predicts memory requirements and dynamically samples large datasets to fit available computational resources — no manual configuration needed.
13. Sample weights for classification (Runtime 15.4 LTS ML+)
As of Databricks Runtime 15.4 LTS ML, AutoML supports sample weights for classification via the sample_weight_col parameter. This lets you adjust the importance of individual samples during training.
14. Custom train/validation/test splits (Runtime 15.3 ML+)
From Runtime 15.3 ML onward, the split_col parameter lets you define your own train/validation/test split by specifying a column with user-assigned values, giving you finer control over data partitioning.
How does Databricks AutoML work?
Databricks AutoML streamlines the machine learning process by automating critical activities such as the ability to evaluate and train ML models. This “glass box” method enables transparency and extensive insights into each process, allowing users to understand and alter the resulting models.
Here’s a detailed look into how AutoML works in Databricks:
Phase one—Data preparation
AutoML starts with data preparation, which includes:
Missing value imputation. AutoML uses statistical or ML-based methods to fill in missing data points.
Data type detection and semantic type annotation. AutoML identifies suitable data types and semantic types for each column, so data gets handled correctly during training.
Imbalanced data handling. For classification, AutoML detects class imbalances and corrects them by downsampling the majority class and applying class weights. This applies to training data only.
Phase two—Data splitting
AutoML supports two approaches to splitting data into training, validation and test sets:
Random split. By default, data is split 60% training, 20% validation and 20% test. For classification, a stratified random split is used to preserve class distribution across splits.
Chronological split. For time series data, you can split based on a time column so that the training, validation and test sets respect the temporal order of the data.
Custom split (Runtime 15.3 ML+). Use the split_col parameter to provide your own pre-defined split assignments.
Phase three—Model training and hyperparameter tuning
AutoML iteratively trains multiple models across different algorithms and hyperparameter configurations. Here’s how:
Model selection. AutoML identifies relevant algorithms based on the problem type.
Hyperparameter tuning. Trials are distributed across worker nodes in the cluster, with each trial exploring a different hyperparameter configuration.
Sampling large datasets. If the dataset is too large to fit in a single worker node’s memory, AutoML samples it. The sampling fraction adjusts based on available memory and Spark configuration.
Phase four—Model evaluation and selection
AutoML evaluates models using metrics appropriate to the task:
Classification: f1 (default), log_loss, precision, accuracy, roc_auc
Regression: r2 (default), rmse, mae, mse
Forecasting: smape (Symmetric Mean Absolute Percentage Error), mdape (Median Absolute Percentage Error)
Models are ranked by these metrics and the best-performing model is selected.
Phase five—Model explainability
AutoML notebooks include code to calculate SHAP (Shapley Additive Explanations) values for regression and classification models. Remember: SHAP is off by default. Set shap_enabled = True in the notebook’s “Feature importance” section to enable it.
Note: for Databricks Runtime 11.1 ML and below, SHAP plots are not generated if the dataset contains a datetime column.
Phase six—Integration with Databricks ecosystem
Auto-generated notebooks. AutoML creates a notebook for each trial containing data preparation, training and evaluation code. For forecasting experiments, all trial notebooks are auto-imported to your workspace. For classification and regression, only the data exploration notebook and the best trial notebook are auto-imported. Other trial notebooks are saved as MLflow artifacts on DBFS.
Feature Store integration. With Databricks Runtime 11.3 LTS ML and above, AutoML can pull in existing feature tables from the Feature Store to augment your training dataset.
Scalability. AutoML is built on Databricks’ distributed computing stack, so it handles large datasets and clusters without breaking a sweat.
Phase seven—ML model deployment
Once the best model is identified, you can register it with the MLflow Model Registry and deploy it as a REST endpoint using MLflow Model Serving.
Algorithms used by Databricks AutoML
Databricks AutoML utilizes a variety of algorithms from several prominent machine learning libraries to support different types of machine learning tasks such as classification, regression and forecasting. Here are the primary algorithms and libraries used:
Classification models:
Regression models:
- Decision trees
- Random forests
- Linear regression with Stochastic Gradient Descent (SGD)
- XGBoost
- LightGBM
Forecasting models (classic compute):
- Prophet (for time-series forecasting)
- Auto-ARIMA (Available in Databricks Runtime 10.3 ML and above, for time-series forecasting with regularly spaced time intervals)
Forecasting models (serverless compute):
What are the feature types that Databricks AutoML supports?
Databricks AutoML supports a variety of data feature types:
- Numeric (ByteType, ShortType, IntegerType, LongType, FloatType, DoubleType)
- Boolean
- String (categorical or English text)
- Timestamps (TimestampType, DateType)
- ArrayType[Numeric] (Databricks Runtime 10.4 LTS ML and above)
- DecimalType (Databricks Runtime 11.3 LTS ML and above)
Now that we have a comprehensive understanding of AutoML and Databricks AutoML, let’s dive into the step-by-step guide for training machine learning models and deploying ‘em using Databricks AutoML, via UI and programmatically using Python API. Let’s get started.
Step-by-step guide to train and deploy ML models with Databricks AutoML via UI
Before diving into the step-by-step guide, make sure you meet the following prerequisites:
- Databricks runtime: 9.1 ML or above; 10.4 LTS ML or above for GA features
- Time series forecasting: Requires Runtime 10.0 ML or above
- AutoML dependency: The databricks-automl-runtime package (available on PyPI) is required on Runtime 9.1 LTS ML and above
- Library management: Do not install additional libraries or modify preinstalled ones. Any version change (upgrade or downgrade ) causes run failures
- Cluster access mode: AutoML is incompatible with Standard (formerly “shared”) access mode. For Unity Catalog, use Dedicated (formerly “single user”) access mode
- Network ports: Ports 1017 and 1021 must be open in your workspace for AutoML experiments to access files. Check your VPN firewall and security group rules if you’re not sure
- Runtime 18.0 ML or above: AutoML is not pre-installed. Install databricks-automl-runtime from PyPI before running any experiments
To train and deploy machine learning models using the Databricks AutoML UI, follow these steps for a seamless and efficient process.
Step 1—Access the Databricks AutoML UI
To begin training a machine learning model using Databricks AutoML, first open the AutoML user interface. In the Databricks sidebar, click “New” and then “AutoML Experiment“.
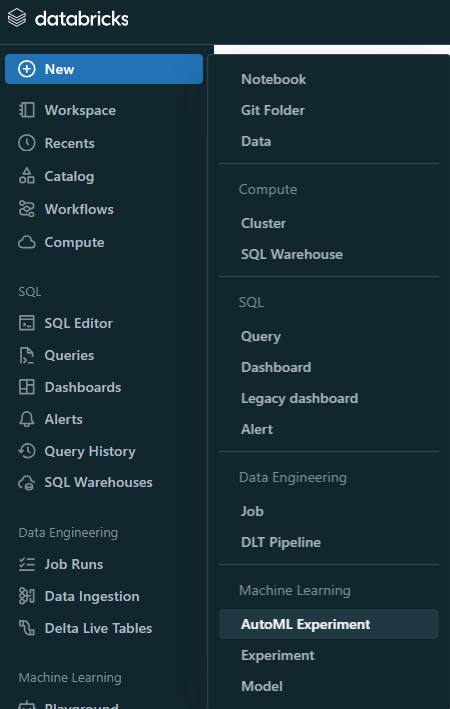
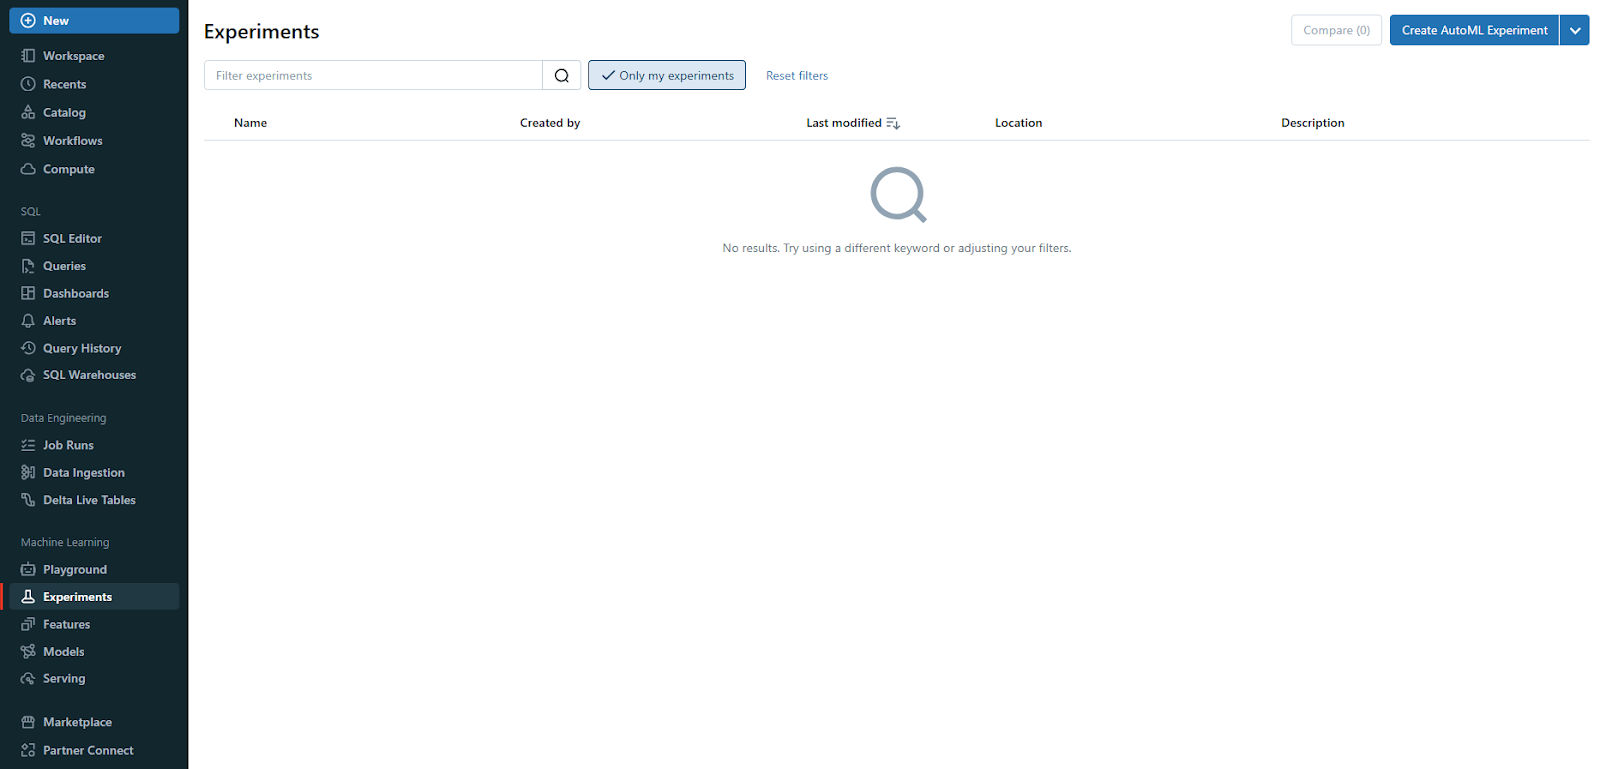
Also, you can create a new AutoML experiment from the Experiments page, which serves as a centralized hub for organizing all of your experiments.
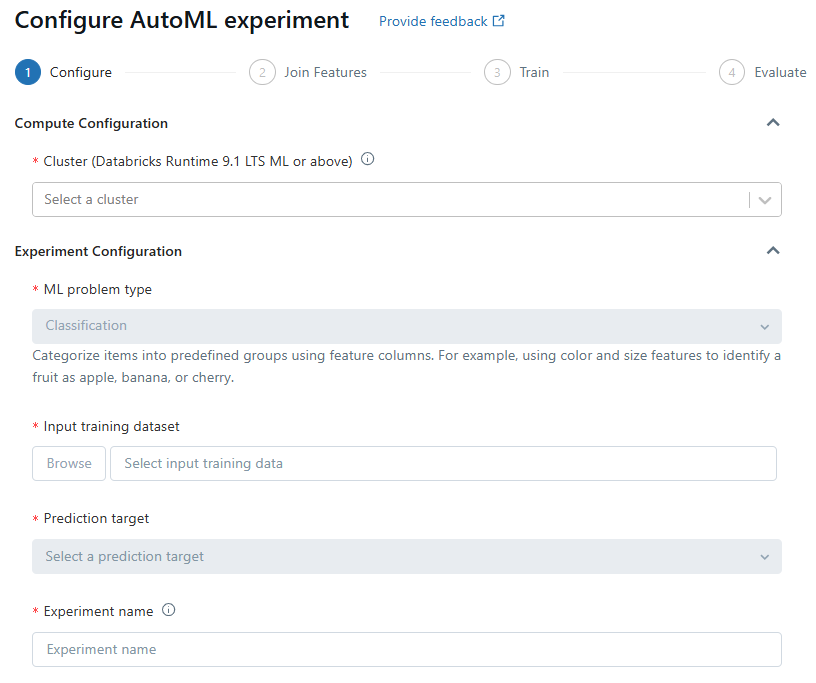
Step 2—Configure the Databricks AutoML experiment
On the Configure Databricks AutoML experiment page, you’ll need to specify key details for your experiment.
First, in the Compute field, select a cluster running Databricks Runtime ML.
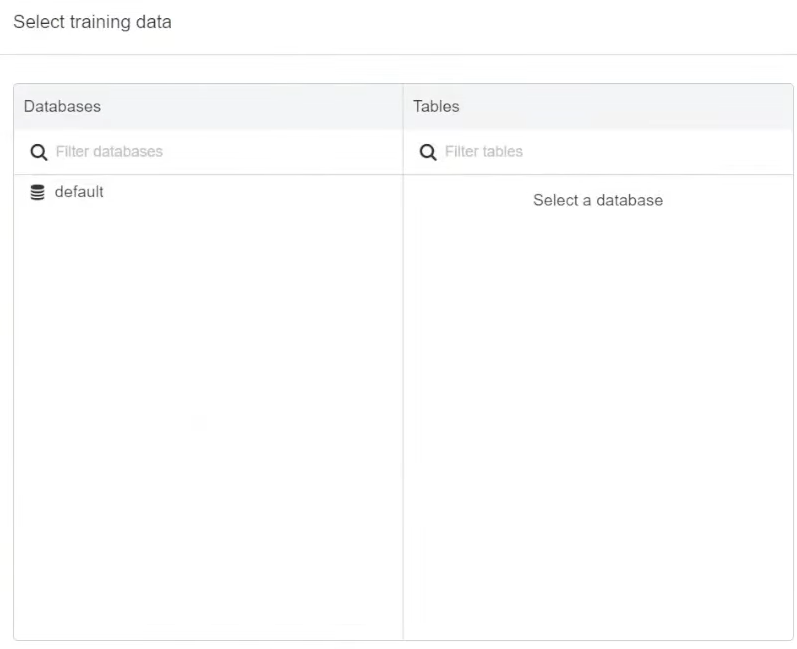
Next, select your dataset by browsing and choosing the appropriate data table.
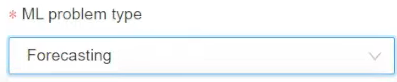
Then, define the ML problem type—Classification, Regression, or Forecasting—based on your analysis needs.
Select the target column, which Databricks AutoML should use for training by including or excluding them as needed. This functionality is only available for classification and regression problems.
Choose an evaluation metric to score the experiment runs and set any stopping conditions to control the duration and scope of the experiment. This configuration ensures that your AutoML process is tailored to your specific requirements.
Step 3—Setting up classification or regression problems
For classification or regression problems, start by selecting a cluster running Databricks Runtime ML in the Compute field. Choose the problem type from the drop-down menu—Regression if predicting a continuous numeric value or Classification if categorizing observations into discrete classes.

Next, browse and select your dataset.
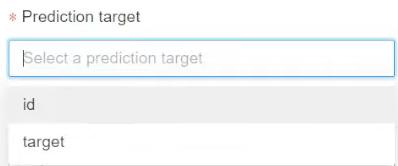
In the Prediction target field, pick the column you want the model to predict.
You can also customize the columns included in the training, select imputation methods for missing values and leverage existing feature tables from the Feature Store to enhance your dataset.
Optionally, rename the experiment for better organization.

Step 4—Setting up forecasting problems
To set up a forecasting problem, make sure that you select a cluster running Databricks Runtime 10.0 ML or above. Choose Forecasting from the ML problem type menu, then browse and select your dataset.
In the Prediction target field, choose the column to predict, just like you did above. Select the appropriate time column, which should be of type timestamp or date. For multi-series forecasting, identify the individual time series using the Time series identifiers field.
Specify the forecast horizon and frequency to define the number of periods into the future for which predictions are needed.
If you are using Auto-ARIMA, make sure your time series has a regular frequency.
Optionally, save the prediction results to a specified database (Databricks Runtime 11.3 LTS ML and above).
Again, you can rename the experiment and add any additional configurations as needed.
Step 5—Using existing feature tables
In Databricks Runtime 11.3 LTS ML and above, you can enhance your input training dataset by incorporating feature tables from the Databricks Feature Store. To do this, click “Join features (optional)” on the Configure AutoML experiment page.
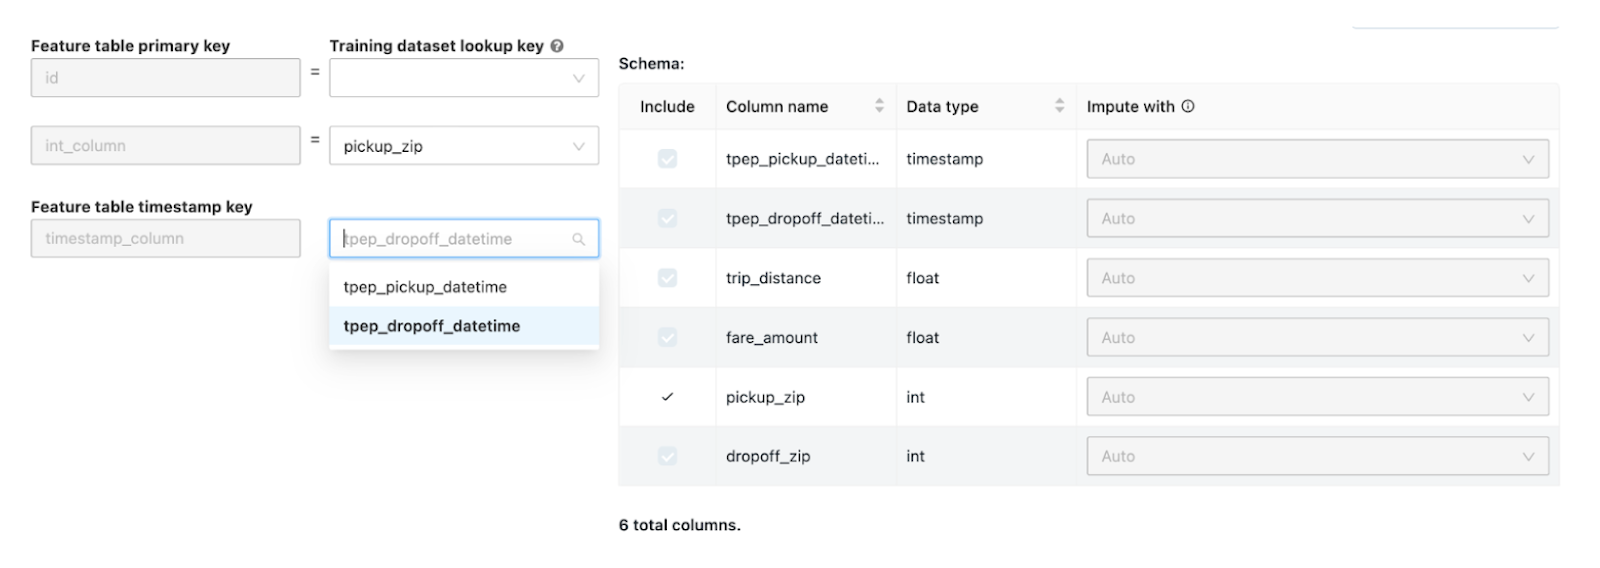
Select a feature table and the corresponding lookup keys that match your training dataset. For time series feature tables, make sure the timestamp lookup key aligns with your dataset.
Repeat these steps if you need to add more feature tables, which can significantly improve the model’s performance by providing additional contextual information.
Step 6—Advanced configurations
The Advanced Configuration section allows you to fine-tune several parameters. Choose the primary evaluation metric for scoring runs and exclude specific training frameworks if necessary (Databricks Runtime 10.4 LTS ML and above). Adjust the stopping conditions based on time or trial count. For classification and regression experiments, enable early stopping to halt training if the validation metric ceases to improve. You can also split data for training, validation and testing in chronological order by selecting a time column (applies to Databricks Runtime 10.4 LTS ML and above).
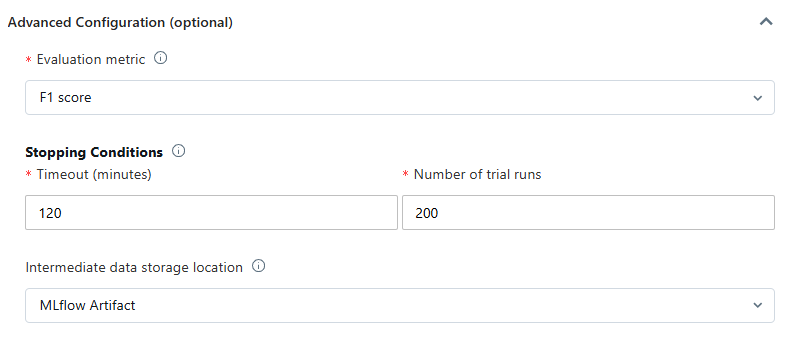
It’s recommended not to populate the Data directory field to maintain secure dataset storage as an MLflow artifact.
Step 7—Run the experiment and monitor results
After configuring your experiment, click “Start AutoML” to begin the training process. The Databricks AutoML training page will display, allowing you to stop the experiment, open the data exploration notebook and monitor the runs.
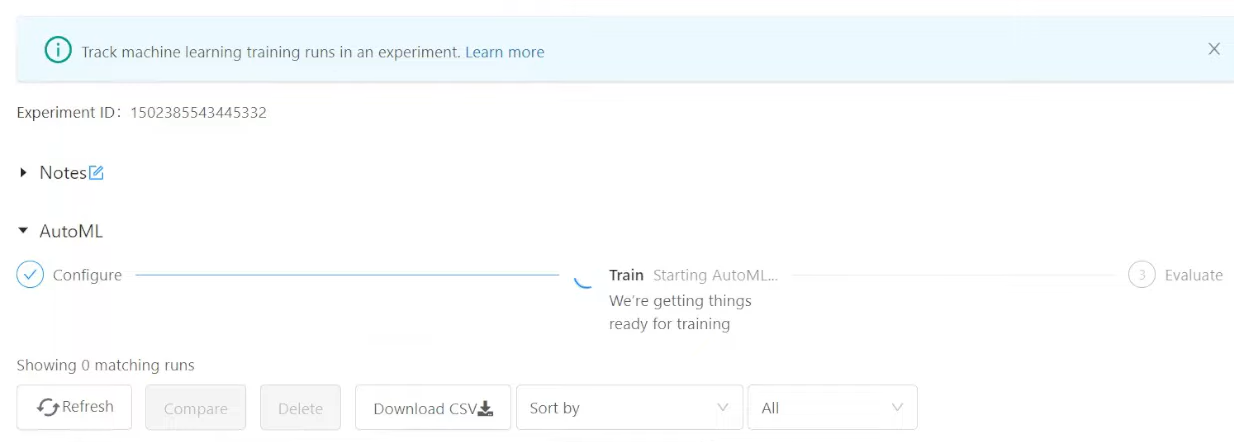
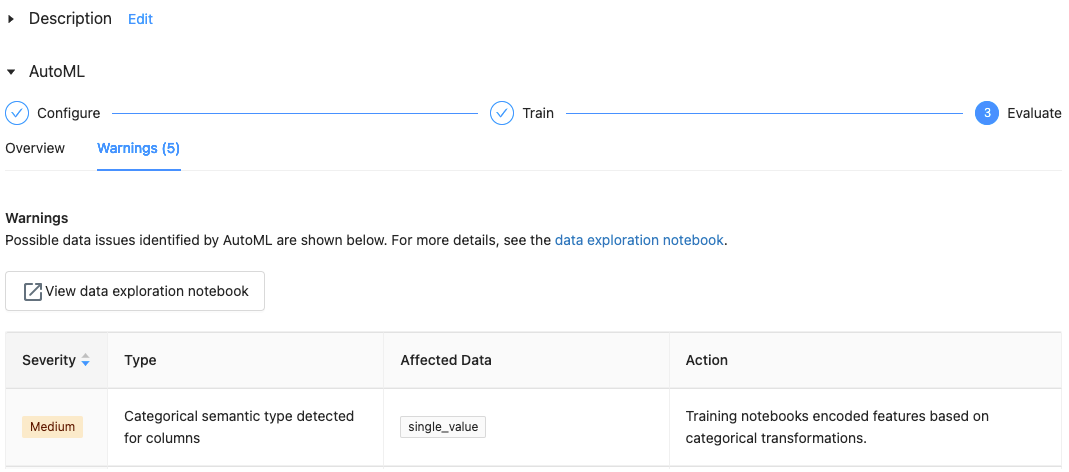
Databricks AutoML provides warnings for potential dataset issues, such as unsupported column types or high cardinality columns, which you can review in the Warnings tab.
If you monitor your runs closely it helps in identifying and resolving any issues promptly.
Step 8—Post-experiment actions
Once the experiment is completed, you have several options for post-processing. You can register and deploy the best model using MLflow, allowing you to manage and track your model’s life cycle. To review and edit the notebook that created the best model, select “View notebook for best model”. If you want to delve into the data exploration phase, select “View data exploration notebook”.
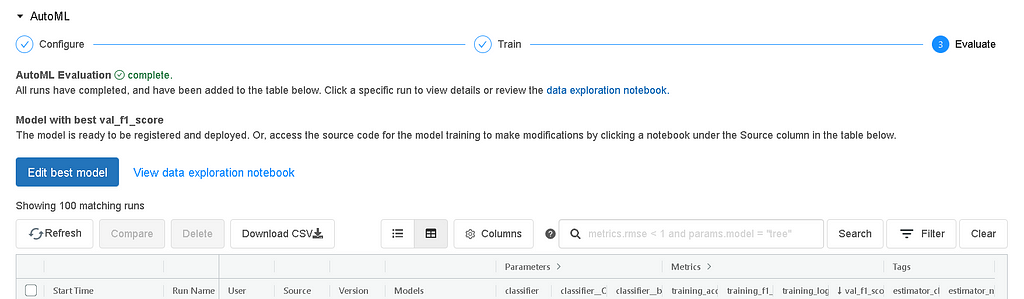
On top of that, you can also search, filter and sort the runs in the runs table to analyze the experiment results comprehensively.
Step 9—Review and edit Notebooks
As you know, Databricks AutoML automatically generates notebooks for each trial run. You can view, edit and download these notebooks to review the source code and further customize your models. This feature is particularly useful for understanding the model’s behavior and making necessary adjustments based on the experiment’s results. Notebooks are stored in the MLflow run’s Artifacts section and can be imported into the workspace if needed.
Step 10—Manage experiment results
To revisit your experiments, go to the Experiments page where all results are listed. The outputs, including data exploration and training notebooks, are stored in a databricks_automl folder within your home directory. This centralized storage ensures easy access to your experiment results and facilitates further analysis or model enhancements.
Step 11—Register and deploy
Finally, now that you have successfully trained and evaluated your model, it’s time to register and deploy it using the AutoML UI. Follow these steps:
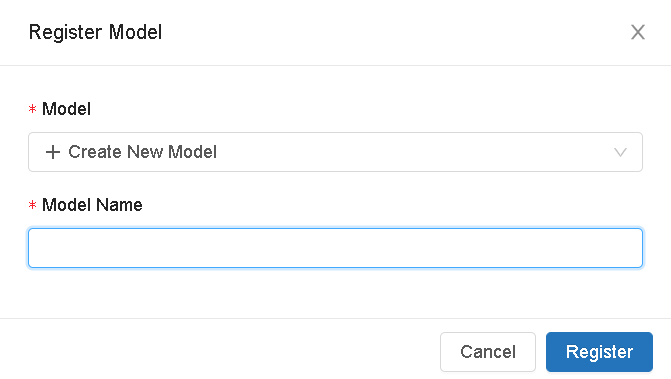
Select the link in the Models column for the model you want to register—when a run completes, the best model based on the primary metric appears in the top row. Click the register model button to register it in the Model Registry.

Now, select “Create a new model“, enter the model name and click “Register“.
Now that we have registered our model in the Model Registry, click the popup icon located at the top right corner of the artifacts section to open the Model Registry user interface.
Or
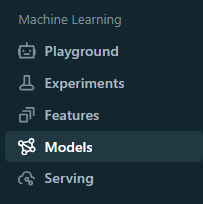
Select the Models icon in the sidebar to navigate to the Model Registry, then choose the name of your model in the model table.
From the registered model page, you can serve the model using Model Serving.
And there you go, if you follow these detailed steps, you can easily use Databricks AutoML to train, evaluate and deploy machine learning models, taking full advantage of the platform’s powerful capabilities to streamline your machine learning workflows.
Let’s move on to the next step, where we will train an ML model with Databricks AutoML—programmatically via the Python API.
Step-by-step guide to train ML models with Databricks AutoML programmatically
Training machine learning models programmatically using Databricks AutoML is an efficient way to leverage automated model selection and tuning. In this step-by-step guide, we will walk you through the process from setup to ML model development and deployment.
Prerequisites
Same as the UI guide, plus:
- Access to a Databricks workspace with Databricks Runtime for Machine Learning
- A cluster running Databricks Runtime ML
- For Runtime 18.0 ML and above, install databricks-automl-runtime from PyPI before running code
Step 1—Set up your environment
First, create a notebook, attach it to a cluster running Databricks Runtime ML and write the code mentioned below.
import databricks.automl
import pandas as pd
from pyspark.sql import SparkSession

# Initialize Spark session
spark = SparkSession.builder.appName("Databricks AutoML Example").getOrCreate()
Step 2—Load your data
Load your dataset into a Spark DataFrame. For this example, we’re using a simple income classification dataset:
# Load dataset into a Pandas DataFrame

data = {
		'age': [25, 32, 47, 51, 62],
		'income': [40000, 50000, 60000, 70000, 80000],
		'education': ['Bachelors', 'Masters', 'PhD', 'Masters', 'Bachelors'],
		 'income_bracket': ['<=50K', '>50K', '>50K', '>50K', '>50K']
}

df = pd.DataFrame(data)

# Convert Pandas DataFrame to Spark DataFrame

spark_df = spark.createDataFrame(df)
spark_df.createOrReplaceTempView("income_data")
Step 3—Start Databricks AutoML run
Pass your table or DataFrame to the appropriate API method. Here are examples for each problem type.
1. Classification example
from databricks import automl

# Databricks AutoML classification run
summary = automl.classify(
		 dataset="income_data",
		 target_col="income_bracket",
		 timeout_minutes=30
)
2. Regression example
from databricks import automl

# Databricks AutoML regression run
summary =automl.regress(
		 dataset="income_data",
		 target_col="income_bracket",
		 timeout_minutes=30
)
3. Forecasting example
For forecasting, make sure your dataset contains a time column.
from databricks import automl

# Databricks AutoML forecasting run

summary = automl.forecast(
		dataset="income_data",
		target_col="income_bracket",
		time_col="---",
		 horizon=30,
		 frequency="d",
primary_metric="mdape")- horizon=30: forecast 30 periods into the future
- frequency=”d”: produce one forecast per day
- primary_metric=”mdape”: optimize for Median Absolute Percentage Error (also supported: smape)
Step 4—Monitor Databricks AutoML run
When the Databricks AutoML run begins, an MLflow experiment URL appears in the console. Use this URL to monitor the progress of the run.
# Output summary to understand the trials and best model

print("MLflow experiment URL:", summary.experiment.url)
Step 5—Explore results
Once the Databricks AutoML run is complete, you can explore the results. View the auto-generated trial notebook and the data exploration notebook.
# Display info about Databricks AutoML output

help(summary)
This shows you details about every trail, the best model and the generated notebooks.
Step 6—Use the best model for inference
You can use the model trained by Databricks AutoML to make predictions on new data.
Using Pandas DataFrame
import mlflow

# Prepare test dataset
test_data = {
		'age': [29, 41],
		'income': [45000, 52000],
		 'education': ['Bachelors', 'Masters']
}

test_df = pd.DataFrame(test_data)
spark_test_df = spark.createDataFrame(test_df)

# Load the best model
model_uri = summary.best_trial.model_path
model = mlflow.pyfunc.load_model(model_uri)

# Run inference using the best model
predictions = model.predict(test_df)
print(predictions)
Step 7—Evaluate model performance
Use the final model to make predictions on the holdout test set to estimate how the model would perform in a production setting.
from sklearn.metrics import confusion_matrix, ConfusionMatrixDisplay
import matplotlib.pyplot as plt

# True labels and predicted labels
y_true = ['<=50K', '>50K']
y_pred = list(predictions)

# Compute and display confusion matrix
cm = confusion_matrix(y_true, y_pred, labels=['<=50K', '>50K'])
disp = ConfusionMatrixDisplay(confusion_matrix=cm, display_labels=['<=50K', '>50K'])
disp.plot()
plt.show()
That’s it. Loading data, starting an AutoML run, monitoring it, evaluating the best model and running inference, the whole workflow fits into a handful of steps.
Remember, this example uses a deliberately simple dataset. Databricks AutoML handles much larger and more complex datasets in production, which is where its distributed training and memory management really shine.
Databricks AutoML: Pros and cons
Here is a list of advantages and disadvantages of Databricks AutoML:
What are the advantages of AutoML?
Databricks AutoML offers several advantages that streamline the machine learning workflow:
1. Automated training and tuning
Databricks AutoML simplifies the process of training and tuning machine learning models. It automatically handles data preparation, model training, hyperparameter tuning and evaluation, significantly reducing the time and effort required to build high-quality models.
2. Support for multiple algorithms and libraries
Databricks AutoML leverages a variety of machine learning libraries such as Scikit-Learn, XGBoost, LightGBM, Prophet and ARIMA, allowing users to select the best algorithms for their specific needs. This flexibility assures robust model performance across different types of tasks, which includes classification, regression and forecasting.
3. MLflow integration
The integration with MLflow allows for seamless tracking of experiment metrics and parameters, making it easier to compare model performance and manage the lifecycle of machine learning models.
4. Customizable notebooks
For each trial run, Databricks AutoML automatically generates a detailed Python notebook that includes all the code used for data preparation, model training and evaluation. These notebooks are fully editable.
5. Glass-box approach
The “glass-box” approach of Databricks AutoML provides transparency into the model building process. Users can see and modify each and every step of the pipeline, assuring they understand how the models are built and can meet any compliance or audit requirements.
6. Scalability
Databricks AutoML is designed to handle large datasets efficiently by automatically estimating memory requirements and distributing workloads across cluster nodes.
Databricks AutoML also supports sampling large datasets to fit within memory constraints while maintaining performance.
7. Imbalanced dataset support
It offers robust support for imbalanced datasets by employing techniques like downsampling the majority class and adding class weights to ensure balanced training.
8. User-friendly UI and Python API
The intuitive UI and API make it accessible for both beginners and experienced users to set up and run machine learning experiments quickly. Users can easily configure their experiments, monitor progress and view results directly all within Databricks platform.
What are the disadvantages of AutoML?
Databricks AutoML offers several advantages, but it also comes with some disadvantages that users should consider:
1. Limited customization
While Databricks AutoML automates many aspects of the machine learning process, it may not provide the level of customization some experienced data scientists and engineers need. Advanced users might find it limiting compared to manually fine-tuning models and hyperparameters.
2. Resource intensive
Running Databricks AutoML can be resource-intensive, particularly for large datasets. Databricks AutoML automatically estimates memory requirements and may need to sample datasets to fit within memory constraints. This can lead to increased computational costs and may require powerful hardware to run efficiently.
3. Sampling trade-offs
Databricks AutoML might sample large datasets to manage memory usage, which can sometimes lead to less accurate models if the sampling isn’t representative of the entire dataset. This is a crucial consideration for projects requiring high precision.
4. Imbalanced data handling
While Databricks AutoML provides some support for handling imbalanced datasets by adjusting class weights, it does not balance the test and validation datasets. This could lead to misleading performance metrics if not carefully managed.
5. Semantic type detection limitations
Databricks AutoML attempts to detect semantic types for columns but might miss some cases or misclassify columns. This can affect the model’s performance, especially if the data requires specific preprocessing steps that AutoML doesn’t handle well.
6. Runtime version dependency
AutoML behavior varies across Databricks Runtime versions, and some features only exist in newer runtimes. The Runtime 18.0 ML change — removing AutoML as a built-in library — is the most significant recent example.
7. No image support
AutoML doesn’t handle image feature types. It’s not suited for computer vision use cases.
8. SHAP is opt-in
Model explainability via SHAP is not enabled by default. You need to activate it manually in the generated notebook.
Save up to 50% on your Databricks spend in a few minutes!
Conclusion
And that’s a wrap! Databricks AutoML is an extremely powerful tool that helps streamline the entire machine learning workflow—from data preparation and feature engineering to model training and tuning; without having to leave the Databricks platform itself. Automating these complex processes, Databricks AutoML not only democratizes access to machine learning for users with diverse technical backgrounds but also accelerates the development of reliable and effective models.
In this article, we have covered:
- What AutoML is and how it works
- Challenges with existing AutoML solutions (Opaque-Box and Production Cliff)
- What Databricks AutoML is and its key features
- The inner workings of Databricks AutoML, phase by phase
- Algorithms used by Databricks AutoML, including DeepAR for serverless forecasting
- Supported feature types
- Step-by-step guide to training and deploying models via the UI
- Step-by-step guide to training models programmatically via the Python API
- Pros and cons of Databricks AutoML
… and so much more!
FAQs
What is Databricks AutoML?
Databricks AutoML is a tool within the Databricks platform that automates key stages of the ML pipeline: data preprocessing, feature engineering, model selection, hyperparameter tuning and model evaluation.
What are the benefits of using Databricks AutoML?
It reduces the time and effort needed for model development, makes ML accessible to non-experts, provides transparency through editable notebooks, scales to large datasets and supports imbalanced datasets.
What ML tasks does Databricks AutoML support?
Classification, regression and time series forecasting.
What ML libraries does Databricks AutoML use?
scikit-learn, XGBoost, LightGBM, Prophet and ARIMA. Serverless forecasting also supports DeepAR.
How does Databricks AutoML handle data preparation?
It performs missing value imputation, data type detection, semantic type annotation and imbalanced dataset handling for classification problems.
How does Databricks AutoML split data?
By default, it uses a 60/20/20 split (training/validation/test). For time series, it supports chronological splitting. From Runtime 15.3 ML onward, a custom split_col parameter is also available.
How does Databricks AutoML perform model training and tuning?
It iteratively trains multiple models using different algorithms and hyperparameter configurations distributed across worker nodes.
What evaluation metrics does Databricks AutoML use?
For classification: f1 (default), log_loss, precision, accuracy, roc_auc. For regression: r2 (default), rmse, mae, mse. For forecasting: smape, mdape.
Is SHAP enabled by default in Databricks AutoML?
No. SHAP calculations are not run by default because they’re memory-intensive. To enable them, set shap_enabled = True in the “Feature importance” section of the generated trial notebook and re-run it.
How does Databricks AutoML integrate with the Databricks ecosystem?
It auto-generates notebooks, integrates with the Databricks Feature Store, leverages distributed computing and tracks everything through MLflow.
How do you deploy models trained with Databricks AutoML?
Register the best model with the MLflow Model Registry and deploy it as a REST endpoint using MLflow Model Serving.
How does Databricks AutoML handle large datasets?
It estimates memory requirements automatically and samples large datasets to fit within available cluster resources.
Can you use existing feature tables with Databricks AutoML?
Yes, in Runtime 11.3 LTS ML and above, you can join feature tables from the Databricks Feature Store with your training dataset using the feature_store_lookups parameter.
What are the cluster access mode requirements?
AutoML doesn’t work with Standard (formerly “shared”) access mode clusters. Use Dedicated (formerly “single user”) mode, especially for Unity Catalog.
Does Databricks AutoML work on Runtime 18.0 ML?
AutoML was removed as a built-in library in Runtime 18.0 ML. You need to install databricks-automl-runtime from PyPI manually.
Are there any network requirements for Databricks AutoML?
Yes. Ports 1017 and 1021 must be open in your workspace for AutoML experiments to access files. Check your VPN firewall and security group rules if experiments fail unexpectedly.
Can Databricks AutoML handle image data?
No. Image feature types are not supported. AutoML is not suitable for computer vision projects.
What is the sample_weight_col parameter?
Available in Runtime 15.4 LTS ML and above for classification, it lets you assign different weights to individual training samples to adjust class importance during model training.
What is the split_col parameter?
Available in Runtime 15.3 ML and above, it lets you define your own train/validation/test split by providing a column with user-specified split assignments, instead of relying on AutoML’s default random or chronological split.
Can you exclude specific algorithms from an AutoML run?
Yes. Use the exclude_frameworks parameter in the Python API (or the equivalent UI option in Runtime 10.4 LTS ML and above) to exclude “sklearn”, “lightgbm” or “xgboost” from consideration.
What does Auto-ARIMA require to work correctly?
Auto-ARIMA requires a time series with a regular frequency; the interval between any two consecutive time points must be consistent throughout the series. Irregular time series cause Auto-ARIMA runs to fail.